Installation of Joysticks to metal plate

steveochi

Beginner
Joined
Dec 4, 2025
Messages
14
Reaction score
2
Location
Horsham, UK
Hi

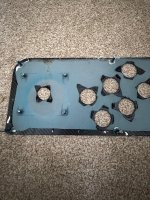
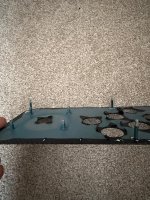
Just wanted to see what people are using to install joysticks to the metal 3m plate on a candy cab clone?, i've seen they have press cinch studs but not easy to install at home.

The one it came with has terrible button placement. I could use nut and bolts but wanted to keep the top clean and with the ability to swap between sanwa and happ style stick

Any ideas?


Thanks

Steve
 

Attachments

  • WhatsApp Image 2025-12-16 at 09.55.21.jpeg
    WhatsApp Image 2025-12-16 at 09.55.21.jpeg
    286.6 KB · Views: 49
  • WhatsApp Image 2025-12-16 at 09.55.32.jpeg
    WhatsApp Image 2025-12-16 at 09.55.32.jpeg
    277.5 KB · Views: 43
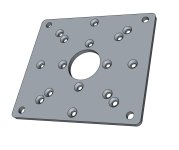
It looks like there is a fair bit of space between your existing mounting studs. You might be able to use an adapter plate (something similar to [this]) to fit one or more joysticks to your panel.

If you can let me know the pitch of the holes (horizontal - along the panel, and vertical - up the panel) then I can probably figure out what joysticks you could potentially fit and then model up an adapter plate for you which you can either get manufactured yourself/locally or I could do it for you.
 
Hi,

Thats very kind, this is my old metal control deck plate. I'm making a new one just want to be able to fit the bolts like the image. I can just go though it but didn't want to mess up my graphic
 
Ah, I understand now.

Yes, press/self clinch studs are not the easiest to do at home, especially in stainless steel.

Some years back I made a couple of control panels where I bonded a plate to the back of the control panel. The plates had M4 CSK bolts set inside them.

Apologies for the tiny/watermarked pictures, these are ~15years old....

i-dT5DW4h.png


i-8rtqC6S.png


i-nvkQhTH.png


i-MmfCZZN.jpg


You could do something similar. However if you want to use multiple joystick types then you can't use multiple sets of studs as they will impede fitment of all of the joysticks. You have about 7mm of space to play with between the back of the CP and the joystick so you could make a plate with either tapped holes, heat set insert nuts or embedded/rear inserted M4 nuts in all of the configurations required for your joysticks. You can then just bolt the desired joystick on using the appropriate length bolt (Happ > M4x12 & JLF > M4x8 in the below pictures). The plates can be bonded to the CP (after keying both) with two part epoxy or similar.

i-PXHbPCV.png


i-msdgcqR.png


i-JCscJ2J.png
 
As it stands, I'm afraid not, the mounting holes in the LS-32 are a different pitch to the LS-56:

i-GWJ59xq.png


It's only a five minute job to modify the plate to make it work though. Let me know if you want it doing.

EDIT:

Done...

i-THvXFbd.png


I'll get it uploaded to Printables and link to it in the [3D Printed & CAD/CAM Arcade Parts] sub forum a little later.
 
Last edited:
Did you cut the metal deck in the picture, looks really good, what type of vinyl are you looking to fit to it, what spec is best as i have a graphics company who are making it for me?.
 
Did you cut the metal deck in the picture, looks really good, what type of vinyl are you looking to fit to it, what spec is best as i have a graphics company who are making it for me?.

Thanks, yes I made that one many years ago when I worked as a CNC machinist. I can't remember who I used to print the artwork at the time but if you're in the UK then I can recommend Olly @ https://www.arcadeartshop.com/

Can you please share the files ? Thanks

Apologies, completely slipped my mind with the run up to the holidays.

For speed I've attached a .stl and a .stp to this post in case you want/need to play with the model. Let me know how it goes and I can get it shared to the wider community.
 

Attachments

Thanks so much, not really ever used cad before, I’ve made a template mainly using your templates, if I post it can you check to make sure it’s roughly right? I’m in the UK so I’ll have a look at that art contact thanks.

I wish I had a proper arcade but can’t really afford it, this is what I’ve done so far but I’m going to go back to original buttons I think

View: https://youtube.com/shorts/JjUlXcKg7cs?si=8M09DgO9HpbjO7ND
 
I have some plates for Seimitsu P=40 and P=50 sticks too, if anyone wants a download. I've used 'em on a bunch of cabs and panels. Easy to print, and they don't seem to suffer any wear despite being made of plastic.
 
I'd say it looks pretty good on the whole, really good work if you've never used CAD before :thumbup:

I can't see anything too glaringly out of place. I don't have experience with your cab though so I cant' speak for any clearance issues etc but nothing looks to be too close to the edges etc. The holes look to be the right size and everything looks pretty well proportioned. P1/P2 button rotation/alignment is personal preference of course.

I did notice there are no studs or holes to the panel to the cabl though, not sure what your plans are there.

I don't think you'll be able to fit Happ joysticks to the stud patten you've got on your dxf if that's what you're planning on doing. Just out of interest, where did you get the dimensions for the studs from? I only ask as the pitch matches my 'universal pitch' exactly ^^

i-BQDXFLB.png


If you are intending on using that pitch (or any pitch for that matter) just make sure they are equally spaced around the joystick hole. I noticed yours were off a little bit whilst offering up a joystick to and extruded version of your dxf:

i-dnv2F6z-L.png


I would have offered to laser cut you a test panel but my worksop is shut down at the moment whilst having some work done...
 
  • Like
Reactions: nem
Thanks for this. The arcade community are so helpful in trying to sort problems so really appricate your input

I didn't know how to do the studs, bought some press fit and managed to bend the control panel trying to install so i think simple nut a bolt to hold the panel in. I would like to have the hole pre drilled or studs but hard for me to get them lined up

I'm going to go Sanwa sticks (think they're the JLF-TP) for the first panel trying to keep it period correct i think, hopefully i used the correct layout. I might have a second panel for happ and the longer 28.5m RGB buttons and swap them over. I basically got my drawing overlayed the sega two player and then stuck your drawning for the drill points for the arcade stick ( hopefully picked the correct one)


My steps so far have been

Tape messure the current deck and made in perspex to check for clearances. 1st one didnt fit that great so had to sand down the edges. Think i got the radius wrong.

1767432821172.jpeg


Then changed to the Sanwa setup but least it was roughly correct.

Then i printed the graphic i wanted as a PDF so i could check i hadn't made a mistake

1767432895515.png


Decided the sanwa was better for the cab

1767432940152.png


Got some made in mild steel but at 3 mm might be too thick and i still had the radius issue so tried to trim the edges also changed to the more standard sega layout

1767433147886.png


Painted it so it would rust or anything

1767433223988.png


This is it installed a the moment. Got a friend who has a graphic company to make up some are work, the sides are great but the marquee doesn't backlight very well and the panel graphic seems like its slightly too high/sticker might snag.

View: https://www.youtube.com/shorts/JjUlXcKg7cs


I'm giving it a go but my very limited skillset seems to be the issue. If anyone has any ideas what to do or improve it please let me know.

Franco, if its something you might be able to make in the future would be very interested. I'm in the UK and not a million miles away from you

I think the Joy-Ro21 which is a poormans candy cab works well for me as fits in a standard door, light and seems to be quite well built. We seem to have quite a few machines in the UK

It doesnt have a CRT, which i know is best but i dont think i can deal with all the repairs and not sure i could even fit it. The 4x3 LCDS seem to be an option but i do still want to play some of the modern arcade games when people come round so might stay 16x9


Thanks for the input and look forward to working on it further.

 
I've got a contact who said they would make my control panel for me, did the holes line up for a standard sanwa joystick? Is it best for it to be made in mild steel, stainless or aluminium? I thnk it needs to be around 2mm
 
@FrancoB @NFGx I have Capcom Panel for Astro, is this a JLF base becuase I measured and its different than the converter plates. Am I missing something here?
1767803279129.jpeg
1767803290524.jpeg
 
Last edited:
@FrancoB @NFGx I have Capcom Panel for Astro, is this a JLF base becuase I measured and its different than the converter plates. Am I missing something here?
The four posts have nothing to do with 'JLF' or not, they're for mounting a plate. The plate is the part with the big hole, and it has two holes on opposite sides which, I'm guessing, will fit a JLF/JLX.

I don't have any panels that have four posts with the same spacing as yours.
 
The LS-32 uses the 50mm screw spacing (Seimitsu calls this P=50), so you'd need a plate with that same 50mm spacing, and then you'd need the plate to match your panel's mounts. Your measurements appear to be off (the calipers don't look to be centred on the posts), but it looks like 65mm on one axis, which matches the Vewlix spacing. I dunno what the 72mm is all about, maybe someone else can point to a 65x72mm arrangement.

Seimitsu makes an 'all in one' with a Vewlix pattern, but while that'll mount a Seimitsu P=50 mech, it will only match two of the posts on your panel.

https://www.cqbarcade.com/products/...e-mounting-plate?_pos=33&_sid=50915f0fa&_ss=r

It'd be very easy to 3Dprint a plate to fit your panel and a P=50 stick, but you'll want to be precise with the measurements of those posts. Try measuring from the outside of both posts, and subtract the diameter of one post to get the accurate spacing.

Very, very easy:

AllInOne-Weirdmount.jpg

This has holes for P=50, P=40, and Sanwa 4- and 2-hole mounts. Assuming the 65x72 spacing is correct. Let me know if it's not and I will revise it.
 

Attachments

Last edited:
Back
Top