

dillingerradio
Professional
Hey folks!
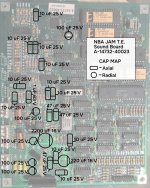
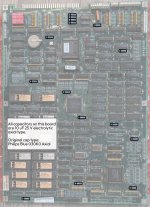
While preparing to recap my NBA JAM T.E., I went ahead and made a couple cap maps.
This is the first in a trio of posts I've made on working on my NBA JAM T.E. The other two posts can be found here:
The Midway T-unit is very recap friendly. Each capacitor's outline is screen printed in its appropriate location, orientation, and scale, along with a pole indicator. The expected values are given in the NBA JAM manual in part 2-7 (~page 32) for the CPU board, and part 2-9 (~page 34) for the audio board. Although most of the caps match what is documented, Midway calls for slightly lower voltage on the 10uF capacitors in the manual than what they actually installed. This has no practical impact in this case, it's just interesting.
If you're new or just starting out, replacement capacitor resistance (uF) must match, capacitor voltage (V) can be the same or higher, but not lower (which is why it doesn't matter that the manual identifies the 10uF as having a couple different lower voltage ratings than what they actually used). Always check your board matches what's expected first before doing any work (bearing that rule of thumb in mind).
[Edit:]
My recap of these boards may be found here.
In any case, here are those maps:
CPU Board:
Audio Board:
While preparing to recap my NBA JAM T.E., I went ahead and made a couple cap maps.
This is the first in a trio of posts I've made on working on my NBA JAM T.E. The other two posts can be found here:
The Midway T-unit is very recap friendly. Each capacitor's outline is screen printed in its appropriate location, orientation, and scale, along with a pole indicator. The expected values are given in the NBA JAM manual in part 2-7 (~page 32) for the CPU board, and part 2-9 (~page 34) for the audio board. Although most of the caps match what is documented, Midway calls for slightly lower voltage on the 10uF capacitors in the manual than what they actually installed. This has no practical impact in this case, it's just interesting.
If you're new or just starting out, replacement capacitor resistance (uF) must match, capacitor voltage (V) can be the same or higher, but not lower (which is why it doesn't matter that the manual identifies the 10uF as having a couple different lower voltage ratings than what they actually used). Always check your board matches what's expected first before doing any work (bearing that rule of thumb in mind).
[Edit:]
My recap of these boards may be found here.
In any case, here are those maps:
CPU Board:
Code:
Game: NBA JAM T.E.
Type: CPU Board
Model: A-14816-40023

Capacitor  Type    Qty     Location

10uF 25V   Axial   15      C11, C66, C88, C96, C102, C113,
                           C114, C115, C116, C118, C120, C141,
                           C179, C190, C214

* Capacitor type removed: Axial Electrolytic: Philips 030 K0 (Transparent Blue).
Audio Board:
Code:
Game: NBA JAM T.E.
Type: Audio Board
Model: A-14732-40023

Capacitor    Type     Qty    Location

10uF 25V     Axial    11     C46, C53, C57, C64, C67, C73, C75,
                             C81, C83, C100, C102
100uF 25V    Radial   5      C70, C85, C86, C87, C103
47uF 25V     Axial    3      C63, C66, C80
1uF 63V      Axial    1      C68
220uF 16V    Radial   1      C84
2200uF 16V   Radial   1      C95

* Capacitor types removed: Axial Electrolytic:  Philips 030 K0 (Transparent Blue).
                           Radial Electrolytic: Marcon 105C (Black).
Attachments
Last edited:
