What's new

SeasonedBeef

Student
Joined
Feb 5, 2021
Messages
12
Reaction score
44
Location
Texas, US
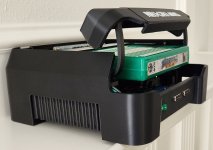
Here is a project that I've been working on from scratch for the past two years. It's actually quite far along already in the build phase! Just two more pieces to print and assemble.

20230314_170536.jpg


20230314_170136.jpg20230314_170751.jpgMVS-B 01 compressed.pngMVS-B 03 back compressed.png

Design goals and constraints:
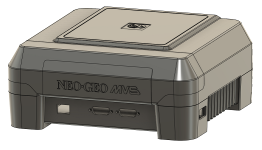
  • It needs to look and function like an actual console from the 90's
  • Frontload like an NES with a top hinged cartridge door. The hinge needs to be hidden if possible.
  • It has to be simple to change games.
  • The plastic SNK branded cartridge guide that comes with the MV1B must be used. It will be built in to the structure.
  • 3D printed using ABS, including the logos. 300mm^3 printer max size.
  • Use the Minigun Supergun with no deviations. Plug and play. RGB out only.
  • Internal PSU. The back panel will have a 120V AC female socket, just like a PC.
  • All electronic components were readily available and sourced from Digikey. No custom PCB's (other than the minigun).
  • Absolutely no modifications needed to the MVS board. The only soldering I did was to make the minigun.
  • Front mounted, illuminated power switch to the A/C input of the rear power supply.
  • Finally, maybe most importantly, show the underappreciated MV1B board some love for what it is, and not just flatten it into a toploader configuration. :)
After a lot of image research I settled on the Neo Geo CD Frontloader as my style target. When I looked at the picture of the console, I could just envision if I decreased the width and increased the height a little bit that the B board + PSU would fit inside. Below is a view of my final prototype design next to the CD console, somewhat roughly to scale.
MVS-B 02 compare compressed.png


I have to pause here for now. I'll make some more updates going into a bit more detail on the internal layout, cooling, some of the trade-offs I had to make, and then some of the build process.
 
It looks fantastic.

Do you have any plans to share this design, when you are done?
Yes, that's the intent! I also designed the front and rear panels to be customizable for different AC receptacles and power switches in the future. The design is somewhat modular to be able to swap out various pieces.

Believe it or not, I just found out about it less than a week ago on reddit. I was pretty surprised to see such a similar project, to say the least.
 
Last edited:
Believe it or not, I just found out about it less than a week ago on reddit. I was pretty surprised to see such a similar project, to say the least.
I know right. I saw it and instantly thought of your project. It's interesting to see different approaches in a similar fashion. I'm really digging what your doing here and look forward to the progress.
 
Update #1: Design Overview and Internal Layout

Before I go into the actual build process I think it might be good to show a few more views of the design and how it all goes together generally. I feel that it's a bit easier to understand and illustrate with CAD views and contrasting colors.

The main structure of the enclosure is two side pieces (shown in black), and they are connected by the front and rear panels/crossbars (shown in red). I divided the design up into pieces like this in order to keep the print time down to around 10 hours for any single part, keep support material to a minimum, and allow all parts to fit on a 300x300 mm print bed. I knew that for my first prototype I would likely be reprinting a few pieces, and I didn't want to undergo a potentially 40 hour long reprint for an entire half shell if I did a split top/bottom shell design.

There are a lot of nice advantages I found to doing the frame like this. It's hard to tell from the picture, but the front panel is like a structural "C" channel, printed with the front face down on the print bed. It's really stiff! There is also a lot of corner and floor support built into the LH and RH side pieces. This stiffness is intended to withstand the cartridge insertion/ejection forces. The MVS will be bolted directly to the "floor" on the LH/RH side pieces through the factory cartridge guide/cover that comes with the MV1B.

One more note: I'm leaving out info on fasteners for now to keep this high level. I'll go into that detail during my build updates.

MVS-B Iso Structure 1.png


Next the bottom panel goes in. I originally designed it to be a CNC cut sheet of acrylic, but later I changed my mind to keep this project 100% 3D printed. I added a raised grooved track built in to the bottom panel, and also into each side structure. This will allow for a printable (or cnc cut) "firewall" (not shown) to completely isolate the PSU bay in the rear for thermal management.

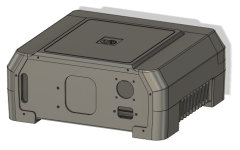
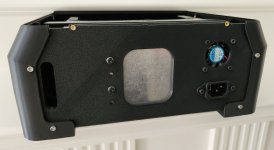
Moving back to the rear panel: the tall slot on the right side of the rear panel is an inlet for cooling, and the circular cutout on the top left rear is a mount and outlet for a standard 40mm fan. I'm not sure if it's needed or not, but since I had doubts I added it. This isn't a cost saving project! Beneath the fan is a cutout for an AC female receptacle.

The large square cutout in the middle of the back panel is just for weight reduction. The PSU bolts directly to the back panel and covers up that square cutout. I'm sure many of you will see that this is a Meanwell RT-65A. It might be overkill, but it packages well here and seems more than enough for the job. It also seems to be a highly recommended PSU for this supergun.

(Apologies for the messy wiring! I am not a cable management pro. I plan to zip tie it up later. :)
MVS-B Iso interior 4.png
MVSB Internals 01.jpg


Once the basic frame is together the layout is pretty straightforward. The MVS motherboard (with SNK cartridge guide not shown) is represented by the green block, and the supergun is represented by the blue board. The hinge mechanism is two identical arms mounted to the LH and RH structure through a separate printed pivot bushing at both ends (only LH is shown). It allows the door to swing up and back - kind of like a front loader garbage truck (it works surprisingly well!).

MVS-B Iso Interior 1.png
MVSB Internals 02.jpg


Up again to the front panel, the supergun DB15 controller ports are bolted directly to the front panel, and the front power rocker switch is a snap fit. On the output side of the supergun there is an opening on the case RH side support for the A/V cable out.

My next update will start with the printing of the structure shown here and hopefully will serve to start documenting the build process.
 
Back
Top