mathewbeall
Champion
Hi @Kujako - I decided to start a new post, so that if other people had the same question, it was easy to reference.
This is what I used to get mine all built.
1 of these, its for connecting the security card to the front panel usb - https://www.amazon.com/gp/product/B0160CP1K0/ref=ppx_yo_dt_b_asin_title_o07_s00?ie=UTF8&psc=1
1of these, it plugs into port usb0 on the ODE: https://www.amazon.com/gp/product/B00LN3LQKQ/ref=ppx_yo_dt_b_asin_title_o05_s00?ie=UTF8&psc=1
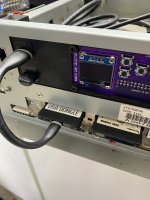
1of these, it plugs into the front panel - holds all the games/dongle images - https://www.amazon.com/gp/product/B07857Y17V/ref=ppx_yo_dt_b_asin_title_o04_s00?ie=UTF8&psc=1
a pack of these - you only need 2 of them, but it comes with 5 - these snap into the front panel - https://www.amazon.com/gp/product/B08ZN247XV/ref=ppx_yo_dt_b_asin_title_o09_s00?ie=UTF8&psc=1
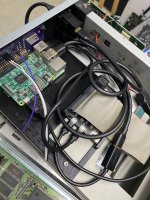
2 of these - one connects from the inside front panel to the OTG adapter (that plugs into usb0 on the ODE), the other one (that is the usb drive) connects to the RPI on any usb port - https://www.amazon.com/gp/product/B00P0E3954/ref=ppx_yo_dt_b_asin_title_o08_s00?ie=UTF8&psc=1
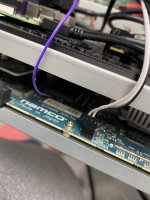
you only need 1 of these 1ft cables - but its a 5 pack - this connects from usb1 on the ODE to any usb port on the RPI - https://www.amazon.com/gp/product/B011KMSNXM/ref=ppx_yo_dt_b_asin_title_o05_s00?ie=UTF8&psc=1
1 of these - to split the power so you don't have to cut into original cable, and it still lets you plug in a DVD drive if you wanted to. You don't have to get a splitter, it could just be an extension also - https://www.amazon.com/gp/product/B002HM9G7C/ref=ppx_yo_dt_b_asin_title_o06_s00?ie=UTF8&psc=1
1 of these - I but the black/red wires from the molex splitter and screwed gnd and 5v into this, and then plugged it into the rpi power port - this powers both the pi and the ODE. https://www.amazon.com/gp/product/B07QN719P2/ref=ppx_yo_dt_b_asin_title_o03_s00?ie=UTF8&psc=1
a pack of these - you will need one for the reset wire, and three for the jumper block on the right side of the motherboard to auto select 246/256. https://www.amazon.com/gp/product/B01EV70C78/ref=ppx_yo_dt_b_search_asin_title?ie=UTF8&psc=1
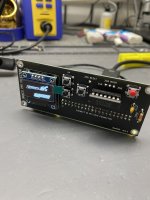
the reset point you can see in the picture i attached - you have to take the motherboard out - but its literally labled right by the main CPU "reset" - super simple to solder a wire there - and it plugs into the front board also.
last but not least - you need the image from BladeZX (http://bladeplugins.com/arcade/namco2x6_raspbian.zip) - this has all the dongle images on it. Using win32diskimager - write this image to the SD card for the Rpi (I used a 32GB card). Then grab all the rom images (if you don't already have them) and run the "unchd_all" batch file, and take the resulting set of files and copy them over to the thumbdrive.
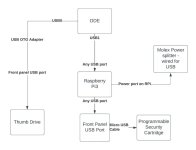
Including a diagram as well!
This is what I used to get mine all built.
1 of these, its for connecting the security card to the front panel usb - https://www.amazon.com/gp/product/B0160CP1K0/ref=ppx_yo_dt_b_asin_title_o07_s00?ie=UTF8&psc=1
1of these, it plugs into port usb0 on the ODE: https://www.amazon.com/gp/product/B00LN3LQKQ/ref=ppx_yo_dt_b_asin_title_o05_s00?ie=UTF8&psc=1
1of these, it plugs into the front panel - holds all the games/dongle images - https://www.amazon.com/gp/product/B07857Y17V/ref=ppx_yo_dt_b_asin_title_o04_s00?ie=UTF8&psc=1
a pack of these - you only need 2 of them, but it comes with 5 - these snap into the front panel - https://www.amazon.com/gp/product/B08ZN247XV/ref=ppx_yo_dt_b_asin_title_o09_s00?ie=UTF8&psc=1
2 of these - one connects from the inside front panel to the OTG adapter (that plugs into usb0 on the ODE), the other one (that is the usb drive) connects to the RPI on any usb port - https://www.amazon.com/gp/product/B00P0E3954/ref=ppx_yo_dt_b_asin_title_o08_s00?ie=UTF8&psc=1
you only need 1 of these 1ft cables - but its a 5 pack - this connects from usb1 on the ODE to any usb port on the RPI - https://www.amazon.com/gp/product/B011KMSNXM/ref=ppx_yo_dt_b_asin_title_o05_s00?ie=UTF8&psc=1
1 of these - to split the power so you don't have to cut into original cable, and it still lets you plug in a DVD drive if you wanted to. You don't have to get a splitter, it could just be an extension also - https://www.amazon.com/gp/product/B002HM9G7C/ref=ppx_yo_dt_b_asin_title_o06_s00?ie=UTF8&psc=1
1 of these - I but the black/red wires from the molex splitter and screwed gnd and 5v into this, and then plugged it into the rpi power port - this powers both the pi and the ODE. https://www.amazon.com/gp/product/B07QN719P2/ref=ppx_yo_dt_b_asin_title_o03_s00?ie=UTF8&psc=1
a pack of these - you will need one for the reset wire, and three for the jumper block on the right side of the motherboard to auto select 246/256. https://www.amazon.com/gp/product/B01EV70C78/ref=ppx_yo_dt_b_search_asin_title?ie=UTF8&psc=1
the reset point you can see in the picture i attached - you have to take the motherboard out - but its literally labled right by the main CPU "reset" - super simple to solder a wire there - and it plugs into the front board also.
last but not least - you need the image from BladeZX (http://bladeplugins.com/arcade/namco2x6_raspbian.zip) - this has all the dongle images on it. Using win32diskimager - write this image to the SD card for the Rpi (I used a 32GB card). Then grab all the rom images (if you don't already have them) and run the "unchd_all" batch file, and take the resulting set of files and copy them over to the thumbdrive.
Including a diagram as well!
Attachments
Last edited:
")