Sega Astro City - Light/Speakers Back Panel Screws and Restoration [SOLVED IT!]

jumisjones

Beginner
Joined
Jan 2, 2026
Messages
19
Reaction score
3
Location
Americas
Hi everyone,

I recently aquired a Sega Astro City that was previosly restored by a third party. With that, I'm checking what's wrong and what needs corrections and improvements.

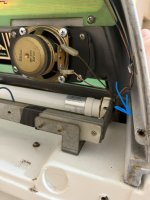
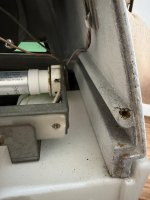
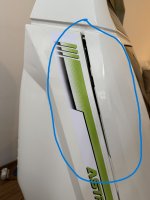
The backplate for the lights was using wrong screws and the machine itself is a little not perfectly fit and wobbly as seen in the pictures.

Some questions:

1. I'm using M4 screws like the manual says but some holes are not good anymore. Any idea on how I could secure not to crack more and make new screw drills? I was considering maybe injecting epoxy in the old holes and drilling the M4 screw, removing it and waiting it to dry, but I'm not sure if it's a good idea.

2. Is the fact that the machine is not perfectly aligned something that can be fixed? I plan on unscrewing and trying to refit this upper part. Are there any risks or something I should pay attention to? Maybe it's okay not being perfectly aligned due to old age or something.

I don't want to cause permanent damage, because of this I've removed the backplate until I can work on it. It was previously using thorougher screws and it was really tight to make it snuggly fit but I'm not so certain this is correct and that the alignment should be done by the screw.

Thanks a lot!

Post edit: The suggestions were right. The monitor was bigger and back mounting it made the cabinet correctly snap into place!
 

Attachments
  • IMG_3371.jpg
    IMG_3371.jpg
    103.8 KB · Views: 55
  • IMG_3374.jpg
    IMG_3374.jpg
    138.2 KB · Views: 63
  • IMG_3375.jpg
    IMG_3375.jpg
    157.4 KB · Views: 54
Last edited:
Do you have a pic of the screws that you're trying to use, because they're not supposed to be machine thread M4?

Whenever you're putting screws into resin or plastic without an insert, you use a coarse thread screw, kind of like a wood screw.

Search for self tapping truss head screw.
 
Thanks for the reply and support!

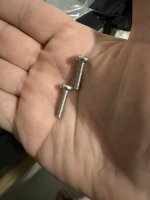
Well, in this case I might have been wrong since the screws that came in it were, in fact, both threaded and self tapping.

I was afraid they would harm the machine, especially with the cracks. And, the right side screw was really bringing the the front part to be aligned together by screwing it to the end and I'm not sure if this part should put so much strenght to make the machine straight. I will try to re-fit the front panel tomorrow to see if I can make it fit better and more aligned.

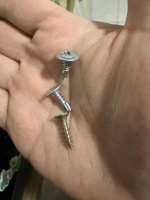
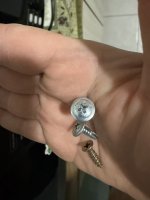
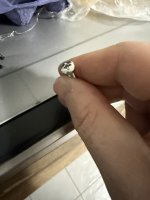
The original screws are attached here in a picture, there is a small threaded one that was the one handling the strongest hole and the others are the self tapping ones that are a little bit loose there. I'm not sure how it is originally and how it should be. The machine ones that I bought later fit nice in the other holes, especially for the ones in the base of the machine that attach to the backplate.

I find the screws that were in it a little bit ugly, I know I'm being picky. But I also feel that being self tapping and making so much force to hold it tight could damage it in the long run, couldn't it?

Appreciate any insights and pictures and comments from those that have the original screws in it.

Thank you
 

Attachments

  • IMG_3437.jpg
    IMG_3437.jpg
    95.6 KB · Views: 19
  • IMG_3438.jpg
    IMG_3438.jpg
    93.5 KB · Views: 21
  • IMG_3439.jpg
    IMG_3439.jpg
    94.6 KB · Views: 16
  • IMG_3440.jpg
    IMG_3440.jpg
    102.2 KB · Views: 21
Update on this, although there is concern for the screws, they are under the bigger problem which is the cabinet itself not correctly snapping in and correctly fit.

Today I have unscrewed it and tried many ways to make it fit but it either ended up not 100% being correct at the top, like it is now, or at the botton (thus making it not entirely possible to close the CP correctly).

Any ideas on why it might have gone somewhat bent and I could solve it? Not sure if anyone has seen this in multiple cabs and found a way.

Thank you!
 
Update on this, although there is concern for the screws, they are under the bigger problem which is the cabinet itself not correctly snapping in and correctly fit.

Today I have unscrewed it and tried many ways to make it fit but it either ended up not 100% being correct at the top, like it is now, or at the botton (thus making it not entirely possible to close the CP correctly).

Any ideas on why it might have gone somewhat bent and I could solve it? Not sure if anyone has seen this in multiple cabs and found a way.

Thank you!
What's the other side look like when you're trying to get it to line up? You have to put in a little elbow grease to line it up perfectly so it falls into place correctly. Start at the bottom and place the tabs on the screw holes in the CP. Check that both pieces are in the channels and slowly work it in place. Also, make sure your speaker wire isn't getting in the way while doing this.
 
Update on this, although there is concern for the screws, they are under the bigger problem which is the cabinet itself not correctly snapping in and correctly fit.

Is the monitor original and mounted correctly?
 
What's the other side look like when you're trying to get it to line up? You have to put in a little elbow grease to line it up perfectly so it falls into place correctly. Start at the bottom and place the tabs on the screw holes in the CP. Check that both pieces are in the channels and slowly work it in place. Also, make sure your speaker wire isn't getting in the way while doing this.
The other side fits up better. I tried starting from the bottom and everytime I do this, I end up with the top part like it is now, with leeway and "overspilling". The tabs are fitting up at the bottom but the screws for the tabs don't go all the way in and I don't want to force it. It doesn't line up 100% the other side, but like, 95%.

If I start aligning at the top, I end up with the tabs not able to entirely enter at the bottom, and even crashing into the locks. The cabinet has a little bit of cracks where the control panel starts to dettach from the main body, and I believe it might be because of these. When I close the control panel I also need to find a special way to fit just right.

I'll have some friends over in a couple of weeks so that we do in more people to try different ways of aligning it. Elbow grease is an expression to put some force in, right? Haha

I'll try to get different and more screws.

Is the monitor original and mounted correctly?
The monitor is not original, unfortunately. But it seems to have been mounted correctly as it doesn't seem to be touching the bezel entirely and the neck if not touching anything in the back. I'll pay closer attention to it the next time that I try to refit.

Thanks a lot everyone, it's one of the last details to make it as perfect as it can be.

Have a great week.
 
Took some additional pictures from other parts to help visualization.

Right side as it is now, when left side is really distant, much closer on the right:

Right Side 'natural fit'.jpg


Right side control panel:

Right side bottom.jpg


Left side as it is right now, really distant:

Left side current distance.jpg


And, the control panel part where they all come together:


left side cp fit.jpg


left side cp panel fit.jpg


Ps.: stickers obviously not original, some low quality repro, one day I'll fix that :)
Ps2.: I'll pictures of the monitor mount later down the line
 
Took some additional pictures from other parts to help visualization.

Right side as it is now, when left side is really distant, much closer on the right:

Right Side 'natural fit'.jpg'natural fit'.jpg


Right side control panel:

Right side bottom.jpg


Left side as it is right now, really distant:

Left side current distance.jpg


And, the control panel part where they all come together:


left side cp fit.jpg


left side cp panel fit.jpg


Ps.: stickers obviously not original, some low quality repro, one day I'll fix that :)
Ps2.: I'll pictures of the monitor mount later down the line
Take a picture of that piece standing up against a wall. Does anything look broken or warped? Did you look in the female portion of the channels for any debris?

There's been some stress on that CP - is anything else cracked?
 
I took some pictures of the monitor mount, and with a friend today, tried to re-fit the part. I believe it's some bad news and seems that the machine might have been bent due to timing. Not sure how I could fix it, but will continue to try it :)

IMG_3535.jpg


IMG_3534.jpg


Appreciate any insights, ty!
 
Last edited:
Just curious--you said the monitor is not original, what monitor is in there now? The mounting ears are further forward on Toshiba tubes, so other tubes will end up pushed outward, colliding with the bezel. Back mounting the tube to the frame is usually the solution.

You can rule out the monitor colliding by removing the monitor or removing the bezel.
 
Thank you so much to both of you. It was indeed a case where back mounting it solved it.

With many people helping we removed the monitor and inverted the screws from the back. It was a lot of work, especially holding and screwing it from the back. But now the machine lines up perfectly. There were only 2 screws missing from the monitor mounting bracket so I'll buy them tomorrow and make sure everything is screwed.

I also haven't re-screwed the back plate of the light/speakers into place, I'll do it once everything is done, but the screws are like they were originally. A little bit damaged, let's see how that goes.

Is the monitor original and mounted correctly?

Just curious--you said the monitor is not original, what monitor is in there now? The mounting ears are further forward on Toshiba tubes, so other tubes will end up pushed outward, colliding with the bezel. Back mounting the tube to the frame is usually the solution.

You can rule out the monitor colliding by removing the monitor or removing the bezel.

Besides that, my control panel doesn't perfectly snap into place, it needs a little bit of elbow grease but I think this might be normal as in the end after pushing it, it correctly fits.

Thanks a lot for all the help!
 
Thank you so much to both of you. It was indeed a case where back mounting it solved it.

With many people helping we removed the monitor and inverted the screws from the back. It was a lot of work, especially holding and screwing it from the back. But now the machine lines up perfectly. There were only 2 screws missing from the monitor mounting bracket so I'll buy them tomorrow and make sure everything is screwed.

I also haven't re-screwed the back plate of the light/speakers into place, I'll do it once everything is done, but the screws are like they were originally. A little bit damaged, let's see how that goes.


Besides that, my control panel doesn't perfectly snap into place, it needs a little bit of elbow grease but I think this might be normal as in the end after pushing it, it correctly fits.

Thanks a lot for all the help!

I think you just loosen the screws on the hinge for the control panel and slide it back or forward to get it just right. The holes are slotted.

Cheers
 
Last edited:
Thank you, tried doing that today. I'm still not sure if it's 100% right but it's better, I just feel the CP could come even closer to the other edge, like almost touching lips with the upper part of the machine.

Here are some picture on how they are right now:
I think you just loosen the screws on the hinge for the control panel and slide it back or forward to get it just right. The holes are slotted.

Cheers


1772302240916.png
1772302252176.png


And here is how much better the cabinet now snaps into place:

1772302285190.png


With this solved, the original problem of the backplate of the speakers became much less of a hassle. Don't get me wrong, the holes are not perfect and they're kinda broken on top, but, with the machine perfectly snapped, the bottom screws (that go into the main body) hold the plate much better, making the top screws not necessary to do too much strenght to hold it in place:

1772302419936.png


All front stickers are low quality repro, I'll get them better in the future.

I'll also work on getting a sound amplifier inside the machine with time.

Thanks everyone.
 
I think you just need to loosen the control panel hinge screws enough that you are able to close it and then slide it with a little force into the proper position. Open carefully and tighten. That should help close the gap on the left side.
 
Back
Top