What's new
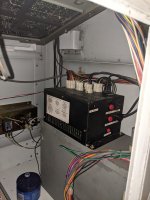
Were there different revisions of these psus? I have some of these that look similar to the one in your cab, but these seem smaller I think. Need to open it and see if there are any specs on it. Can you check if the pinout is the same in yours?
I believe the smaller black PS were from the Neo Candy 29 and not the Super Neo 29 - A friend had a few Neo Candy 29 and I believe I remember seeing the black PS in those.


Not a great shot of the diagram but I think still legible.
VeqqVdnh.jpeg
 
My Super Neo 29 has the exact same black power supply in it. Mine is just the plain JAMMA Candy model if that makes any sort of difference.
 
My Super Neo 29 has the exact same black power supply in it. Mine is just the plain JAMMA Candy model if that makes any sort of difference.
Looks like between these they are wired a bit different, will have to check my super neo 29 to see which one it has.
 
So maybe the distribution looks like:

Neo Candy 25/29 - Black PSU
Super Neo 29 - Black PSU
Super Neo 29 Type 2 - Silver PSU

@statix138 - Do you know if yours is a type 2? The way I am telling them apart is the decal on the side of the cab, not sure if there are exceptions to this. The big super colorful decal I believe is a Super Neo 29 and the more subtle, smaller one (like found on mine) is a type 2.
 
I am not sure what the original side said as when I got the cab the art had already been replaced. I can tell you that the original marquee that came with it was the wide single image marquee, like this one, and it had just the regular Super Neo 29 panel, not one that had anything Hyper64 on it.
 
Looked in my Super Neo last night and confirmed it is the same PSU as Derick2k's.
 

Attachments

  • PXL_20201023_000340656.jpg
    PXL_20201023_000340656.jpg
    888 KB · Views: 362
does anyone here have the version with the lcd screen and can tell me how to light up the top marquee? or is there no light tube inside the lcd version at all. thanks
 
@dewmansnk this super neo 29 type 2 of yours was already jamma wired when you got it? are the always jamma wired? did you have the lcd screen also inside?

thanks
 
Sorry for the abrupt halt on this Super Neo 29 Type 2 restore. I moved from an apartment to a house in 2020 and have sadly had the arcade stowed away in the garage while I get the house up to par. Hopefully in a few months I will have a bedroom all finished so I can get the cabs out of the garage and start tinkering again. Thanks for the continued interest in this restore thread, its a good reminder that I need to get the dust off this cab and finish the cosmetic bits.
 
Control panel wiring documentation. Not so much any new progress, just getting some wiring documented as it will help myself and others figure out how to add in the start/select buttons if needed.

Ak4glKQ.jpg

JAMMA (MVS) Parts Side -
P1 Start = Double white wires
P1 Select = Single white wire


VoZQNXS.jpg

JAMMA (MVS) Solder Side -
P2 Start = Double pink wires
P2 Select = Single white wire


mVxnaC7.jpg

Red Control Panel Connector Back Side -
Near white wire = P1 Select (UP)
Far white wire = P2 Select (Down)


xuyRv53.jpg

Small white control panel connector rear
White wire = P1 Start
Pink wire = P2 Start


XcwUc56.jpg

White Control Panel Connector Back Side -
White wire = P1 Start
Pink wire = P2 Start


GpmjkX1.jpg

Red Control Panel Connector Front Side -
Unpopulated left position = P1 Select (UP)
Unpopulated right position = P2 Select (Down)


hfpIR3n.jpg

Small white control panel connector front
White wire = P1 Start
Pink wire = P2 Start


K9pYrb6.jpg

White Control Panel Connector Front Side -
Unpopulated left position = P1 Start
Unpopulated right position = P2 Start


8R1NMLs.jpg

Control Panel Underside - P2 side
(pink wire = P2 start = small white connector)

AtQ0gAx.jpg

Control Panel Underside - P1 side
(white wire = P1 start = small white connector)


Currently I have only the P1 / P2 start buttons connected. In the future I will wire up the single P1 select button. It will get pinned into the Red control panel connector, bottom left unpopulated position.
 
Last edited:
I’m looking to change out the buttons on a Type II I bought couple years ago. Would you happen to know what kind of buttons they are? Thanks.
 
I dug up my order from Focus Attack where I ordered the buttons from:

SEIMITSU-PS-14-D-G/KSeimitsu PS-14-D 24mm Pushbutton Green/Black
2​
SEIMITSU-PS-14-D-Y/KSeimitsu PS-14-D 24mm Pushbutton Yellow/Black
2​
SEIMITSU-PS-14-D-B/KSeimitsu PS-14-D 24mm Pushbutton Light Blue/Black
2​
SEIMITSU-PS-14-D-R/KSeimitsu PS-14-D 24mm Pushbutton Red/Black
2​
 
Picking up on this again, with the power supply recapped its time to reinstall the wiring harness,
nIxkrf9l.jpg


coin box and power supply.
Q7NW0tal.jpg


AxxHYqNl.jpg


Next, we recap the monitor chassis and give it a good brush with a large paintbrush I have just for dusting. Some Krud Kutter on a rag will go a long way to cleaning up the wires and the flyback.
2RbqtpJl.jpg


C28GazRl.jpg


Replace all the old zip ties and ready for re-install
lQJo9X3l.jpg


Well, almost ready for reinstall...
qpEnmNal.jpg


Much better and all mounted
VVAzR5xl.jpg


Never forget lube (or dielectric grease)
5IoW3CKm.jpg


All systems go, we are ready for launch
Ddh6MLOl.jpg


The turkey is stuffed...
M1Fayexl.jpg


Looks like a success
3dXbgyYl.jpg


Down low, too slow ! Where did the Neo go...
3yt9U9ml.jpg
 
This is a really great thread, glad it’s being updated again! I have a Super Neo 29 coming on a future container and I’m excited to dig in.
 
One thing I have always wanted, even if it is not exactly correct for the cab, is a Super Neo 29 type 1 control panel. I know that reproductions exist, but I have a thing for only using original control panels. So as luck would have it I nabbed one off YAJ, but I have my work cut out for me.

JfX9PPh.jpg

b2df1g1.jpg


Panel removed and my white vinegar bath has been constructed from a box and a trash bag. Hoping that I can keep the panel submerged and use as little vinegar as possible, so a large shallow pool is best.
7mLafij.jpg


Press F to pay respect
AMBuYeM.jpg


After sitting about 20 minutes, Checking the overlay and looks to be holding up to the vinegar. Giving the bottom a scrape to remove some rust.
B5fDHwl.jpg


A few cycles of soak 30 min, check on overlay, scrape, soak 30 min, scrape
U4ilMHY.jpg


The next day after soaking about 10 hours and a light wire brushing
6935TeZ.jpg


Overlay seems to have withstood the vinegar just fine. No staining for sitting in a toxic rust bath overnight either.
eDP27uT.jpg


Gave the bottom a good final once over with a wire brush and wiped the whole panel down with iso alcohol. Masked off the overlay and gave the bottom a coat a primer to hopefully stop the oxidation.
17IyRby.jpg


Getting ideas for button colors. You can see a little bit of edge damage to the panel, but pretty minor considering the horror show that was on the other side.
TeMxCrd.jpg


Panel set back in the surround
2oCBO8l.jpg


So I can check one thing off the list. Got a spare panel and surround for when I want to do fighters in the Super Neo 29 and support a 6-button or 4-button fighter. Super happy to have this pretty rare panel and feels good to give new life to it.
 
Thanks for this guide bro, I used same method to derust my Super neo 29 cpo oannel, came out pretty good.
 
Back
Top