
You are using an out of date browser. It may not display this or other websites correctly.
You should upgrade or use an alternative browser.
You should upgrade or use an alternative browser.
twistedsymphony's adventures in making PCBs.
- Thread starter twistedsymphony
- Start date

I've been getting some message about status of this stuff.
a mini non-update:
I'm kinda taking this month off from multi work. as I've got some non-multi related stuff to get done. hoping to pick this back up mid August.
a mini non-update:
I'm kinda taking this month off from multi work. as I've got some non-multi related stuff to get done. hoping to pick this back up mid August.
it's mid August and I'm back on it 
over the weekend I finally got Poitto fully patched and working on the VG460 multi, which was the last major hurdle and have an official interest list for that multi here:
so far I've been testing with Last Fortress as a donor, just need to confirm it also works with Lady Killer Donor and find someone with a VG460-(B) PCB to test on that variant as well.
over the weekend I finally got Poitto fully patched and working on the VG460 multi, which was the last major hurdle and have an official interest list for that multi here:

Earlier this year I released a multi for the Metro VG420 hardware, a number of people had trouble finding a suitable donor and requested I made a version for the Metro VG460 hardware as well.
The Metro VG460 hardware is nearly identical to the Metro VG420 hardware, electrically they're the same design, but the PCB components are all in different spots and they swapped around the input circuit So despite it needing a completely re-designed multi board it has essentially the same game list.

(V1.2 PCB)
Games this will play:
The Metro VG460 hardware is nearly identical to the Metro VG420 hardware, electrically they're the same design, but the PCB components are all in different spots and they swapped around the input circuit So despite it needing a completely re-designed multi board it has essentially the same game list.
(V1.2 PCB)
Games this will play:
- The Karate Tournament (Japan and...
- twistedsymphony
- Replies: 34
- Forum: General Jamma and pre-Jamma

so far I've been testing with Last Fortress as a donor, just need to confirm it also works with Lady Killer Donor and find someone with a VG460-(B) PCB to test on that variant as well.
Last edited:
RepairGuy95
Champion
Any update on the taito?
Any update on the taito?
no, I haven't worked on it at all. what time have spent has been on the Metro VG460, which is working 100% on some donors and 0% on others so I'm trying to work out what the actual difference is between them, and I'm so far empty handed

Taito Auska multi is completely working except for Cadash, so it's a matter of whether the time and money to make that work are worth it.
RepairGuy95
Champion
Thanks for the update. Fingers crossed you can find the bug. My donor is german so sounds like it is affected.
As for cadash I would enjoy that if its possible.
As for cadash I would enjoy that if its possible.
Last edited:
So I've been working on the Seta multi and because it uses a different architecture wanted to build a quick and dirty test board before I finished up some of the areas.
in trying to make that test board more useful and interesting I ended up making a whole other multi for a different platform.
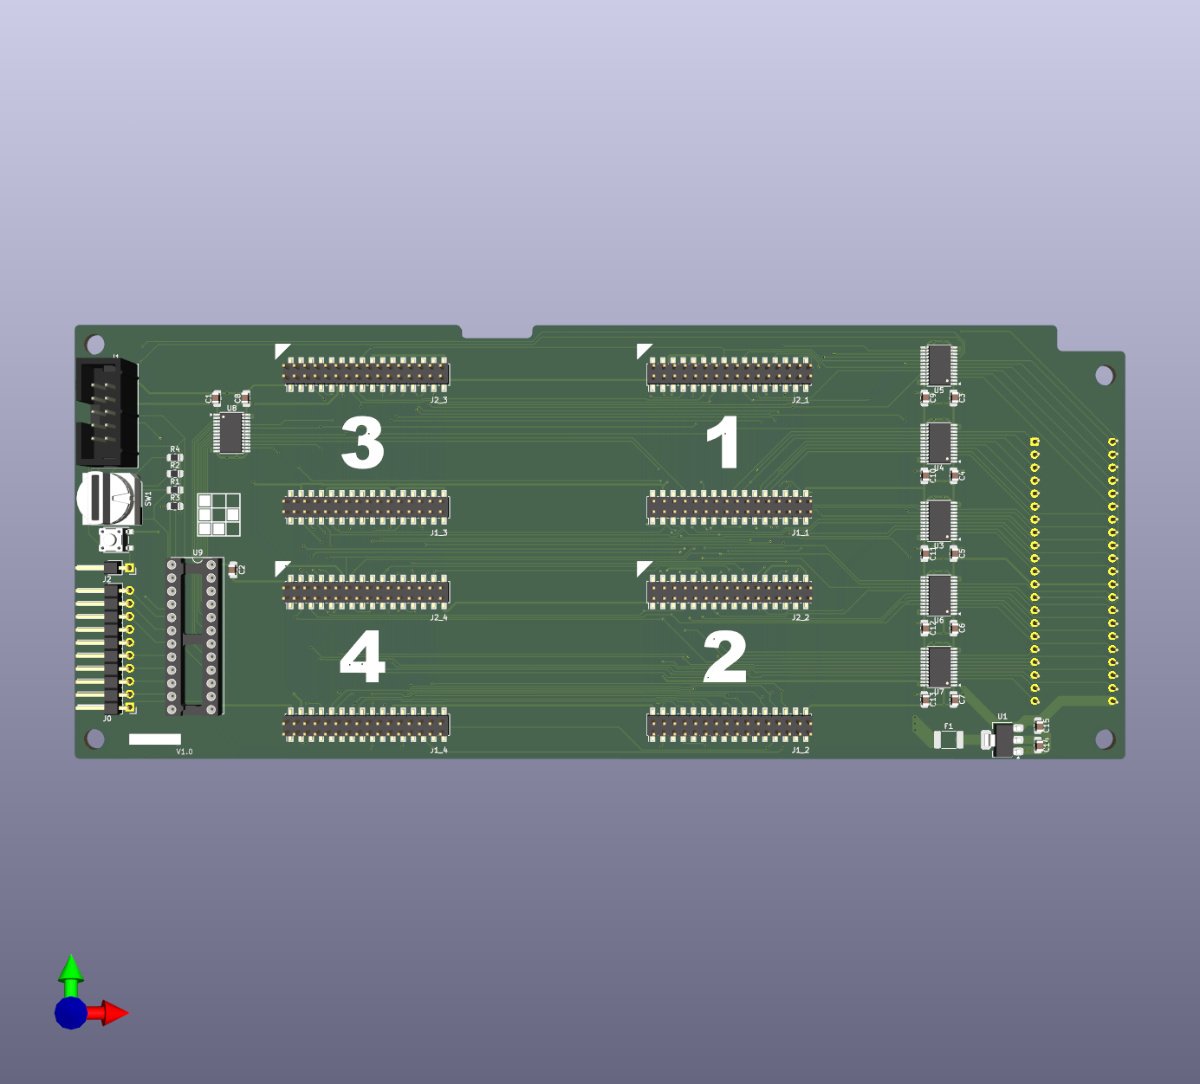
Any guesses as to what hardware this is for?
For now this is just an interesting experiment, for now we'll need to see if it actually works.
in trying to make that test board more useful and interesting I ended up making a whole other multi for a different platform.
Any guesses as to what hardware this is for?
For now this is just an interesting experiment, for now we'll need to see if it actually works.

mathewbeall
Enlightened
I really want to say that its a naomi multi - even though it doesn't look like it... LOL - thats mainly because I would love to have a proper, simple multi for the Naomi
I really want to say that its a naomi multi - even though it doesn't look like it... LOL - thats mainly because I would love to have a proper, simple multi for the Naomi

Good guess, that's exactly what it is. It's designed to plug into the IC22 socket on a existing cart. depending on game size you might only fit 1 game here, or as many as 16 if they're smaller games.
mathewbeall
Enlightened
oh this is FANTASTIC!

RepairGuy95
Champion
I foresee a great need for it.
Would be great to get all the vertical shmups on one cart if possible...
Would be great to get all the vertical shmups on one cart if possible...
So since the Seta Multi will need to use ROM modules like DS's System 1 and 2 multi's I wanted to make a simple board that was just a ROM module attached to a 27c322 so I could confirm I got all of the pinout and level shifters, and connector spacing correct. as an inexpensive experiment.
Since just a single ROM replacement like that isn't interesting on it's own I was thinking if there were any hardware platforms that used a single ROM region where that would be useful.... Then I remembered that NAOMI carts use a single ROM region and many of them have a 27c322 slot. So then of course I grabbed the first cart I had handy which was a 171-7919A from a Sega Tetris and started poking at it to see if the module plugged into in the IC22 socket would actually be able to cover the whole ROM region.
4 Modules seemed to be a decent number given the space available. You'll notice that there's a 10-pin connector and that's because there are a number of signals NOT on the IC22 socket that we need to tap. So there are 7 higher level address lines and bank-selection signals that need to be tapped as well as the 3 ROM Enable signals for IC1 IC2 and IC3 as it seems that there is some unique ROM selection logic for the first few ROMs. So I added a 22V10 GAL to translate those into something that works for the module.
Then of course I wanted this board to be able to fit under the plastic shell of the cart and spaced out the modules to fit around the cart ribs.
Since NAOMI games vary greatly in size the 22V10 is integrated in a way that it can be re-programmed depending on the size of the game in each slot. So we could have a single big game that spans all 4 modules, or a mix of different sized games across them.
Based on the physical dimension sizing I could easily fit 2 more modules on here, and maybe even up to 8 in total if I played a bit more Tetris with the components, but more than 4 modules would require even more complexity in the circuit design and this was supposed to be a quick and dirty test board
Despite spending a day learning how the cart addressing works this was a pretty quick build and taught me a lot about how to integrate the modules, component selection, etc. I did also discover that the way I implemented the footprint is going to cause some issues with the production files, so I need to redo that part before I can get these made (and glad I did this because re-doing that on the Seta Multi would have been a nightmare).
So for now this will only work with the 171-7919A donor cart, you'd need to remove all of the old ROMs (or at least lift their enable pins) then install the 10 fly wires, program the ROM modules and the GAL. Theoretically it should be able to support games that utilize the "leftover" gap between IC22 and ROM1 which normally cart conversion on this cart couldn't do. It should also be able to fit games that are larger than that cart originally supported. 4x 1Gbit modules = 256MB and it should be able to support any combination of 1 to 16 games that will fit in that space.
I do want to stress that this was literally something I through together over last weekend as a test board. I've decided with these projects of mine I'm going to design them in a way that I feel makes them useful for myself, and I'm going to share the results with the community, rather than try to make something that I think other people want or like. With that said I'd love to hear any ideas or feedback you have, but I'm not making any promises or setting any expectations.
Since just a single ROM replacement like that isn't interesting on it's own I was thinking if there were any hardware platforms that used a single ROM region where that would be useful.... Then I remembered that NAOMI carts use a single ROM region and many of them have a 27c322 slot. So then of course I grabbed the first cart I had handy which was a 171-7919A from a Sega Tetris and started poking at it to see if the module plugged into in the IC22 socket would actually be able to cover the whole ROM region.
4 Modules seemed to be a decent number given the space available. You'll notice that there's a 10-pin connector and that's because there are a number of signals NOT on the IC22 socket that we need to tap. So there are 7 higher level address lines and bank-selection signals that need to be tapped as well as the 3 ROM Enable signals for IC1 IC2 and IC3 as it seems that there is some unique ROM selection logic for the first few ROMs. So I added a 22V10 GAL to translate those into something that works for the module.
Then of course I wanted this board to be able to fit under the plastic shell of the cart and spaced out the modules to fit around the cart ribs.
Since NAOMI games vary greatly in size the 22V10 is integrated in a way that it can be re-programmed depending on the size of the game in each slot. So we could have a single big game that spans all 4 modules, or a mix of different sized games across them.
Based on the physical dimension sizing I could easily fit 2 more modules on here, and maybe even up to 8 in total if I played a bit more Tetris with the components, but more than 4 modules would require even more complexity in the circuit design and this was supposed to be a quick and dirty test board
Despite spending a day learning how the cart addressing works this was a pretty quick build and taught me a lot about how to integrate the modules, component selection, etc. I did also discover that the way I implemented the footprint is going to cause some issues with the production files, so I need to redo that part before I can get these made (and glad I did this because re-doing that on the Seta Multi would have been a nightmare).
So for now this will only work with the 171-7919A donor cart, you'd need to remove all of the old ROMs (or at least lift their enable pins) then install the 10 fly wires, program the ROM modules and the GAL. Theoretically it should be able to support games that utilize the "leftover" gap between IC22 and ROM1 which normally cart conversion on this cart couldn't do. It should also be able to fit games that are larger than that cart originally supported. 4x 1Gbit modules = 256MB and it should be able to support any combination of 1 to 16 games that will fit in that space.
I do want to stress that this was literally something I through together over last weekend as a test board. I've decided with these projects of mine I'm going to design them in a way that I feel makes them useful for myself, and I'm going to share the results with the community, rather than try to make something that I think other people want or like. With that said I'd love to hear any ideas or feedback you have, but I'm not making any promises or setting any expectations.

AlxUnderBase
Enlightened
I like the idea more than a netboot setup ... and what to think more than that (my naomi motherboard still in the box) ? My opinion is every project did by Twistedsymphony's rocking ! I'm feeling like a seal clapping now 

XtraSmiley
Legendary
Amazing work as always!
I would say if it makes things easier not to worry about the plastic shell because I’m sure there will be a 3-D printed solution as long as it fits inside the Naomi shell, but otherwise I have no idea what you were talking about so it sounds great!
I would say if it makes things easier not to worry about the plastic shell because I’m sure there will be a 3-D printed solution as long as it fits inside the Naomi shell, but otherwise I have no idea what you were talking about so it sounds great!

West
Grand Master
That’s so sick @twistedsymphony


West
Grand Master
@twistedsymphony if you make some kind of Naomi multi cart, I’ld be down to make a 3D printable case for it to your spec.
It's not necessary, the current design piggy backs off an existing 171-7919A NAOMI cart and will fit under the original case for that cart.@twistedsymphony if you make some kind of Naomi multi cart, I’ld be down to make a 3D printable case for it to your spec.