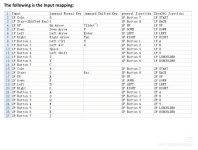
Press the 1P start key for more than 3 seconds to switch to the keyboard shift mode, where there is esc key.
Attachments

Last edited:
Press the 1P start key for more than 3 seconds to switch to the keyboard shift mode, where there is esc key.
Hello, I am the creator of this pcb board. If you have any questions in the use process, you can consult me and I will answer them for you.Greetings everyone, well looking for a manual for this SQarcade I find that I am not the only one, by the way it arrived on Monday since the seller informed me that it is a 100% handmade product, thanks to all those involved in the data collected.
Hello, keyboard mode, press and hold the 1P start key for more than 3 seconds, and switch to jammASD mapping, otherwise it is shift mapping.@Arcade_Lover The SQarcade JAMMA/JVS to PC adapter arrived.
Ordered 10th December so shipping to Europe is between 1 to 2 months.

Nice and neat. No external power or audio amp required.
Here is the JPAC type of setup I've been using for years to compare:

As you can see, the JPAC has no support for audio so you have to DIY solder on the audio cables and power from the amp to the jpac finger board.
It wasn't a drop in replacement as the JPAC compared to SQARCADE devices use different connection:

JPAC has mini USB (in yellow), inverted male VGA Dsub connector (Green) and RCA cables for the amp (Orange).
The SQarcade uses full size USB-A, normal VGA and a 3.5mm audio cable
Connected it up and looks good for a 1st test. PC is configured to output 15K with the latest emu driver and groovymame:

Some questions please:
1. Is there a manual? (It might help answer the next questions!)
2. How to I set the inputs to "MAME" keyboard mode. e.g. P1 joystick down = keyboard down.
Right now the default key for P1 Joystick down = Keyboard P
3. Is there anyway to set stereo "right speaker" to output from JAMMA pins 11 (Right speaker +) and M (Right speaker -)? I know its not JAMMA standard but many cabinets are wired like this for stereo.
4. How do you set the "shift delay" option you mentioned previously? Right now pressing P1 start enables the Shift function immediately so if P1 and P2 press start at once the game exits due to the ESC key being sent.
5. Is there any 15k protection on this? e.g. If the PC tries to send a 24K or 31k signal will it turn off the video output or otherwise protect the 15k monitor?
6. how can I connect up a CPS2 kick harness? Perhaps I crimp some dupont connectors on the end of the harness wires and plug them in as per the below picture:

EDIT:
I was able to get it fully playable. Sound, video and now controls. The keyboard mode didn't work for me (buttons and joystick movements sending odd characters to notepad, definitely not traditional MAME standard). Change this jumper (highlighted in RED) to JOYSTICK (Enables DINPUT Mode) and remove the jumpers for P1 and P2 Button 6 (highlighted in GREEN) (you must remove this jumper otherwise the button 6 is always held down)

This puts the device into DINPUT Joystick mode:

Then you can configure your emulator to use joystick buttons instead of keyboard keys:

Still following with your guidance, Micky. Where you at with this now that you've gotten feedback and updates?Hello @Arcade_Lover
Welcome back!
Could you release a firmware update where the shift function turns off when you let go of the shift button? In the current firmware you hold shift for 3 seconds and the shift mode turns on. But it stays on and you have to press and hold the shift button again for 3 seconds to turn it off. It would be better if you press and hold the shift button for 3 seconds to activate shift but you have to keep it held down and when you let go it reverts back to normal.
Also could you write a full a manual? You are mad to have put all the work in to this and not have a manual detailing every feature it's capable of.
Thank you!
Set switchres to 0 in the mame.ini file. When MAME launches, it simply uses the desktop resolution.I have a question regarding GroovyMame and crt emu driver/switchres.
I've spent a lot of time searching and experimenting but I'm not getting anywhere.
I need to know what how MAME is selecting which resolution to use.
For example, Mortal Kombat and other Midway ROMs always load in 2560 x 480i.
I don't want this. I want them to load in 2560 x 240p. I do not care what anyone thinks about it; it's what I want. No offense intended.
Is there a way to override these settings? If it's in a config file, I can't find it.
I thought maybe I could mess around in arcadeOSD but the geometry settings don't even translate over to MAME.
I have used versions of mame on pi that let you set modelines for each game.
All the guides I've found just tell how to setup crt emu driver but not how to get in there really mess around.
I tried using retroarch and while I could change the resultion to 2560 x 240p, no matter what settings I saved, it defaulted to 2560 x 480i on the next load.
retroarch doesn't even save the y setting in the game overrides.
I'm pretty sure retroarch is a dead end so I'm back to trying MAME.
I suspect what I want to do is not that complicated, but I have a gap in knowledge.
Thanks for any help.
It sounds like you don't have all the resolutions defined in crtemudriver (I think that's where they go). Mortal Kombat isn't interlaced so you're correct, it shouldn't be 480i. It should be 400x254@54hz.I have a question regarding GroovyMame and crt emu driver/switchres.
I've spent a lot of time searching and experimenting but I'm not getting anywhere.
I need to know what how MAME is selecting which resolution to use.
For example, Mortal Kombat and other Midway ROMs always load in 2560 x 480i.
I don't want this. I want them to load in 2560 x 240p. I do not care what anyone thinks about it; it's what I want. No offense intended.
Is there a way to override these settings? If it's in a config file, I can't find it.
I thought maybe I could mess around in arcadeOSD but the geometry settings don't even translate over to MAME.
I have used versions of mame on pi that let you set modelines for each game.
All the guides I've found just tell how to setup crt emu driver but not how to get in there really mess around.
I tried using retroarch and while I could change the resultion to 2560 x 240p, no matter what settings I saved, it defaulted to 2560 x 480i on the next load.
retroarch doesn't even save the y setting in the game overrides.
I'm pretty sure retroarch is a dead end so I'm back to trying MAME.
I suspect what I want to do is not that complicated, but I have a gap in knowledge.
Thanks for any help.
Thanks for the response. I do have all the resolutions defined. The super resolutions are not available without them being installed.It sounds like you don't have all the resolutions defined in crtemudriver (I think that's where they go). Mortal Kombat isn't interlaced so you're correct, it shouldn't be 480i. It should be 400x254@54hz.
Also, I personally think horizontal super resolutions look worse than native and you should use native if you can tolerate having to adjust the monitor per game.
Thanks for the tip! I still want to use switchres, because of the different 240p timings.Set switchres to 0 in the mame.ini file. When MAME launches, it simply uses the desktop resolution.
Thanks but I'm not trying to get rid of custom resolutions. I'm trying to control which resolutions are used with which games.Hi George. It looks like you are doing everything correct there.
Is 2560x240 one of the available desktop resolutions in Windows? (If not add it from vmmaker.exe).
This is the line in mame.ini to avoid using the custom timings:
monitor generic_15
(Usually it's monitor custom)
Adding interlace 0 will probably help too.
Also if you use the Bandicoot and njz3's VideoAmp board with your PC/laptop instead of emudriver you will always get 2560x240p 60hz for everything because it doesn't yet support the on-the-fly custom timings of switchres.
MK with VideoAmp, switchres using 2560x240p

https://www.arcade-projects.com/thr...rd-for-arcade-monitor-with-sync-filter.24936/
The game's resolution is controlled by the game driver itself, you can't really customize it. regular MAME is designed to simply scale the native resolution to the resolution of your display (or the resolution of the window). Groovy MAME is designed to change your display resolution to the native resolution of the game, or some derivative there of if your display can't support the native res.
Groovy MAME was made explicitly for CRTs so that the games can run in their Native Res, it sounds like that's NOT want you want since you want to control the resolution explicitly.
really your simplest option is to switch to regular MAME set your desktop to the resolution you want it to run in and there you go.
Alternatively if you want to have tighter control over GroovyMAME you would set it to LCD mode (there's an ini flag for this IIRC) then limit your supported resolutions to a short list of resolutions that you approve. GroovyMAME will still chose the resolution but it's going to be based on your limited list.
MAME PC-based arcade cabs, nev
Hey. I really love your threads!! I'm a little bit confused. I have an Intervideo 25'' and i want to connect it to the pc. From hardware view do i need special board like vga to cga?Step 4: Input/Output Options to an Arcade Cab
There are three arcade cab-types that we shall concern ourselves with from here:
By fully wired, I mean none of the components inside of the cab that allow real arcade PCB's to be connected and played on the cab have been stripped out. The other thing that you should adhere to is that you want a cab that has a Street Fighter 2 button layout natively. Don't take a Donkey Kong cab and convert it to MAME, someone is going to execute you. Seriously. Sell that to a collector if you have such a cab and ask in the transaction that as part of the deal that you want a Dynamo or 3Koam Street Fighter-style cab. Or just acquire one outright. It is simply to much work to rework a non-JAMMA/JVS cab for MAME. Let alone the mention of how destructive the endeavor is to such a cabinet. If you have a Japanese candy cab, you are mostly set. Just make sure the control panel is 2L12B (2 players with 6 input buttons per player). This will allow you to play most of the games in MAME's library.
- A fully wired JVS w/tri-sync monitor
- A fully wired JVS cab with a VGA-only monitor
- A fully wired JAMMA cab
A Warning Regarding the VGA/RGB Cable on a JVS Cab
Sometime in the past, the VGA/RGB cable in your JVS cab may have been replaced with a standard computer monitor cable. All of the pins on a standard VGA monitor cable will be populated. A JVS cab's RGB cable looks very similar to a standard computer monitor's VGA cable. However, it will only have pins populated for Red/Green/Blue/Video Ground/Sync. A standard computer VGA cable is fine for connecting JVS PCB's to your JVS cab. However, you are now connecting a PC to your JVS cab. Pin 9 on a fully populated computer VGA cable will carry a 5 volt signal from the PC to your arcade monitor. I've seen this blow up a Sanwa PFX chassis before. Best that you ensure that the VGA cable in your JVS cab only has the Red/Blue/Green/Video Ground/Sync pins populated. If your JVS cab's RGB has been replaced by a standard computer monitor VGA cable, remove excess pins with needle nose pliers to be safe. Additionally, we do not want Windows to attempt to perform any EDID. We will set the monitor specifications using CRT Emu.
JVS cab with a VGA-only monitor
A fully wired JVS cab with either a tri-sync monitor or a VGA-only monitor connects to a PC in the same way. The only difference is in the installation setup of CRT Emu. For VGA only JVS cabs, follow the guidance laid out here for 31khz cabs. Additionally, you must not run ATOM-15. This hacks the BIOS for AMD graphics cards to output a 15khz signal as the PC boots up before Windows loads. A VGA only monitor will not be able to display a 15khz video signal. Either way, the video connection for the PC is through the JVS cab's VGA/RGB video connection. The audio is connected from your PC right into the cab's stereo amp. You'll need a 3.5mm stereo jack adapter for this. Something like this:

Find one that you like as there are lots of choices.
As for controls, there is JVS-Pac 2 that simplifies the controls interfacing. Plug your JVS cable into the JVS-Pac 2, plug your PC into the JVS-Pac 2. If for whatever reason you cannot acquire the JVS-Pac 2, it is out of stock or what ever, then you can do something like this with a controller PCB of your choosing.

Though I would no longer recommend using a Zero Delay encoder board (pictured above) for MAME (more on this later), this shows you can be non-destructive as you build out your JVS MAME cab. Your button/joystick harness simply plugs into the adapter that you've crimped together for your controller PCB. This is reversible and therefore non-destructive. There are a few things if you interface controls as such:
I figured out how to do this back when there was no such thing as a JVS-Pac 2. Though I have never used JVS-Pac 2, I would highly recommend going the route of JVS-Pac 2. @invzim makes fine products.
- You'll need the tools to do the crimping
- You'll need the proper connectors and pins to do the crimping
- You'll have to program the joystick input commands in MAME to control the games
- You'll have to do some extra wiring if you want to control coining up through the coin drop
- You'll have to route the USB cable inside of your cab so that it is nice and tidy
JVS cab with a tri-sync monitor
The PC connects same as above mentioned with JVS cab with a VGA-only monitor, however you can run games at native 15khz resolution. Therefore, set GroovyMAME's 'switchres' setting to '1' and install Calamity's CRT Emu driver through GroovyTime to output a 15khz signal from your PC. You can also optionally run Atom-15 to hack the AMD graphics card's BIOS to output a 15khz signal during bootup. Might be a good idea to run Atom-15 should you ever decide to move your MAME rig to standard JAMMA cab.
JAMMA cabinet
This cabinet will represent most scenarios where a user will connect a PC to an arcade machine. From here, there are choices for the input controls interface and we'll go through only the ones you should consider. Additionally, the PC interface for a JAMMA cab also is leveraged for video and audio input.
The J-Pac was the first to market for PC-to-arcade interfacing. It is the least expensive option. MAME natively maps control inputs to specific keyboard keys. There is no need to program inputs to control games with the J-Pac as it is effectively a keyboard encoder. J-Pac also has circuitry that will protect your arcade should you feed it a 31khz computer video signal. However, the J-Pac has its shortcomings:
Similarly to the J-Pac, the JAMMASD has a keyboard encoder built in. There is no need to program MAME control inputs. However, it 1Ups the J-Pac in that it has an onboard audio amp. You simply jack the 3.5mm audio cable from your PC into the JAMMASD and JAMMASD routes that audio goodness to the JAMMA edge connector. Easy as 3.14159. Here are the shortcomings with JAMMASD:
- There is no audio amp
- This is huge
- You'll have to wire up and power an audio amp separately
- There is no direct connection for a CPS2 style kick harness
- You will have to wire up an adapter
- Please, no hacking
- I don't much like the video amp in J-Pac
- I feel it lacks contrast and crushes whites
Though I bought a JAMMASD a while ago, I have yet to have the time to use it. I can't speak to the qualities of its video amp yet but I expect it to be at least as good if not better than J-Pac's. If the decision for me was to only connect a PC to a JAMMA cab, no other source devices like a video game console, and I want to be the most economical in terms of money spent and time spent, the JAMMASD would be my choice.
- It is more expensive than J-Pac
- There is no direct connection for a CPS2 style kick harness
- You'll have to wire up an adapter
- Please no hacking
SCART2ARC30 & JAMMAizer
You can read my comparison of the two over here. With these options, you are afforded the ability to also connect video game consoles which is a huge bonus. If you have one of these devices already, no need to double up and buy a separate interface just for MAME. With MAME, the button mapping advantages JAMMAizer has over SCART2ARC30 is neutralized. Button mapping is controled via MAME's software. SCART2ARC3 has circuitry that will product your standard resolution arcade monitor should you incorrectly feed it a non-15khz signal; JAMMAizer does not. Not a big deal if you know what you are doing with CRT Emu.
The shortcomings going with these devices are:
One last word with any of the devices above and native keyboard encoding (J-Pac, JAMMASD, JVS-Pac 2). No matter what, you will have to do some programming/mapping of input commands to some degree. Whether this is for the front end or for special commands in MAME, like escaping out of a game back to the front end or shutting down the PC. There is just an added step of mapping Up/Down/Left/Right/Buttons 1-6/Start during setup. This just takes a few extra minutes while you are performing some special input combinations mapping anyway. Also, having a joystick/multi-concole PCB allows for other applications like fight sticks and such. Therefore, I don't consider any of the interfaces with native keyboard encoding to have an advantage over joystick/multi-console controller PCB's.
- They are more expensive than the other two options by a good amount
- You'll need to ensure you have purchased the optional VGA connections to connect your PC
- An added expense
- You'll need separate 2x10 controller PCB's with the 2x10 pin header
- One each for 1p and 2p
- Both PCB's are added expenses
- There is no keyboard encoder and you will have to program input commands to play MAME
- Additionally, JAMMAizer is OOP right now
- No word on when it will come back in stock
- SCART2ARC is the 3rd iteration (version 3.0) from Tim Worthington and is readily available now, but......
- The previous 2 revisions had went OOP before
- No telling when/if SCART2ARC30 will go OOP