What's new
All good mate
No it was working fine before water rinse. Sorry for lack of steps. I’m remembering what I did as we talk through this
Before or after? not trying to be a stickler just trying to identify if the fault manifested as a result of the water rinse or pot clean.
 
If you washed the chassis, try adjusting the blue cut off pot on the chassis. It might be that simple.
 
If you washed the chassis, try adjusting the blue cut off pot on the chassis. It might be that simple.
i tried this before and the blue would only get less or more intense. I’ll try again. Any ideas on why the whole monitor shuts down when i adjust brightness/contrast nobs?
 
All good mate

Before or after? not trying to be a stickler just trying to identify if the fault manifested as a result of the water rinse or pot clean.
Yes. It worked before cleaning. Hating myself now thank you. 😂
 
haha no not trying to rub it in, I was under the initial impression this was working fine before cleaning just the pots on the remote board hence my comment earlier
When you cleaned those pots did you adjust them at all? to 'work the insides' etc, this just seems to be escalating somewhat.
What started off as a working tube, to having a simple pot clean has resulted in the neckboard being removed.
but you also washed the chassis as well, key piece of information
 
Any ideas on why the whole monitor shuts down when i adjust brightness/contrast nobs?

MS293x go into shutdown very easily. I wouldn't worry about it too much. Maybe turn down the voltage on the flyback while you diagnose your blue overdrive.
 
I washed the chassis with a moderate spray of simple green and then rinse with a spray bottle of filtered water.

I did not touch the chassis pots otherwise.

For the remote board I cleaned the pots w deoxit mainly because the volume knob was very tough to turn and i thought those pots would have been affected due to them being in the same place.
 
The volume pot is a rheostat, it's supposed to be a bit tough to turn.
 
Some considerations here.
Check or reflow the solder joints for the remote board connector and the pots related to color brit and cont
Ideally you should whip out your multi-meter find out what the values of the pots are and just sanity check that they are within reason.

Then you can move your attention more to the chassis its self.
You are asking how it removes?

The 2930 sits on a metal tray thats held in to the frame of the monitor with 4 screws on the under side and its slotted with some tabs to the frame. Slide the chassis tray it comes loose.
The PCB for the chassis sits on a plastic frame as well. There are screws surrounding the outside of that frame you remove these and it slides out to free up.

However the goop from the inductor next to the HOT can sometimes get between the metal tray and the plastic tray (If its leaked). You can pry at it some and it should free. If its really stubborn you may need to soak that stuff in rubbing alcohol or apply some heat. /

I recently have considered to upload a series of youtube videos about how to access and remove chassis's and quick things to check for these cabs on you youtube channel but have not gotten around to it yet.

But first just rule out the easy to reach easy to check and easy to reseat stuff first before you move to more and more complex things
 
Some considerations here.
Check or reflow the solder joints for the remote board connector and the pots related to color brit and cont
Ideally you should whip out your multi-meter find out what the values of the pots are and just sanity check that they are within reason.

Then you can move your attention more to the chassis its self.
You are asking how it removes?

The 2930 sits on a metal tray thats held in to the frame of the monitor with 4 screws on the under side and its slotted with some tabs to the frame. Slide the chassis tray it comes loose.
The PCB for the chassis sits on a plastic frame as well. There are screws surrounding the outside of that frame you remove these and it slides out to free up.

What is the best way to check pots? I’m sure I could google but thought id ask here. Am I measuring resistance?

Just as you typed this I started to understand the chassis removal. I just don’t want to remove more stuff than i have too. Thank god for the ice cube trays that have been organizing my screws
 
Photo Dump of Chassis and Neckboard. I have a closeup of the black goo which looks like it was addressed at some point? I don’t know what that piece of cloth is
 

Attachments

  • 32126222-58E7-491A-AEE6-3D1A93035565.jpeg
    32126222-58E7-491A-AEE6-3D1A93035565.jpeg
    272.2 KB · Views: 50
  • 22764148-55EF-49CF-B66B-13E9C896315E.jpeg
    22764148-55EF-49CF-B66B-13E9C896315E.jpeg
    153 KB · Views: 50
  • 5A8CC700-8EA6-472B-8438-5CF4091CB797.jpeg
    5A8CC700-8EA6-472B-8438-5CF4091CB797.jpeg
    244.7 KB · Views: 53
  • 984C3B0A-CD2B-44BA-A30A-23D101384E32.jpeg
    984C3B0A-CD2B-44BA-A30A-23D101384E32.jpeg
    226.5 KB · Views: 51
  • F9478574-9D39-4112-9225-09AFA4B6E241.jpeg
    F9478574-9D39-4112-9225-09AFA4B6E241.jpeg
    233.6 KB · Views: 53
  • A5454DA2-9FE4-4E80-A79F-34DB17A429CB.jpeg
    A5454DA2-9FE4-4E80-A79F-34DB17A429CB.jpeg
    157.3 KB · Views: 58
Un obstructed shot of neck board. Not noticing any cold joints, but does any else’s 2930 have this stuff going on w the hot glue and the green wire?
B1C76841-09BC-4786-AAAE-81A9023ECB85.jpeg
 
A lot of those look not great but it could just be the photo.

I am not in love with R305, R315, and the joint above J311 looks damn near cracked but could just be something else, as photos are never perfect. Another joint near J311 is not excellent but I bet it’s at least connected.
 
I will just give it a flow w a bit of fresh solder. Can’t hurt right?
 
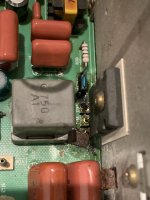
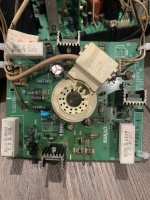
This center pin solder on this drive transistor looks like its broken and needs re-flowing ( arrow pointing it out)
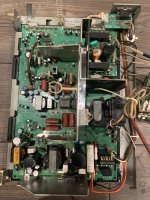
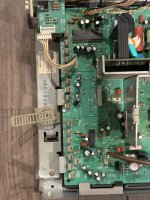
Everything in the boxes I would just go ahead and reflow at minimum while you have it out. Anything else that looks dry or cracked (has a dark ring around it) reflow too.

Something I keep in mind is if it gets hot, has physical connectors, or has any kind of physical stress points its probably worth it to inspect it and or reflow it.

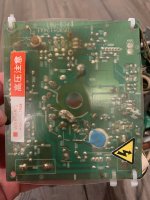
Checking the pots would require you to know the value, there's a 3 digit code number printed on each pot that represents its value.
So if the pot is marked for 1k ohm then you need to take your multi-meter and measure from the outer two pins it should read close to 1k ohms.

Checking the center pin gives you the reading of what its set to. The other probe on one of the other two pins, that center pin is the difference in resistance of where the pots screw/wiper is set to compared to the left or right side of that center pin.

So for example if the adjustment pot is set to the center point of a 1k ohm pot your reading of the center pin should be roughly half of 1k ohms and so on depending where its set to.

But just make sure the solders on the pots look good and you read a value close to what the value is supposed to be.


---------
Edit:
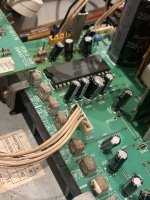
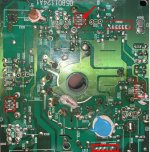
I would just reflow anything that looks dull or has cracks or circles. That neck board has a lot of cold looking joints but they may not be compromised its hard to tell.
 

Attachments

  • Untitled.jpg
    Untitled.jpg
    287.4 KB · Views: 69
Last edited:
4F6E7D8B-C09A-439D-963F-3BC405B5E0CE.jpeg

Here are the remote pots… i should be getting close to 332 ohms on the outside pins based, correct?

R-Gain: 2.71k (edited from 271)
B-Gain: 2.99k (edited from 299)
Bright: 835… ?
 
Last edited:
4F6E7D8B-C09A-439D-963F-3BC405B5E0CE.jpeg

Here are the remote pots… i should be getting close to 332 ohms on the outside pins based, correct?

R-Gain: 271
B-Gain: 299
Bright: 835… ?
the proper way to test is to hook the meter up to the pot, and slowly move it from 0 to max. if the number values climb gradually it is an indicator of a good pot assuming it reaches near full value at the max range. if the values skips all over on your meter as you slowly move it, chances are its toast and/or needs cleaning. keep in mind a shitty meter might not be able to keep up, so move it reasonably slow.
 
Ok this is what I’m using. My dad’s an electrician but I’m kind of a noob w the multimeter… any advice on how to set this thing? I have it on ohms, not sure about how to set the range w the yellow button in the middle
17811EFD-A627-477A-B330-48D08F23D6B9.jpeg
 
Back
Top