What's new

twistedsymphony

Enlightened
Staff member
Immortal
Joined
Jul 21, 2015
Messages
11,718
Reaction score
13,181
Location
NH, USA
These housings are designed to be used in Conjunction with the Darksoft Reproduction CPS3 Security Cartridges: CPS3 Repro Carts coming (very) soon!!

There are essentially 3 configurations of the files here each with a unique purpose.
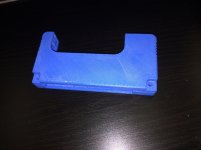
  1. The standard front and back housing are designed to be used with reproduction security cartridges or modified "Super Bios" carts that do not have a battery. Since the reproduction cartridges don't have a housing to go with them hopefully this 3D printed housing will serve as a useful alternative to stealing one from an original cartridge.
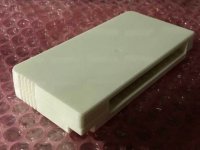
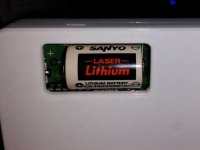
  2. The back housing with a "Battery window" includes a cut out designed to accommodate the large battery that sticks out the back of an original, un-modifed security cart. the window is elongated to the left to accommodate a larger replacement battery that may use the larger foot-print solder points. this also allows you to easily see the production month/year of the battery for easily determining when a replacement might be needed.
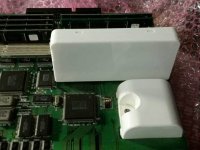
  3. The "battery replacement jig" variants of these parts are to help facilitate a live (powered) battery swap, by providing stabilization to the cartridge PCB and reduce the risk of power loss during a battery replacement which could kill the cartridge.*

*NOTE: please test the stability your printed jig provides before attempting a battery swap, not all 3D printers will provide results consistent with my own. As such I assume no responsibility if a jig printed using these files does not hold the cartridge tight enough to prevent power loss during battery replacement. Use this at your own discretion.

More Details can be found on my blog here: http://solid-orange.com/1457

As with all of my 3D printed projects the files are provided free of charge and can be downloaded on my Thingiverse page below. Please read the print details section before printing.

DOWNLOAD THE FILES TO PRINT YOUR OWN HERE: http://www.thingiverse.com/thing:1690059

BUY ONE FROM ME HERE:

MultiBIOS housing: https://bit-district.com/arcade/capcom-cps3/capcom-cps3-multi-bios-cart-housing.html
Battery Jig: https://bit-district.com/capcom-cps3-battery-replacement-jig.html


For those of you who are so inclined, there is a donation button on my blog if you'd like to help support this and other projects of mine.

Any questions, comments, or concerns please post below, photos of your prints are also appreciated as well
:thumbsup:
 

Attachments

  • cps3_cart_housing.jpg
    cps3_cart_housing.jpg
    23.9 KB · Views: 180
  • cps3_cart_housing_battery_window.jpg
    cps3_cart_housing_battery_window.jpg
    17.2 KB · Views: 164
  • cps3_battery_replacment_jig.jpg
    cps3_battery_replacment_jig.jpg
    30 KB · Views: 164
  • cps3_cart_housing_installed.jpg
    cps3_cart_housing_installed.jpg
    35.6 KB · Views: 185
Last edited:
Awesome as always T :thumbsup:

Did you actually recreate that little depression in the front shell form the injection molded case? or is that just my eyes playing tricks on me. If it is, wow, talk about attention to detail.
 
Did you actually recreate that little depression in the front shell form the injection molded case? or is that just my eyes playing tricks on me. If it is, wow, talk about attention to detail.
haha, no. My aluminum build platform has a screw right in the center. I've filed it down but it still has a very slight raise to it right there. if I built on painters tape you probably wouldn't see it but I use kapton tape which is so thin it means even scratches in the built plate are sometimes visible on the bottom surface. That's also why the build surface comes out so flat and glossy... if I were using painters tape it'd have the same texture as the painter's tape.
 
Gotcha, Always wondered how you got it so smooth on those test prints. Kapton tape aint cheap, can you use the same strip for a few prints?
 
Kapton tape aint cheap, can you use the same strip for a few prints?
It's not bad. They sell it in 10" squares specifically for 3D printing. i bought a 10 pack about a year ago on amazon (I think it was like $30) and I'm only on sheet number 2... and that's really only because the first sheet got a few tears in it (which was totally my fault)... of course I screwed up another 2 sheets trying to apply them to the platform too, lol
 
Can someone in USA and someone in EUR offer them for sale?
On the Thingiverse page there's an "Order this Printed" button that will connect you to 3D Hubs... 3D Hubs is a service that helps find you someone with a 3D printer in your area... kind of like AirBnB or Uber for 3D printing.

Of course if there are members here willing to offer the service I'd suggest them first, but 3D hubs is an alternative that's always there.
 
Not to de-rail the thread, but what's the need for the battery on the repro carts? I thought they were no longer needed with the Super Bios?
 
Not to de-rail the thread, but what's the need for the battery on the repro carts? I thought they were no longer needed with the Super Bios?
there is no need for the battery on the repo carts, that's why configuration "1" as explained in the top post has a flat back with no hole for a battery.
 
The print worked pretty good. Here are some pics

2uescnq.jpg


30dlddt.jpg


1pfo6p.jpg


The only issue I would foresee is in the last picture. Where the two clips on top of the cart snap in. The strip across is very thin. Not really a problem if you just keep the cart pcb in the case full time. It definitely does the trick and is an awesome replica. Way beyond what I expected.
 
Thanks for the pics!

I'll say it's not my best work, there are definitely areas where it could be improved, but i fiddled with this thing for so long that I had to draw a line in the sand and say "this is good enough to do what it needs to do" and call it there.

The clips do make or break how well everything fits together. and the quality of the clips really has to do with the supports and how well your printer handles overhangs.
 
I wonder how the resin printer will do those clips. I think it might do well, but I think to do this cart I might have to get FormLabs tough resin, their standard resin is a little on the soft side for those clips to hold up. I will give it a shot and see how it comes out.
 
I'm interested to see how the resin printer manages this as well.

I've got in the habit of 3D modeling my own supports as I've found the auto-support generation to be really lacking and since I started doing that the results have been much nicer. Unfortunately the supports I'm building are designed based on my own printer setup so they're not really translatable. However if anyone is planning on printing a lot of these Shoot me a PM with your nozzle size and layer height and I can give you some models with integrated supports to try.
 
Yup, I am doing both the closed and open jig carts on the resin, the auto support is pretty good on the software so we will see how they come out.

I am having a friend do a print with ABS, but I think his printer only goes down to 100 microns, dont know what to expect on how they will come out. On my resin I went down to 25 for the DC tray, the results were pretty fantastic to me, almost looks like it was injection molded.
 
I am having a friend do a print with ABS, but I think his printer only goes down to 100 microns, dont know what to expect on how they will come out
The lowest I can get is 50 microns and that's if I swap to a smaller 0.25mm nozzle. most of the time I'm printing at 200 microns with a 0.40mm nozzle, which is what all of my prints have been for this project.

100 micros should make for a very good fit along the parameter lip, however lower layer height makes for less stable overhangs so you'll definitely need to make sure your supports are built well.
 
So I had a buddy print these out in ABS, not crazy about the quality, but the cart is super stiff, feels like it was injection molded, but again the finish is not as nice as with my resin printer. I am ordering some tough resin from form labs to see how much stronger and how the finish is on the resin printer.

IMG_4696.JPG
IMG_4697.JPG
 
Back
Top