What's new
After sorting into different color piles. This cab is ready for the Powder Coater!

E99-D54-A0-0-AA2-4-B95-A53-A-4-E4-AA418-B0-E7.jpg
Love this picture. "What is a cab? A joyful little pile of secrets." Awesome Progress! :thumbsup:
 
Last edited:
Time to take a bath!

993812-AE-691-B-4473-A11-A-B7-F3-C9-C4-AED6.jpg


I soaked the wire pasta for 20 minutes to loosen up the silt and smoke it it had accrued over the years.

I scrubbed and sprayed inside the connectors like the Jamma and CP connector knowing full well I would be evacuating any water in this next step, Already it's looking amazing to what it did 20 minutes ago..

8-BB16-CE7-5-C73-4880-8-A20-4431-EE406-BD1.jpg


I bought a new spray trigger from Harbor Freight, and began to blow out each connection removing all air from connections to components.

FABA9-DB2-7162-40-B5-8857-889-D5-DE7-BCBD.jpg


There is a heat wave currently in Bellingham so I laid the wires out in a sunbath to finish the job.

8879-B9-FE-7221-4-FDD-9619-EADEE4-A03-C18.jpg


The wires looked great. The zip ties not so much. They reminded me of crackhead teeth and cigarettes.

9248-E00-B-8-D22-4-DBE-A4-EC-14325-FCCDFF9.jpg


I zipped new ties next to the old ones and added a few more where I saw fit.

B8983-CBA-5-EB2-40-C4-B246-799-DA0-D5550-C.jpg


The monotony paid off and 76 ties later I had a nice harness to pipe my Jamma connections from.

86-F1-D4-B4-2-AAC-43-CE-B036-19-B7-FD6-D350-D.jpg


Here's a contrast to the old ones from the extra tie I had to snip. Don't the old ones look like fingernails and toenails?

E8-F466-E7-66-B9-4-B24-806-B-991-FC46250-D0.jpg


With time leftover. It was time to tackle the Control Panel.

3-DF1117-E-F573-47-E6-A09-F-64-E2-C13-A523-E.jpg


The buttons were made out of Necco candy and would break when touched. These are going to the bin. A bit closer

8-AF0-D090-107-B-49-A0-9-A8-B-1-E181-FA9-ED36.jpg


The joystick connections were soldered to the fork contacts. personally, I would prefer a crimped connector. The joysticks were stiff and mushy. I would like to replace them but I don't know which ones today would replace these with? Any recommendations are welcome

D7535-AD5-F2-EB-4397-A873-D27-DC99-D0-B07.jpg

C5-BA1376-6705-4-FE1-9-BE6-FDE41-EBB56-D8.jpg


I had two "gifts" from each joystick when I went to remove them. The left joystick had this weird bug in it who crawled out to yell at me when I disturbed his home.

5-C1-D0-F22-CC46-455-E-9732-7968-A08-E1-B95.jpg


The right joystick dumped out a 30 year old cigarette. At least they were kind enough to not put it out on the vinyl?..

BB458-F0-F-739-F-4729-B884-47331524-F3-C4.jpg


The panel is mostly cleared minus these wire guides noted in this picture. I can now move on to removing the vinyl graphic from the CP. I plan on sending @alberto1225 the scan so he make me one not covered in tobacco smoke.

97-E417-C4-A1-AB-4-CE6-A17-C-DD20594759-CA.jpg


The vinyl was stuck pretty good. After jamming a razor in one. I was able to start gripping and pulling evenly to avoid tearing.

C485-F977-2706-4638-857-A-C644-F7-C7-A8-A8.jpg

4400-B1-EB-51-D1-4401-BB37-ACFF917-DA30-C.jpg

9-FC9-CF23-1-DEF-42-FF-98-E2-D858-EC870-E67.jpg


I'm off to Kinkos to scan my first CP overlay!

489-A3208-93-FC-403-F-A190-56-B5-CC1-FA1-D2.jpg
 
Last edited:
Its been awhile since I posted.

I had an issue with the powder coating color.

I was going for a "chocolate chip mint" but it turned out more like a Bluish green.

The Powder coater agreed to recoat the entire cab for free, but asked that I decide the color for the cab.

He uses Prismatic Powders:

Here is the link: https://www.prismaticpowders.com/?g...EDZU2TOrKLJJNLMsDmiVeQakNO2St4hRoC4uwQAvD_BwE

Here are some pictures of the original colors:
18029-a596dd7442aa0cfcfff9b151c4577293.jpg

download.jpg

Sigma-Fantasia-28.jpg

Sigma-Game-Fantasia-28-14.jpg


I used a color picker software on one of the image to get an idea of the brighter shade:

Screenshot-2023-08-13-114415.png


and darker shade:

4.png


The Prismatic Powders Seafoam green is a close match to my brighter pic:

6.png


But in their finished example, It looks sky blue and not minty green at all..

7.png


Any color match experts out there that can help me get this final coat on Point?

I would love to hear your input AP people!
 
We used to do color matching for injected molded parts at work using a spectrometer. We have since pivoted from doing anything like this, but still have the spectrometer. It's pretty straightforward in use -- it has a chamber you drop a part in, hit the magic button, and it gives you the mixing ratios for color additives. I'm fairly certain it will also give an exact color code as well. I don't want to make any promises (and you may not be interested in this route, anyway), but I can check tomorrow to see if it's still functioning/calibrated.
 
We used to do color matching for injected molded parts at work using a spectrometer. We have since pivoted from doing anything like this, but still have the spectrometer. It's pretty straightforward in use -- it has a chamber you drop a part in, hit the magic button, and it gives you the mixing ratios for color additives. I'm fairly certain it will also give an exact color code as well. I don't want to make any promises (and you may not be interested in this route, anyway), but I can check tomorrow to see if it's still functioning/calibrated.
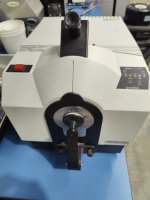
I might take that route if your accepting a piece of my metal.

Im not sure if Prismatic Powders can locate color based on code. They don't have a color finder on their website and their offices are closed till Monday.

Ill call in and see if they have a color match process after the weekend and go from there
 
It's straight forward enough that I'd be glad to do it if everything is still in order. I will send you a PM tomorrow.

EDIT: Even if they don't color match, they should be able to objectively give you their closest match if you can provide a PMS code :)
 
Last edited:
It's straight forward enough that I'd be glad to do it if everything is still in order. I will send you a PM tomorrow.

EDIT: Even if they don't color match, they should be able to objectively give you their closest match if you can provide a PMS code :)
Well thanks. That's very kind of you.

I ended up using their color match service.

They have me ship them a piece of the machine, color match and send me the powder SKU.

The whole service including shipping costs about 30 bucks.

Hopefully this helps other color candy owners. Fingers crossed
 
That's definitely more surefire. I did verify our machine still works and accessible, so if anything changes feel free to DM me. Hard to beat 30 bucks with a guarantee :)
 
That's definitely more surefire. I did verify our machine still works and accessible, so if anything changes feel free to DM me. Hard to beat 30 bucks with a guarantee :)
I want to see your machine and know more about it lol.

That sounds like a relevant service around here
 
I'll take a pic tomorrow. It's getting old now, so don't expect anything too fancy, lol. But I agree. It's literally been collecting dust on the shelf for 8 years or so. I think the machine itself is about 15 years old.
 
Here she is. 16 years old. It was calibrated (re: verified to function correctly, then slap a sticker on it) one last time before end of life on the unit about 8 years ago. It still powers on, but I'd have to install the software on an older laptop to totally dig in. This machine was about $70,000 when purchased, if I recall correctly. Worth a small fraction of that now, of course.

To use it, you release the black lever that hides an aperture. You then take a piece of whatever you want matched and clamp it between the black piece and aperture. Bingo bango, the software kicks out an analysis.

It could be useful for developing a PMS table of commonly restored cabinet parts and artwork. Though I imagine most NOS is still not quite "original" in color, be it artwork or painted components. At the very least, it's dead simple to use and of no practical use to us anymore.
 

Attachments

  • IMG20230815160807.jpg
    IMG20230815160807.jpg
    120.1 KB · Views: 53
Last edited:
The company color matched #tropical breeze green. It looks looks exactly like the underside of my coin door on my other Fantasia. Thanks @nem

0-EAD1-EC9-9-C4-A-4-F68-91-BA-07611772-F3-D7.jpg

38733-C72-953-A-4220-8876-7-EDDE191-A879.jpg


I sanded and coated the grey parts a “Super Chrome”

D5-C06257-924-C-4171-9335-527-C2-CACF4-C0.jpg


This time I decided to disassemble one of two cabs because of the 300 or so screws in this Sigma cab.

I brought the next unfinished cab JIC

E6-AF7-F45-7-DE8-4105-B979-3-CB429-FF15-F9.jpg


This should be alot of fun putting back together.

Bonus points for anyone who knows how to clean out interior screw thresholds over new powder coating. Im curious if I should take a Tap and Die Approach or small drill bit to knock off the powder remnants..

Also thanks @SC-Ultra for helping me haul these beasts.
 
Last edited:
Back
Top