Blast City / Astro City / Astro City 2 / NNC - Restorations

IMG_3339.jpeg


My tube / chassis I just got repaired doesn’t have this plastic cover on the back of the neck board. I’m worried if I install the metal shield it will contact the back of the neck board. That neck \ neckboard seems to stick out just a little more making it a little close for comfort.

I was thinking of just getting a piece of clear plastic and cutting it to size or does anyone have any suggestions?

IMG_3340.jpeg
 
Last edited:
Even with totally new tube and chassis I still have this crazy green tint over black screens. I’ve messed with gains I can’t figure out what this could be if I have replaced both tube and chassis. Could my power supply or some other component be causing this?

This is the Mister update script where it is basically green and not black.


IMG_3358.jpeg
 
Got my speaker cover repainted! Can’t find 2 of my black screws for the marquee but looking pretty good!

IMG_3335.jpeg


IMG_3338.jpeg
Beautiful job!
I have one too

They are ms8-29fsg for astro 2, mines the same (the owners manual suggests even sanwa chassis were an option, pm1745, but never seen one factory delivered with one).

The bolts youre missing are m4 x12length , security torx button head. Im sure a hardware or bolt shop should have something similar even normal torx or allen drive button head. Could even paint the bolt heads black of needed.

Not sure if youve seen but i uploaded an english manual a few years back, should help with things like bolts sizes parts etc
http://wiki.arcadeotaku.com/w/Sega_Astro_City_2
 
Beautiful job!
I have one too

They are ms8-29fsg for astro 2, mines the same (the owners manual suggests even sanwa chassis were an option, pm1745, but never seen one factory delivered with one).

The bolts youre missing are m4 x12length , security torx button head. Im sure a hardware or bolt shop should have something similar even normal torx or allen drive button head. Could even paint the bolt heads black of needed.

Not sure if youve seen but i uploaded an english manual a few years back, should help with things like bolts sizes parts etc
http://wiki.arcadeotaku.com/w/Sega_Astro_City_2
Interesting I found 3 black security head screws I labeled with a ? mark maybe those are them. I was using shorter ones i found that i ended up finding 3 of again lol. Thanks for the info ill double check these.
 
Interesting I found 3 black security head screws I labeled with a ? mark maybe those are them. I was using shorter ones i found that i ended up finding 3 of again lol. Thanks for the info ill double check these.

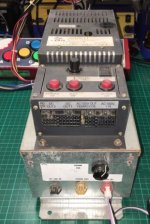
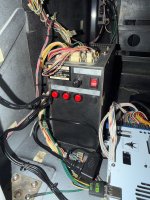
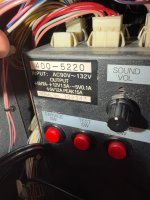
Out of interest, did you change the power supply in your machine, or did it come with that 4198 PSU unit?

The astro city 2 came with 400-5220 originally, the real tall power supply, per the Sega manual.

My friends Astro 2 still has the 5220 in it as well.

Mine however, has the 400-5261z (still 5v 12amp), as well as the sega stereo amplifier underneath it. Looks like the photo i attached. Perhaps swapped from a new astro city?

I originally got my Astro 2 out of a local arcade, back in 1999 (and I used to play it in this same arcade between 1996-1999). So it was either
1. Shipped with it from factory - unlikely
2. Someone in Japan changed it over before it was shipped to Australia
3. Local arcade swapped it out here in Australia with one from another Sega cab

I know theyre all plug and play, but just curious. I guess people just swap them when they have issues, I just found it odd mine was already a different psu part number and it was only 5 years in age at that point in time, so psu failure that early seems unlikely.

 

Attachments

  • 5261.jpg
    5261.jpg
    146.4 KB · Views: 11
Last edited:
Out of interest, did you change the power supply in your machine, or did it come with that 4198 PSU unit?

The astro city 2 came with 400-5220 originally, the real tall power supply, per the Sega manual.

My friends Astro 2 still has the 5220 in it as well.

Mine however, has the 400-5261z (still 5v 12amp), as well as the sega stereo amplifier underneath it. Looks like the photo i attached. Perhaps swapped from a new astro city?

I originally got my Astro 2 out of a local arcade, back in 1999 (and I used to play it in this same arcade between 1996-1999). So it was either
1. Shipped with it from factory - unlikely
2. Someone in Japan changed it over before it was shipped to Australia
3. Local arcade swapped it out here in Australia with one from another Sega cab

I know theyre all plug and play, but just curious. I guess people just swap them when they have issues, I just found it odd mine was already a different psu part number and it was only 5 years in age at that point in time, so psu failure that early seems unlikely.

Which PSU do I have?
 

Attachments

  • IMG_3368.jpeg
    IMG_3368.jpeg
    496.3 KB · Views: 19
  • IMG_3367.jpeg
    IMG_3367.jpeg
    371.3 KB · Views: 17
Hey guys I’m revisiting my Tekken 4 and Tekken 5 buttons issue.

I had everything setup to work with a Mistercade and all 6 buttons worked for games like Street Fighter 2.

I had my system 246/256 connected to a JAMMA IO and purchased a System 246/256 extra button harness from eBay from the Namco JAMMA IO board into the Blast City.

However buttons 3 and 4 were swapped and those same buttons swapped for P1 and P2 (ie gotta use P2 kick buttons to make P1 perform a kick.

It also shows certain P2 buttons being held down even though they are not physically being pressed.

IMG_3371.jpeg


I then realized maybe mistakenly “maybe I can have USB coming out of my Tekken units and into my Sega IO board rev b and somehow get all the buttons over JVS instead of JAMMA?

@Lemony Vengeance built me a custom harness to get all of my buttons working when I first got my Blast City that worked great u til I decided to move my Naomi into another cabinet. I’d like to bypass the JAMMA IO completely but I think that’s the only way I can power my System 246 and System 256.

Not sure if anyone can help me out? I’m quite confused.


IMG_3376.jpeg


IMG_3375.jpeg
 
I also have this guy. Left label says “Buttons 4,5 P1 P2 only for namco 246 IO board” right label says “Buttons 6 P1 P2 only for Sega IO board”

image.jpg
 
Last edited:
I turned my brightness on the adjustment CP board way down and then increase brightness on the fly back and think I fixed my green tint issue for the most part. I fiddle with voltage adjustment slightly too as I totally didn’t realize there is a POT on the side of the PSU. Picture still seems slightly washed out but I’ll take it for now.

image.jpg
 
Does this chassis not have cutoffs or it is more like the MS8?

Also, you really want color bar gradient up (like CPS2 menu) to properly set the colors. Get them all equal and visible for entire range without the gradient disappearing on the far right side and just make sure your white is true white.
 
Last edited:
Does this chassis not have cutoffs or it is more like the MS8?

Also, you really want color bar gradient up (like CPS2 menu) to properly set the colors. Get them all equal and visible for entire range without the gradient disappearing on the far right side and just make sure your white is true white.

I have an M8-29FSG chassis I believe. Are those the pots on the side of the chassis? R G and B bias?

I’ve never touched those before.
 
Got my monitor pretty good adjusted the RGB bias on the side.....but im getting brightness fluctuations. Things will look perfect for a few mins then get brighter or darker. Testing my Mistercade 1 as well to see if that's the issue. Currently using a Mistercade 2.

I am not sure if this was always happening or I just noticed it after adjusting everything.

Thinking it could be the chassis or my power supply but idk. Prob gonna try to swap my Sharp restored chassis in this weekend to see if that makes a difference. I feel like im so close lol. Would love to get PSU recapped if anyone in Socal can do that for me.
 
Last edited:
Try turning the flyback down slightly and see if it still does it. Not normal behavior.

I tested this and seemed like it worked at first, but unfortunately it is still happening. Really easy to see on the options for Final Fight CD. Seemed like it started after it warmed up a bit. Will probably try the chassis swap since I have another one on hand.

I turned the screen POT on the flyback down and then increased with the brightness knob in the Control Panel almost to the max to get things back to visible and looking good but then the brightness started fluctuating again, when I stopped making adjustments and was testing.
 
Last edited:
Got some thin plexiglass sheets from Amazon and cut it to the size of the neck board, punctured holes and zip tied and installed my metal shield. Always nice when you can recreate a part or take care of a detail that’s bothering you.

IMG_3551.jpeg


IMG_3547.jpeg


It was way too hot here in CA today.


IMG_3552.jpeg
 
Back
Top