Almost there!


You are using an out of date browser. It may not display this or other websites correctly.
You should upgrade or use an alternative browser.
You should upgrade or use an alternative browser.
Complete! Haggard lookin' Konami Windy Restoration
- Thread starter opt2not
- Start date
Barth0lin0
Professional
what a perfect restoration ! Congrats !
Can I have a picture of the led marquee light wiring ? I definitely need to change my power hungry bulb for a led in my windy 2!
Can I have a picture of the led marquee light wiring ? I definitely need to change my power hungry bulb for a led in my windy 2!
Kidkaos
Champion
The link says not available.

There's really not much to it, and when you order the LED bulb there are instructions included. But there are 3 wires coming out of the power connector in the Windy's: GND (green), Neutral (white) and Hot (Black). Connect the GND to the metal of the light holder (which should already be done), connect Neutral or Hot to one of the pegs on one end of the LED bulb, connect the other wire to a peg on the other end. Completely bypassing the Ballast and Starter. That's really it.what a perfect restoration ! Congrats !
Can I have a picture of the led marquee light wiring ? I definitely need to change my power hungry bulb for a led in my windy 2!
There are plenty of other listings, just do an Amazon search for F15T8 LED Tube and a ton will show up.The link says not available.
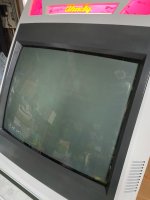
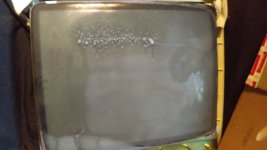
Let's talk about the monitor scratches.
First, to the person(s) that scratched their initials into this monitor glass -- BIG fuck you! Now that is out of the way, I spent a good 3 hours trying to buff these scratches out of the glass, unfortunately I was only able to reduce it a little bit.
Before, the scratches were deep, you can catch your fingernail on them. Now they're smoother, but you can still see them when the monitor is turned off.
I used this 1200 grit Diamond Compound used for polishing up glass, metals, etc. with a buffing wheel in my drill.
At first I made the mistake of trying to smooth out the scratches with high-grit sandpaper. Thinking that I can remove smaller scratches with the Diamond compound. Well that was a misstep, I should have just used the compound and the buffing wheel.
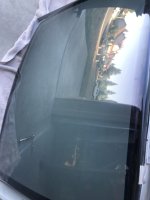
Before:
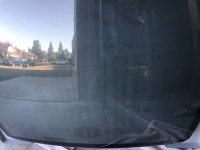
After:
The scratches are less pronounced, but the part where I sanded is noticeable. FML
Then I buffed the whole damn monitor and overall it came out ok. I'm still not happy with it, though.
It does look better, and the scratches aren't as deep now.
I'm going to leave it, but I want to come back to this sometime later with a heavier grit compound and see if I can get the remaining scratches reduced. I dunno maybe I’ll just leave it altogether.
c'est la vie
Attachments
Last edited:
duffcon
Professional
That's been my experience with polishing. Granted I have no idea what i'm doing lol. I had a tube that had a Heater/Cathode short along with weak guns and scratches. So I figured I had nothing to loose so I gave it a shot and got about the same result.
@Hatsune Mike seemed to have pretty good results with his scratches…
Polishing a scratched monitor
Could it be a coating that is all marred up?
Polishing a scratched monitor
Could it be a coating that is all marred up?
Yeah I think I'm going to come back to this later on and see what I can do.@Hatsune Mike seemed to have pretty good results with his scratches…
Polishing a scratched monitor
Could it be a coating that is all marred up?
It doesn't seem like there's a coating on this. As I was polishing it, I didn't see the coating come off at all.
But I will read through Mike's post and see what I can do to this tube.
Yeah I think I'm going to come back to this later on and see what I can do.
It doesn't seem like there's a coating on this. As I was polishing it, I didn't see the coating come off at all.
But I will read through Mike's post and see what I can do to this tube.
You could grab some lapping compound and give that a go or just start with straight up sandpaper at 1000 grit and work your way towards 3000 (maybe go up to 10,000) and then polish compound etc. Idk. many ways to skin the cat I think. You can definitely get it sorted. Just takes lots of steps haha
The eagle has landed!
I gotta wait a week or so for the repro control panel from @alberto1225 , so I put the Astro one on there for now. But I'm calling this done! It's in the house, fully functioning, ready for our party tomorrow.


Recap of the last few items:
I populated the cab with all the hardware. Had to drill some new holes into the metal mounting plate for the monitor chassis, since the holes there were for the D29CR55 chassis.

Wired up the entire cab, managed cables with the existing cable tie-downs.

Does this happen to you? Tie-downs that lost their stickiness?

What I do is pull the old tape off of it then put new Gorilla Glue mounting tape on instead. This stuff is strong, and can withstand the heat!

Coindoor bits are in too. Coin mech, reject slot, etc... installed the locks, as well as the keyless lock for the service door (I put these keyless locks on all my cabs).

I'm extremely happy with how this came out! Roughly a 1.5 month restoration. Not bad, not bad. Definitely a lot faster than I was initially planning, but the wife wanted me to finish this for our daughter's b-day party so I could have it out and playable for the kids. Hey, if she's on board for whatever reason, that's all I need.")
There are still a few smaller tasks that I still need to do to it, like install the new repro CP, add a volume pot to the cab since these early version Windy's didnt' have it. But as it stands it's fully ready for playing.
Big thanks to the following people who helped me out during the project: @snake_eyes_ex @Aurich @PASTBLASTER @Asobu @cruzlink2 @kikaso @Mukuro_W you all were a big help!
I'll update this thread when the new panel arrives.
Cheers all!
I gotta wait a week or so for the repro control panel from @alberto1225 , so I put the Astro one on there for now. But I'm calling this done! It's in the house, fully functioning, ready for our party tomorrow.
Recap of the last few items:
I populated the cab with all the hardware. Had to drill some new holes into the metal mounting plate for the monitor chassis, since the holes there were for the D29CR55 chassis.
Wired up the entire cab, managed cables with the existing cable tie-downs.
Does this happen to you? Tie-downs that lost their stickiness?
What I do is pull the old tape off of it then put new Gorilla Glue mounting tape on instead. This stuff is strong, and can withstand the heat!
Coindoor bits are in too. Coin mech, reject slot, etc... installed the locks, as well as the keyless lock for the service door (I put these keyless locks on all my cabs).
I'm extremely happy with how this came out! Roughly a 1.5 month restoration. Not bad, not bad. Definitely a lot faster than I was initially planning, but the wife wanted me to finish this for our daughter's b-day party so I could have it out and playable for the kids. Hey, if she's on board for whatever reason, that's all I need.
There are still a few smaller tasks that I still need to do to it, like install the new repro CP, add a volume pot to the cab since these early version Windy's didnt' have it. But as it stands it's fully ready for playing.
Big thanks to the following people who helped me out during the project: @snake_eyes_ex @Aurich @PASTBLASTER @Asobu @cruzlink2 @kikaso @Mukuro_W you all were a big help!
I'll update this thread when the new panel arrives.
Cheers all!
Kyotaro
Student
I remember seeing the Windy ad on Offerup and it looked rough and def a project needed on it.
Looks great! enjoyed the well document journey in this thread.
Looks great! enjoyed the well document journey in this thread.
West
Grand Master
Beautiful work and awesome seeing the whole process.
Whatcha putting in the cab for the kiddos party?
Whatcha putting in the cab for the kiddos party?
very nice job, my dude. enjoyed following along thru the whole process.
I like to run a crappy Pandora’s box for parties, especially for the kids who don’t care about real hardware. It’s easy to install, easy for them to navigate the selection menu, and they just want variety.Beautiful work and awesome seeing the whole process.
Whatcha putting in the cab for the kiddos party?
After this party I’m going to rotate the monitor and have this cab more dedicated to shoot-em-ups.
West
Grand Master
@opt2not Smart. Whenever my kids friends or non-arcade friends come over a PB in the cabs usually win. I pair it down to like 30 games I know everyone will dig, all killer no filler. Curated variety.
A light gun setup is also a great party pleaser in my experience. But depending on the age of the kids the gun factor can rub some parents the wrong way. For inebriated adults its gold.
Either way congrats on finishing the cab. It’s lovely.
A light gun setup is also a great party pleaser in my experience. But depending on the age of the kids the gun factor can rub some parents the wrong way. For inebriated adults its gold.
Either way congrats on finishing the cab. It’s lovely.
duffcon
Professional
Did you end up living with the scratches?
In the monitor? I'm going to try another polishing pass later on. For now I'm just going to enjoy this cab being functional and looking sexy.Did you end up living with the scratches?
Battlesmurf
Grand Master
RE: Glass- novus 2/3 to get the coating. For E2/Astro and various others, it's a purple ish tint. For the 24"/25" monitors, a lot of the times there is no coating that I've seen. I'm curious about this one.
Then- get stuff specifically for glass. No sandpaper.
https://www.amazon.com/GP28002-Glass-Scratch-Scratches-Diameter/dp/B007CJI6HQ
So Novus with a buffing pad, then the glass stuff. Anything with a fingernail catch is too deep to buff. BE CAREFUL with the coarse stuff. It can flat spot and change how the monitor looks if you go too deep. Follow the directions-wear a mask, clean the pads and change them frequently (so you're not grinding glass dust into the glass again). The 2nd to last step will have a dull haze- that's how you know you're almost there, then it's the buffing disk and cream.
I'll dig for better pics, but I have a write up from a few years back. Mike is a wizard with the stuff as well.
Take your time, it'll turn out rad. If it helps- practice on a jank busted tube first.
I think out of the last 20-30 tubes I've worked on from a glass standpoint, all but 2 or 3 turned out amazing and worth doing. Screw the way these things are handled in the USA/Mexico. I never get any graffiti tubes from Japan.
Attachments

Kavas
Champion
Always does so much with so little. And quick turn arounds. Amazing.
Few updates on the finishing touches.
I picked up a full set of N5000 locks and a repro MS9 remote board from @SnakeGrunger, thanks man!

It's nice to have all the original locks, and be able to lock everything up. especially when you have kids.
My current remote board was gnarly. corroded, dirty, mismatched pots. This repro is beautiful!

Problem is, the Windy's mounting holes for the remote board are positioned for the D29CR55's remote. You could only mount 1 screw in there to secure it down. Not ideal. BUT, luckily this community has people who have thought of everything! Thanks to @jcmorrisii , I picked up one of his 3D printed mounts specifically made for mounting a MS9 remote board in Windy's CP space.

Mounts nice and neat! You still use one screw to secure it, but there are pegs and standoffs built into the print to secure the sides. everything fits like a glove.

While I was in there, I decided to install my Easy CoinUp button, made by KLOV member Jawhn. I prefer running games with the credits, not on freeplay, but I don't wanna deal with coins anymore. At the start of this hobby, I was all about putting coins into my cabs. To keep the authentic feel. But as a home user and over a while of doing that, I found that to be annoying and decided to go this route.

I first found out about these from the arcade convention in Mesa, AZ. Zapcon. These are great, they have tact switches and a ribbon cable that is adhesive-backed. just wire them up to the coin switch wires then stick them anywhere! I've got these installed on all my cabs.
...and now the Windy is in it's final spot in my line-up! I put my Nesica 1P panel on there for shmuppin' goodness. Single player panel cabinets work well in the corner due to more elbow room on the panel.


Like i mentioned before, I wasn't planning on getting another cab, so my game room/home office space is definitely packed now. But it looks good in the room, across the standing Aero's. (before i get any flack for the risers, i'm currently recovering from a leg issue I had late last year, so standing has been helping my recovery).

I think my daughter is slowly becoming a shmupper. She's been really enjoying Detana!! TwinBee!

I picked up a full set of N5000 locks and a repro MS9 remote board from @SnakeGrunger, thanks man!
It's nice to have all the original locks, and be able to lock everything up. especially when you have kids.
My current remote board was gnarly. corroded, dirty, mismatched pots. This repro is beautiful!
Problem is, the Windy's mounting holes for the remote board are positioned for the D29CR55's remote. You could only mount 1 screw in there to secure it down. Not ideal. BUT, luckily this community has people who have thought of everything! Thanks to @jcmorrisii , I picked up one of his 3D printed mounts specifically made for mounting a MS9 remote board in Windy's CP space.
Mounts nice and neat! You still use one screw to secure it, but there are pegs and standoffs built into the print to secure the sides. everything fits like a glove.
While I was in there, I decided to install my Easy CoinUp button, made by KLOV member Jawhn. I prefer running games with the credits, not on freeplay, but I don't wanna deal with coins anymore. At the start of this hobby, I was all about putting coins into my cabs. To keep the authentic feel. But as a home user and over a while of doing that, I found that to be annoying and decided to go this route.
I first found out about these from the arcade convention in Mesa, AZ. Zapcon. These are great, they have tact switches and a ribbon cable that is adhesive-backed. just wire them up to the coin switch wires then stick them anywhere! I've got these installed on all my cabs.
...and now the Windy is in it's final spot in my line-up! I put my Nesica 1P panel on there for shmuppin' goodness. Single player panel cabinets work well in the corner due to more elbow room on the panel.
Like i mentioned before, I wasn't planning on getting another cab, so my game room/home office space is definitely packed now. But it looks good in the room, across the standing Aero's. (before i get any flack for the risers, i'm currently recovering from a leg issue I had late last year, so standing has been helping my recovery).
I think my daughter is slowly becoming a shmupper. She's been really enjoying Detana!! TwinBee!