You are using an out of date browser. It may not display this or other websites correctly.
You should upgrade or use an alternative browser.
You should upgrade or use an alternative browser.
replacing scsi cd-rom drive with scsi sd card adapter?
- Thread starter SelfDeniedHoarderz
- Start date
I still have all of the labels but the black version.
J
jassin000
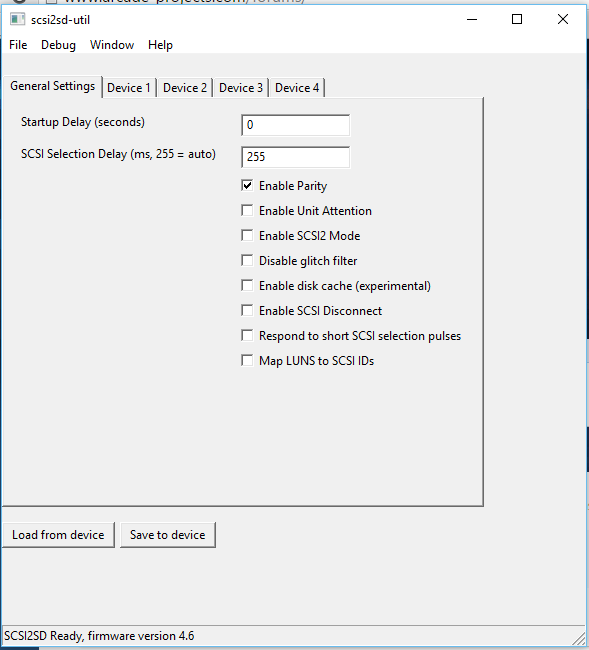
I've updated screen shots for the Windows version of "scsi2sd-util" software, based on the information in this thread.
General Settings
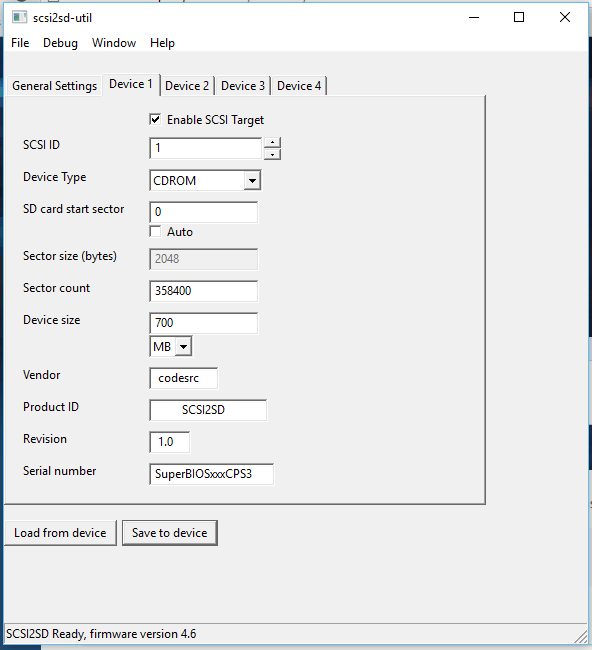
Device Settings
General Settings
Device Settings
J., Jasencustoms has them for like $3.95, I got mine from him.Sorry I should have been more specific... Will someone sell me a ready to apply cart label.
ShinGouki94
Student
These things are awesome, dead easy to set up and work a treat. I had a little trouble getting mine to run with the 64bit tool, so used the 32bit version, upgraded the firmware and HDGuru's disk utility and it worked first time. Thanks to all in this thread for the info.
kardus
Student
Finally got mine. If anyone is thinking of ordering one, maybe wait another week or 2 because there's a new version coming out thats smaller with full sized SD slot, as opposed to a microsd slot.
I got the older (v5) version
I got the older (v5) version
J
jassin000
Currently I think the v5 is best, because that's how Jasen designed the Plexiglas case.I got the older (v5) version


If he ever decides to do another run, this size/foot print change will need to be addressed.
Lovely setup!Currently I think the v5 is best, because that's how Jasen designed the Plexiglas case.I got the older (v5) version
If he ever decides to do another run, this size/foot print change will need to be addressed.
SelfDeniedHoarderz
Professional
I personally think the open case is not that great IMHO. If someone can create an enclosure case for CPS3 board, given enough space for PSU, SCSI2SD, you can have a very cool consolized CPS3 or just rugged and solid CPS3 case. The thing about his case is that you might need to modify it a bit to have a PCB leg so that you can tug it inside the cabinet vertically.
kardus
Student
v5 is the current best right *now*, but the v6 will be out in about a week in limited quantities according to the wiki, http://www.codesrc.com/mediawiki/index.php?title=SCSI2SD#NewsCurrently I think the v5 is best, because that's how Jasen designed the Plexiglas case.I got the older (v5) version
If he ever decides to do another run, this size/foot print change will need to be addressed.
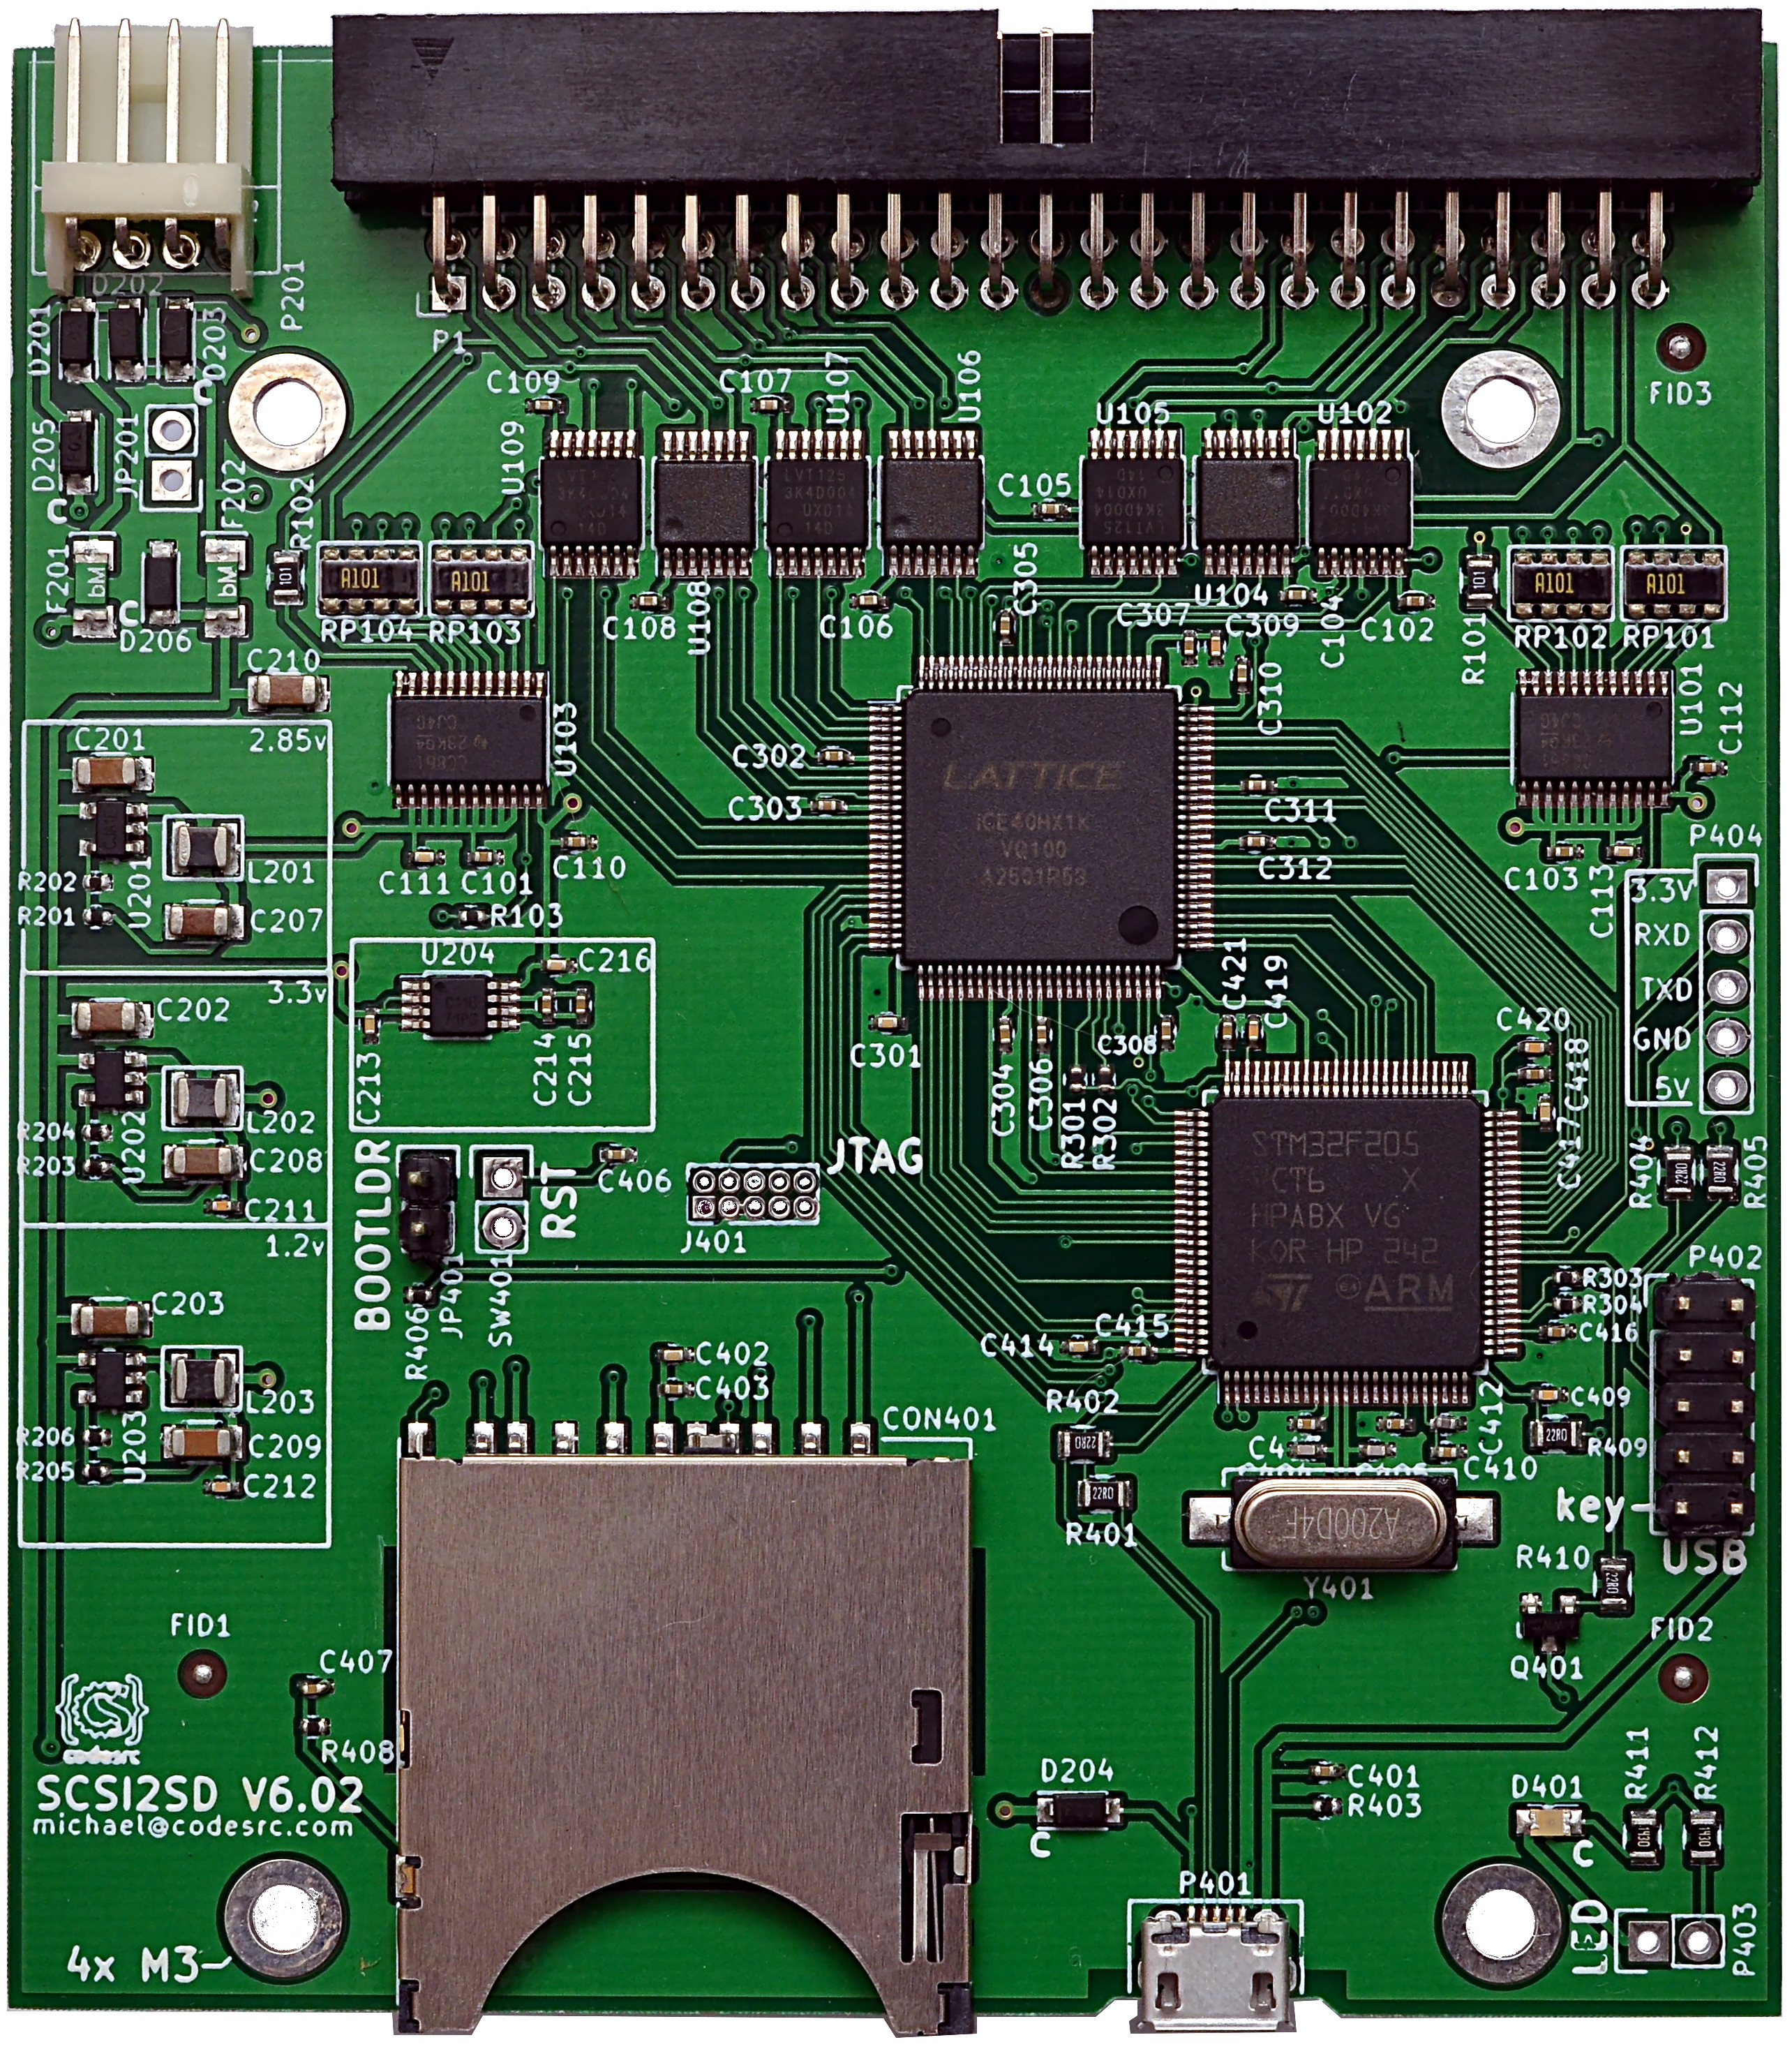
I think the v5 will still be the "standard", although the full-size slot and smaller size is nice. One major improvement is that you can also access the SD card without a separate adaptor, but this feature isn't that useful for CPS3 users. It would be nice for people who use these things with music samplers.
jugu
Professional
I just received a SCSI to SD adapter, but I'm having trouble writing an ISO file to my micro SD card. I feel like I'm missing something very basic. I'd appreciate any tips provided. Here's what I do:
1. Download the UniBios ISO from this link: http://www.mediafire.com/download/p8eieg5zz47rmk6/UniCD-CPS3_for_custom_SH2_V5.7z
2. Download and install SD formatter:
https://www.sdcard.org/downloads/formatter_4/eula_windows/
3. Format SD card using the SDFormatter (I also used a brand new micro sd card already pre-formated and using Windows 7 quick format, same result)
4. Launch Winhex as Administrator, select Tools, then Disk Tools, and finally Clone Disk.
5. I select the downloaded ISO file from step 1 as my source, and the logical partition for the sdcard as the destination.
6. I use the settings as pictured.
Result:
After the operation is complete I'm left with an unreadable SD card and am asked to format it by Windows. I had the same result using HD Raw Copy as well.
What am I doing wrong? This is round 2 for me, as I first was using my Mac to do this and dd on the command line to write the ISO to the sdcard with the same result. I've tried this also with my own ISO that I created from my actual Joe Joe disc and now 3 different micro sd cards, 2 of which were brand new.
Any ideas?
Thank you!
Attachments


jugu
Professional
What the what!?it shouldn't be readable in windows when you are done. Just pop it in the sd2scsi.
This.it shouldn't be readable in windows when you are done. Just pop it in the sd2scsi.
J
jassin000
I guess WinHex is easy for some people?
I've always found it to be a pain in the ass.")
I used HDD Raw Copy portable (totally free installs nothing) and it was easy as pie.
I've always found it to be a pain in the ass.
I used HDD Raw Copy portable (totally free installs nothing) and it was easy as pie.
jugu
Professional
So I had two problems. First, the CPS 3 kept complaining about the CD-ROM not being connected properly. So I reset the settings for the board on Windows. That got rid of the first error.
But now I keep getting an incorrect CD inserted message. This after writing the ISO of the Joe Joe CD numerous times using both HDD Raw Copy and WinHex. I'm trying again but this time I created the ISO with HDD RAW Copy instead of WinHex.
But now I keep getting an incorrect CD inserted message. This after writing the ISO of the Joe Joe CD numerous times using both HDD Raw Copy and WinHex. I'm trying again but this time I created the ISO with HDD RAW Copy instead of WinHex.
jugu
Professional
I feel like a big dummy. Got it working by using a different source disc.
bloodhokuto
Student
- Joined
- Oct 24, 2015
- Messages
- 44
- Reaction score
- 17
I have picked up one of these pcbs and can i ask any Mac users to give me some hints as to how to format the PCB to a CD.
I looked at the support site and it seems that all the software used to do this job has to be run from terminal, plus you have to install various things into directories in OSX ... again using terminal (seriously what the hell is it with insisting that everything is done like this).
I looked at the support site and it seems that all the software used to do this job has to be run from terminal, plus you have to install various things into directories in OSX ... again using terminal (seriously what the hell is it with insisting that everything is done like this).
jugu
Professional
I used the command line tool on Mac initially. It seemed to work, but when I hooked it up to a Windows PC, one of the settings that I'm pretty I had set via the Mac software was loading incorrectly on the Windows machine.
First download the utility:
scsi2sd-util.dmg
And the latest firmware:
firmware_bundle-v4.6.00.scsi2sd
Steps to update firmware:
1. Mount the disk image.
2. Copy the utility from the disk image to your Desktop
3. Launch the Terminal.app application and navigate to your Desktop: cd ~/Desktop
4. Once in the Desktop, launch the "scsi2sd-util" application: ./scsi2sd-util
5. You'll be presented with the UI as documented in this thread earlier, see screenshot.
6. Select File --> Upgrade Firmware... from the Menu bar, see screenshot.
7. Point to the firmware file you downloaded earlier.
Steps to set up board as a CD-ROM:
1. From the General settings tab, make sure "Enable Parity" is checked.
2. From the "Device 1" tab, change the "SCSI ID" to a value of 1
3. Device type should be "CDROM"
4. Device size should be set to 700 MB.
5. Click Save to Device button.
Once that is done, I would disconnect and reconnect the board, and click the "Load from Device" button. The settings you had set previously are read and should display correctly. This is the part that didn't work for me on the Mac, but did on Windows.
Preparing the SD card (Optional):
1. Download and install the SD Formatter: SDFormatter_4.00B.pkg
2. Insert the SD card in your Mac and launch the SD Formatter.
3. If the SD card is still formatted as FAT32, select Quick Format, no need to name the card, click the Format button.
Create the ISO:
1. Mount your source optical disc on your Mac.
2. Launch Terminal.app and enter the following command:
hdiutil makehybrid -iso -joliet -o image.iso /path/to/source
(hdiutil is the name of the command, makehybrid is the action, -iso is the filesystem, -joilet adds the Joliet support to the ISO, -o is the output option, image.iso is the output file, /path/to/source would be your source disc; usually mounted to /Volumes/)
Write ISO to SD card:
1. Still in Terminal.app, type:
diskutil list
2. This will return a list of disks currently attached to your Mac.
3. Look for the disk information that pertains to your SD card, you want the Identifier that pertains to the partition for your SD card, such as /dev/disk4s2
4. Unmount this volume via the commandline and not be ejecting the SD card, diskutil unmount /dev/disk4s2
5. This unmounts the file system which allows us to write the ISO image to this volume, which we do by typing:
sudo dd if=/path/to/image.iso of=/dev/rdisk4s2 bs=1m
(sudo to elevate permissions, dd is the actual command, if=/path/to/image.iso is the input file, of=/dev/rdisk4s2 is the output file. Here we add a letter r before the disk identifier to allow for raw block I/O and bs=1m is the block size. These last two operands are optional but speed up the writing to the SD card.)
Once dd is done, you will not be able to read or write to the card on your Mac unless you reformat it. But you should now be able to insert it into your SCSI2SD board and use it on your CPS3 setup.
Hope this helps.
Attachments


Last edited: