

dillingerradio
Professional
[[ Already configured your NAOMI NetDIMM and just need a refresher on the key stuff? Skip to the next post in this thread. ]]
Hello everyone! I'm here with a long NAOMI post, in which I will cover everything from preparatory maintenance to the installation and testing of a WiPi Netbooter-based NetDIMM multi solution. This setup will utilize a Capcom I/O, as well as a HAS v5 supergun from RGB's Lab. It should be a simple procedure to adjust the instructions to fit your own specific setup. Difficulty-wise, I'd rate this around a 4 out of 10. It's not particularly hard, but it does require some soldering experience and special equipment if you're following along with the preparatory maintenance. If your stuff is already ready-to-go and you just need setup guidance, it's trivial.
With that, let's begin!
Context
This machine is the very first arcade I ever bought! If you sold it to me and are reading this at some point down the line: Salamat, kaibigan ko! It came with everything: the motherboard, game, and Capcom I/O! I originally purchased it strictly for Marvel vs. Capcom 2, and picked up a HAS v5 supergun from RGB's Lab (along with a Meanwell RT-85A PSU originally, later a 125A) to enable me to utilize it. Shortly after that, I learned about how I could put together a Raspberry Pi and a NetDIMM to make a DIY Multi. I was immediately intrigued by the project and set about learning what I could.
If you're new- as I was back then- the NetDIMM module is part of a network solution that SEGA offered operators late in the NAOMI's lifespan. It enabled some multiplayer stuff, along with the feature that we specifically take advantage of: the ability to push a game out over the network to the NAOMI. The hardware came in two flavors: 256 MB or 512 MB. There is no difference internally besides the amount of RAM, and a 256 MB can be upgraded to a 512 MB (see https://www.arcade-projects.com/threads/naomi-net-dimm-256-mb-to-512-mb-upgrade.20952/ ). Your needs or desire will dictate which you choose, I went with 512 MB because I wanted to ensure compatibility with the entire NAOMI catalog.
The most convenient method of managing the multi aspect of this project is to utilize a WiPi Netbooter solution (see: https://github.com/chunksin/WiPiNetbooter ). This solution utilizes a Raspberry Pi 3 WiFi module to provide a WiFi access point, on which the user may access the web-based interface to manage their hardware and games over the network- it makes everything significantly easier and more convenient. With that in mind, I opted to save myself a bit of time and effort (and support a fellow community member) by buying one of the kits sold here on the forum (see: https://www.arcade-projects.com/threads/fabtek-sales-services-updates.33464/ ). I want to stress that purchasing a kit isn't necessary. It just makes things much, much easier. You can always put one together yourself (if you've got a spare Raspberry Pi for instance), or you can opt to use a PC to accomplish the same tasks (but you'll need to track down some additional files and software).
One last thing that needed consideration for the NetDIMM multi was power provision. Under normal operation with a standard cartridge, power over JAMMA- in my case via a Meanwell RT-125A- is sufficient. However, as I understood from what I could find, NetDIMM operations are a bit more thirsty and require a dedicated power supply. The one most often referred to as the golden standard is the Sun 400-5397-01, and that's the one I opted to get in order to maximize compatibility. However, alternative power supply options exist, including conversions of standard ATX PSUs. I wasn't in a rush, so I was happy to wait until I could find a SUN at a reasonable price and condition.
With the hardware all sorted out, it was time to inspect my hardware and conduct any necessary prepatory or preventative maintenance.
Prepatory / Preventative Maintenance
PSU
* - This special equipment isn't strictly necessary, use whatever you have at hand to desolder: a solder sucker, copper braid, whatever works for you.
** - Only needed if you intend to make a wall plug or repair/replace the PSU side socket.
For my setup, I opted to wait until I could acquire a SUN 400-5397-01 PSU at a reasonable price and condition. Subsequently, I wound up buying it off eBay and paid $65. The listing had photos which showed a good exterior condition, and it was described as "tested working," which was sufficient for me. On arrival, I opened it up to inspect its condition firsthand (the seller did not include shots of the internal condition.) Although it did indeed function, several capacitors had failed, and it would benefit from cleaning and repair.
To avoid some redundant effort, I'll refer you to this post in which I cover the work I did to the PSU: https://www.arcade-projects.com/thr...97-01-psu-recap-and-custom-power-cords.38070/ In that thread you'll find details surrounding the recap of the power supply, as well as the conversion of a U.S. standard wall-plug for it, and finally the creation of a small custom cable that uses the last open port on the PSU to provide the 5V power for a supergun.
To summarize, though: I replaced all the internal electrolytic capacitors, as well as a couple wires and connectors. I also converted a regular wall plug to use with the PSU, and made a cable to pull power from it over to my HAS supergun. The wall plug utilizes an inline switch and an AMP connector to plug directly into the PSU, while the ground wire has a forked spade, which is affixed under an external case screw prior to operation.
NAOMI Motherboard
* - Only needed if you intend to replace the super capacitor instead of delete it.
** - Only needed if you intend to regularly work on this stuff (or already have it.) If not, simply buy a replacement BIOS chip on the forum or eBay and save yourself the expense.
As I mentioned in the context section, my NAOMI came as part of a larger bundle. Fair price for a NAOMI is around $150, give or take, and that jives with the breakdown of costs if I consider individual parts' average sales prices. When it arrived, it was in well-loved condition, with the standard layer of operational dust/grime accumulation. With some hot water and mild soap, I cleaned up the shell to the best of my ability. I also blew out and dusted off the motherboard itself.
It was at this point that I began my inspection proper. During my research prior to purchase, I learned that NAOMIs feature a small super capacitor located just below the BIOS chip. As far as I could determine from available information, this super capacitor is intended to provide juice for sales data retention in the event of a shut-off or power failure. It's also a known source of failure, and because of its location, can often lead to catastrophic corrosion development. I was particularly fortunate with mine- as it had indeed failed, but the corrosion had not had an opportunity to spread, and was only just beginning to develop on a leg. Since it is does not impact normal system operation, and I do not need sales data retention, I opted to delete this capacitor entirely and simply desoldered it. I then cleaned the area thoroughly with isopropyl alcohol.
With the super capacitor matter resolved, I turned my attention to the BIOS. The NAOMI BIOS is written on an M27C160 EPROM, located just left of the coin cell battery, and directly above the previously mentioned super capacitor. Early revisions of the NAOMI BIOS do not support NetDIMM operations, and will fail to properly recognize the module. The NAOMI BIOS may have a sticker that indicates which revision it's on, and a revision ending in E, F, G, or higher should work properly. My unit, however, did not feature any such sticker indicating its version, but that was neither here nor there- I intended to upgrade it, regardless.
To that end, I removed the chip from my unit using an IC pry bar and some gentle persuasion. It came up nicely, and I went ahead and clamped it in my IC leg straightener just to make sure it was nice and square. I use an XGecu Pro T48 programmer, which requires the ADP_D42_EX-A adapter to work with the M27C160 EPROM. With that, I backed up the chip's original ROM and then placed it in a UV eraser (I use a Samsung QI wireless charger and UV sanitizer for this purpose) to clear it out. Once complete, I then burned the NAOMI Multi BIOS (with Bootstrap Fix; see: https://www.arcade-projects.com/threads/naomi-multi-bios-fixed-with-proper-bootstrap.14842/ ) to the chip. Finally, I verified it via the programmer software and then went ahead and reinstalled it on the NAOMI, covering the chip window with a small piece of masking tape after seating.
The last thing I considered in my inspection was the condition of the connectors. Although they appeared fine on visual inspection, I decided to flush them with DeoxIT spray just to check. I then utilized a small swab to scrub the connector (once it had sat for a couple minutes.) This wound up being a good idea, as- despite appearing fine- the sockets wound up being quite soiled, and took several treatments before the swab came away clean.
NetDIMM Module:
I purchased my 512 MB NetDIMM module, on firmware revision 3.03, for $250. The NetDIMM is a simple module, and requires only slight modification to work with the unit- specifically, it will need a zero key installed, a firmware update, and verification of jumper positioning.
To access the unit's internals, I removed the two screws next to the GD Cable Connector, and the lower left screw on the top of the unit- below the two tabs. The other screw located on the top of the unit supports the installed PCB support shelf (the tabs for which are visible on top of the unit.) Unscrewing that completely is unnecessary, and will cause the shelf to drop into the unit (requiring it to be fished out.) Instead, I loosened it to just the point at which I could remove the cover. Once I removed the cover, I verified the jumper settings, which should be configured as shown in the image (from left to right: down, down, up.)
I then installed a zero key security PIC in place. The zero key is a replacement security PIC (type: PIC16F628A) which causes the NAOMI to bypass its security checks, allowing it to load decrypted game files. While a zero key was provided in the WiPi Netbooter Kit I mentioned purchasing, since I had the equipment and the chips I decided to go ahead and burn my own just for the practice. I burned the appropriate Zero Key Net file (see: https://www.arcade-projects.com/thr...ng-and-cf-on-naomi-chihiro-and-triforce.6611/ ) to a PIC16F628A using the following settings in my programmer's software:
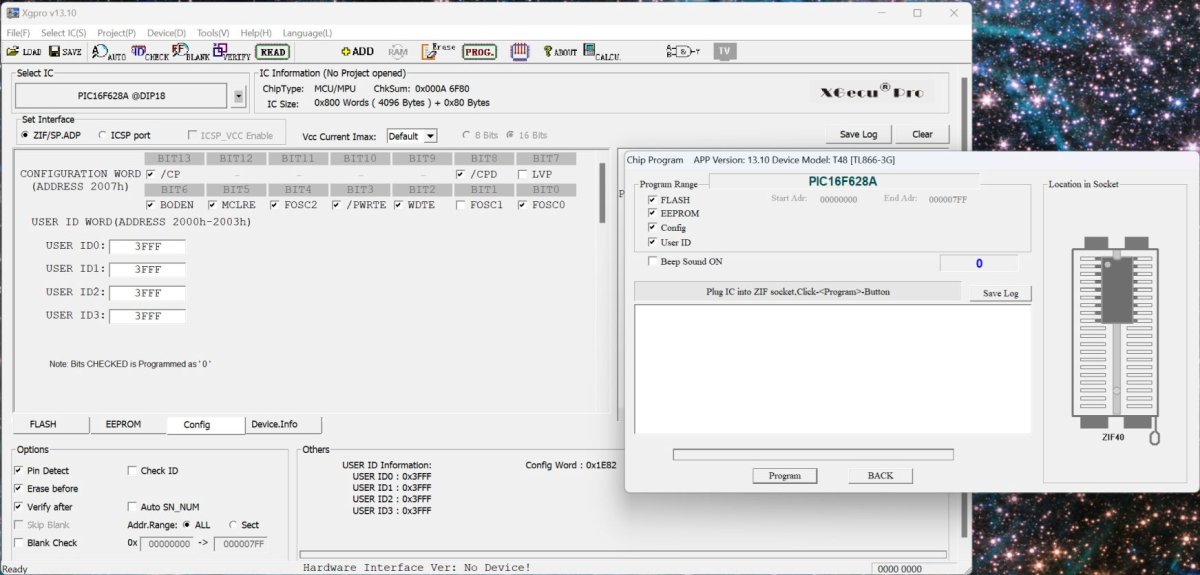
(Check Boxes: /CP, /CPD, BODEN, MCLRE, FOSC2, /PWRTE, WDTE, FOSC0; Options: Pin Detect, Erase Before, Verify After; Chip Program Range: FLASH, EEPROM, Config, User ID; Config Word: 0x1E82.)
The NetDIMM also has a cavity for a battery pack. The battery pack is intended to provide power to the memory on shutdown or power loss, enabling the unit to retain the last game loaded (as well as settings and high scores.) This is ideal for a "set it and forget it" approach to the NetDIMM. Having said that, the Netbooter has an option to enable loading a specific game by default when powered on, essentially replicating this feature (though taking a little longer since it will have to resend the game files on boot.) Since I don't need high score saving, I have opted to forego installing a battery pack. I did find this thread, though, which discusses suitable replacements for the pack in case I ever change my mind (see: https://www.arcade-projects.com/threads/finding-a-suitable-dimm-battery-replacement.8654/ ).
Hardware Setup and Configuration
With the essential preventative maintenance concluded on all the relevant parts, it's time to begin the process of setup and configuration.
This post will not cover setting up the Netbooter image on a WiPi unit- the WiPi folks cover that in their instructions. Having said that, the WiPi hardware configuration consists of a Raspberry Pi 3 module, ethernet patch cable, and custom power cable which uses a (JST, I think?) 4-pin connector to draw power from the back of the NAOMI. The Raspberry Pi is then housed in a plastic case, which can be affixed to the unit by way of hook and loop (Velcro) fasteners. The unit is powered by the NAOMI, and subsequently will turn off when the machine is turned off (and vice versa.)
Setup is routine, with the added step of plugging the WiPi unit into the NetDIMM ethernet port, and rear NAOMI power pins. Because I'm using a JAMMA interface, I also connected the NAOMI video, audio, and USB outs to the Capcom I/O. Finally, I plugged the SUN PSU directly into the unit, and used its last remaining connector to plug into my HAS supergun.
Left: NetDIMM installed without shell to troubleshoot; Right: NetDIMM installed for normal operation.
Once all the equipment is installed together, it's time to apply power and get everything configured. With everything all connected and operating as it should, I noticed the boots can take a while- somewhere between 30-40 seconds to splash screen from power off. In any event, once the system booted my BIOS update success was confirmed: the NAOMI splash screen now displayed the words "NETWORK SYSTEM" in a banner. Confirmation was reinforced upon entry to the service menu, where "VxWorks" signature could be observed in the top right of the menu. From the service menu, I selected DIMM BOARD TEST in order to check the state of the NetDIMM and verify its RAM modules were good. The test results were good, so I proceeded to unit configuration.
NetDIMM WiPi Configuration
Before configuring for WiPi, it's helpful to consult the manual. The latest version can be found at the GitHub here: https://github.com/chunksin/WiPiNetbooter?tab=readme-ov-file
The unit broadcasts a wireless AP on initialization that allows for access to the web interface. The default password for the AP is "segarocks". The manual also includes a recommended network setup- making this task even easier- which I'll cover here:
Interestingly, after exiting the service menu following these changes, I was greeted with Error 31 (see error notes). I rebooted the system to resolve the error, and that worked. The system then booted to splash, and displayed a "CHECKING NETWORK" status. At that point, I connected to the WiPi's access point. Once on the network, the web interface for the module has a convenient loopback address, http://netbooter.local, which I used to gain access to the system configuration.
To configure the NetDIMM unit using the WiPi module I selected the "Setup" menu. From there, I accessed the "Manage NetDIMMs" option. Once the page loaded, I observed that it already had an entry that matched my NAOMI's IP address, and was showing green. For the purposes of learning, I opted to delete the entry and remake it. Once deleted, I added another and input the IP address as I had set it (10.0.0.3 in the example,) then I gave it a generic name, left the default game option blank, and saved the entry. The page refreshed and after a few moments I saw that it had successfully spotted my NAOMI and was again ready for operation. If you've got a NAOMI 2, select that from the relevant drop down instead, the instructions are otherwise the same.
With everything working as expected, it was time to see to the matter of updating the NetDIMM firmware. In my case, my unit was on firmware v3.03 and needed to get to v4.02. Fortunately, the WiPi web interface features a super convenient "Update NetDIMM Firmware" option in the settings menu. The Update NetDIMM Firmware page has a set of simple (but important) instructions that slightly alter how the process will go depending on what version the firmware is already. It's imperative to read and adhere to the instructions, as failure to follow them can result in creating a very expensive paperweight.
The instructions indicated I would first need to update to 4.01, then to 4.02. After selecting the appropriate update and confirming, the WiPi module sent the necessary file over to my NAOMI and directed me to follow the NAOMI's on-screen prompts. I did so, and after the first firmware update completed, I exited as directed, which caused the unit to reboot into Error 22 (see error notes.) I then power cycled the unit, which cleared the error and booted normally, allowing me to then send the second firmware update over. I again followed the instructions from the NAOMI, again was greeted with Error 22 after it rebooted, and (you guessed it) again I cleared it with a power cycle.
At this point, I observed my third error of the process. After power cycling following the final firmware update, the system booted into Error 33 (see error notes.) I presumed this was because the WiPi hadn't booted into a ready state by the time the NAOMI had reached out to it, and decided to ignore it. I logged back into the WiPi to try sending a game over, chose Marvel vs. Capcom 2, and hit send. The unit rebooted and the splash screen came up "NOW LOADING..." Meanwhile, the web interface on the WiPi module began refreshing rapidly (to redraw the progress bar for the upload.) Once it was done, the unit rebooted one final time and Marvel vs. Capcom 2 loaded as expected. A quick test match was sufficient to determine everything was good.
Success! I now had a functioning NAOMI multi!
Configuring with PC:
I'll take a moment to reiterate that I definitely recommend the dedicated WiPi route. That makes things tremendously easier from just about every single perspective. I've provided the PC configuration instructions here because I was curious about this method and looked into it myself. Having said that, like I mentioned earlier, I used a WiPi - so I did not actually use this method. I think it's still helpful to have the instructions for it laid out here, though, so I've provided them to the best of my knowledge.
Let's first outline the steps to setup the NAOMI for use with our PC, by setting its IP:
Anyway, with the unit's IP set we can turn our attention to the PC side of the house. If you've got Python 3 installed, I recommend using netboot (see: https://github.com/DragonMinded/netboot ). The GitHub covers the install and syntax, and if you're comfortable with Python, I will trust you're capable of following the installation instructions. Otherwise, we'll be needing some additional software and files. Most notably, a copy of "transfergame.exe" as well as any appropriate firmware updates and decrypted games you intend to use.
Aside from that, documentation I could find identified that PC connections would require a crossover cable (not standard ethernet.) If- after setup- you can't see the NAOMI with a normal ethernet cable, try a crossover cable instead.
As far as transfergame.exe and the 4.01 and 4.02 DIMM updates, those can be found here:
https://mega.nz/file/ntQ2QYaQ#6Kb7XXQ_0qZaef2BeLKBxRai1jlRMfJ4Im5HWANVqic
The files were scanned with virustotal and determined safe. Use at your own risk.
With regards to the firmware updates, there are some specific instructions that must be followed (see: https://www.arcade-projects.com/threads/how-to-upgrade-your-netdimm-or-dimm-to-firmware-4-02.3296/ ) which depend on what firmware revision your NetDIMM unit is on:
I'm assuming some basic competency here with regards to network configuration and command prompt usage. If you're not really super familiar with configuring your TCP/IP network settings it's not hard, but it's more work, and you'll have to undo it later. (Whereas, using a dedicated Pi solution like above doesn't require that, since the Pi will handle all the network business, and it also has the option for firmware updates, making things really simple. Seriously, go with the Pi route on this.)
With that said, it's time to set up the PC so that it's on the same network. Since we used 192.168.1.2 for the NAOMI, we'll use 192.168.1.1 for our PC. Enter the network TCP/IP settings, and change over to a static IP address as shown below. Besides our IP, we'll also set our subnet mask to 255.255.255.0, and gateway to 192.168.1.1. If you have more than one available ethernet port, make sure the one connected to the NAOMI is the one you're setting these options on.
After that's all set, open up a command prompt and type the following (make sure the IP matches whatever you actually set for your NAOMI):
ping 192.168.1.2
If your settings are correct, you should see several replies from the unit indicating it's present on the network. If you see nothing, it may be worth rebooting your PC and NAOMI to ensure the IP settings take hold. If both machines have been verified as properly configured, check your cable. If using a standard ethernet, switch to a crossover cable and try again (and vice versa.) Once you've established you can see the NAOMI it's time to make use of transfergame to start sending files to the NetDIMM module. Place the program as well as any files you'd like to transfer over together in the same folder, then open up a command prompt and navigate to that folder. From there, the syntax is:
transfergame 192.168.1.2 theFile.bin
Make sure the IP matches whatever you set for your unit, and the filename matches whatever file you're pushing. You should then see a flurry of activity indicating that the program is sending over the data, and once it finishes, the unit should reboot and load as expected. For firmware updates, after pushing them, simply follow the onscreen instructions when the NAOMI reboots to complete the flash. Be aware that the unit may reboot after a firmware update to Error 22, a simple reboot should resolve this and let you proceed. Games will simply load like they would from a cartridge once transferred, and should operate as expected.
At this point, you can disconnect the unit from your PC and undo the network changes you made to your PC to resume your normal operations. If you don't have a battery pack in the NetDIMM module, you'll have to repeat this whole process the next time you reboot it (which is another reason it's super useful to have the dedicated Pi for the unit).
In any case- that's that! Thanks for reading.
Error Notes:
"Error 22 - Communication Error Occurred Between Main Board and Option Board"
Hello everyone! I'm here with a long NAOMI post, in which I will cover everything from preparatory maintenance to the installation and testing of a WiPi Netbooter-based NetDIMM multi solution. This setup will utilize a Capcom I/O, as well as a HAS v5 supergun from RGB's Lab. It should be a simple procedure to adjust the instructions to fit your own specific setup. Difficulty-wise, I'd rate this around a 4 out of 10. It's not particularly hard, but it does require some soldering experience and special equipment if you're following along with the preparatory maintenance. If your stuff is already ready-to-go and you just need setup guidance, it's trivial.
With that, let's begin!
Context
This machine is the very first arcade I ever bought! If you sold it to me and are reading this at some point down the line: Salamat, kaibigan ko! It came with everything: the motherboard, game, and Capcom I/O! I originally purchased it strictly for Marvel vs. Capcom 2, and picked up a HAS v5 supergun from RGB's Lab (along with a Meanwell RT-85A PSU originally, later a 125A) to enable me to utilize it. Shortly after that, I learned about how I could put together a Raspberry Pi and a NetDIMM to make a DIY Multi. I was immediately intrigued by the project and set about learning what I could.
If you're new- as I was back then- the NetDIMM module is part of a network solution that SEGA offered operators late in the NAOMI's lifespan. It enabled some multiplayer stuff, along with the feature that we specifically take advantage of: the ability to push a game out over the network to the NAOMI. The hardware came in two flavors: 256 MB or 512 MB. There is no difference internally besides the amount of RAM, and a 256 MB can be upgraded to a 512 MB (see https://www.arcade-projects.com/threads/naomi-net-dimm-256-mb-to-512-mb-upgrade.20952/ ). Your needs or desire will dictate which you choose, I went with 512 MB because I wanted to ensure compatibility with the entire NAOMI catalog.
The most convenient method of managing the multi aspect of this project is to utilize a WiPi Netbooter solution (see: https://github.com/chunksin/WiPiNetbooter ). This solution utilizes a Raspberry Pi 3 WiFi module to provide a WiFi access point, on which the user may access the web-based interface to manage their hardware and games over the network- it makes everything significantly easier and more convenient. With that in mind, I opted to save myself a bit of time and effort (and support a fellow community member) by buying one of the kits sold here on the forum (see: https://www.arcade-projects.com/threads/fabtek-sales-services-updates.33464/ ). I want to stress that purchasing a kit isn't necessary. It just makes things much, much easier. You can always put one together yourself (if you've got a spare Raspberry Pi for instance), or you can opt to use a PC to accomplish the same tasks (but you'll need to track down some additional files and software).
One last thing that needed consideration for the NetDIMM multi was power provision. Under normal operation with a standard cartridge, power over JAMMA- in my case via a Meanwell RT-125A- is sufficient. However, as I understood from what I could find, NetDIMM operations are a bit more thirsty and require a dedicated power supply. The one most often referred to as the golden standard is the Sun 400-5397-01, and that's the one I opted to get in order to maximize compatibility. However, alternative power supply options exist, including conversions of standard ATX PSUs. I wasn't in a rush, so I was happy to wait until I could find a SUN at a reasonable price and condition.
With the hardware all sorted out, it was time to inspect my hardware and conduct any necessary prepatory or preventative maintenance.
Prepatory / Preventative Maintenance
PSU
Tools Used:
| Parts Used:
|
** - Only needed if you intend to make a wall plug or repair/replace the PSU side socket.
For my setup, I opted to wait until I could acquire a SUN 400-5397-01 PSU at a reasonable price and condition. Subsequently, I wound up buying it off eBay and paid $65. The listing had photos which showed a good exterior condition, and it was described as "tested working," which was sufficient for me. On arrival, I opened it up to inspect its condition firsthand (the seller did not include shots of the internal condition.) Although it did indeed function, several capacitors had failed, and it would benefit from cleaning and repair.
To avoid some redundant effort, I'll refer you to this post in which I cover the work I did to the PSU: https://www.arcade-projects.com/thr...97-01-psu-recap-and-custom-power-cords.38070/ In that thread you'll find details surrounding the recap of the power supply, as well as the conversion of a U.S. standard wall-plug for it, and finally the creation of a small custom cable that uses the last open port on the PSU to provide the 5V power for a supergun.
To summarize, though: I replaced all the internal electrolytic capacitors, as well as a couple wires and connectors. I also converted a regular wall plug to use with the PSU, and made a cable to pull power from it over to my HAS supergun. The wall plug utilizes an inline switch and an AMP connector to plug directly into the PSU, while the ground wire has a forked spade, which is affixed under an external case screw prior to operation.
NAOMI Motherboard
Tools Used:
| Parts Used:
|
** - Only needed if you intend to regularly work on this stuff (or already have it.) If not, simply buy a replacement BIOS chip on the forum or eBay and save yourself the expense.
As I mentioned in the context section, my NAOMI came as part of a larger bundle. Fair price for a NAOMI is around $150, give or take, and that jives with the breakdown of costs if I consider individual parts' average sales prices. When it arrived, it was in well-loved condition, with the standard layer of operational dust/grime accumulation. With some hot water and mild soap, I cleaned up the shell to the best of my ability. I also blew out and dusted off the motherboard itself.
It was at this point that I began my inspection proper. During my research prior to purchase, I learned that NAOMIs feature a small super capacitor located just below the BIOS chip. As far as I could determine from available information, this super capacitor is intended to provide juice for sales data retention in the event of a shut-off or power failure. It's also a known source of failure, and because of its location, can often lead to catastrophic corrosion development. I was particularly fortunate with mine- as it had indeed failed, but the corrosion had not had an opportunity to spread, and was only just beginning to develop on a leg. Since it is does not impact normal system operation, and I do not need sales data retention, I opted to delete this capacitor entirely and simply desoldered it. I then cleaned the area thoroughly with isopropyl alcohol.
With the super capacitor matter resolved, I turned my attention to the BIOS. The NAOMI BIOS is written on an M27C160 EPROM, located just left of the coin cell battery, and directly above the previously mentioned super capacitor. Early revisions of the NAOMI BIOS do not support NetDIMM operations, and will fail to properly recognize the module. The NAOMI BIOS may have a sticker that indicates which revision it's on, and a revision ending in E, F, G, or higher should work properly. My unit, however, did not feature any such sticker indicating its version, but that was neither here nor there- I intended to upgrade it, regardless.
To that end, I removed the chip from my unit using an IC pry bar and some gentle persuasion. It came up nicely, and I went ahead and clamped it in my IC leg straightener just to make sure it was nice and square. I use an XGecu Pro T48 programmer, which requires the ADP_D42_EX-A adapter to work with the M27C160 EPROM. With that, I backed up the chip's original ROM and then placed it in a UV eraser (I use a Samsung QI wireless charger and UV sanitizer for this purpose) to clear it out. Once complete, I then burned the NAOMI Multi BIOS (with Bootstrap Fix; see: https://www.arcade-projects.com/threads/naomi-multi-bios-fixed-with-proper-bootstrap.14842/ ) to the chip. Finally, I verified it via the programmer software and then went ahead and reinstalled it on the NAOMI, covering the chip window with a small piece of masking tape after seating.
The last thing I considered in my inspection was the condition of the connectors. Although they appeared fine on visual inspection, I decided to flush them with DeoxIT spray just to check. I then utilized a small swab to scrub the connector (once it had sat for a couple minutes.) This wound up being a good idea, as- despite appearing fine- the sockets wound up being quite soiled, and took several treatments before the swab came away clean.
NetDIMM Module:
Tools Used:
| Parts Used:
|
I purchased my 512 MB NetDIMM module, on firmware revision 3.03, for $250. The NetDIMM is a simple module, and requires only slight modification to work with the unit- specifically, it will need a zero key installed, a firmware update, and verification of jumper positioning.
To access the unit's internals, I removed the two screws next to the GD Cable Connector, and the lower left screw on the top of the unit- below the two tabs. The other screw located on the top of the unit supports the installed PCB support shelf (the tabs for which are visible on top of the unit.) Unscrewing that completely is unnecessary, and will cause the shelf to drop into the unit (requiring it to be fished out.) Instead, I loosened it to just the point at which I could remove the cover. Once I removed the cover, I verified the jumper settings, which should be configured as shown in the image (from left to right: down, down, up.)
I then installed a zero key security PIC in place. The zero key is a replacement security PIC (type: PIC16F628A) which causes the NAOMI to bypass its security checks, allowing it to load decrypted game files. While a zero key was provided in the WiPi Netbooter Kit I mentioned purchasing, since I had the equipment and the chips I decided to go ahead and burn my own just for the practice. I burned the appropriate Zero Key Net file (see: https://www.arcade-projects.com/thr...ng-and-cf-on-naomi-chihiro-and-triforce.6611/ ) to a PIC16F628A using the following settings in my programmer's software:
(Check Boxes: /CP, /CPD, BODEN, MCLRE, FOSC2, /PWRTE, WDTE, FOSC0; Options: Pin Detect, Erase Before, Verify After; Chip Program Range: FLASH, EEPROM, Config, User ID; Config Word: 0x1E82.)
The NetDIMM also has a cavity for a battery pack. The battery pack is intended to provide power to the memory on shutdown or power loss, enabling the unit to retain the last game loaded (as well as settings and high scores.) This is ideal for a "set it and forget it" approach to the NetDIMM. Having said that, the Netbooter has an option to enable loading a specific game by default when powered on, essentially replicating this feature (though taking a little longer since it will have to resend the game files on boot.) Since I don't need high score saving, I have opted to forego installing a battery pack. I did find this thread, though, which discusses suitable replacements for the pack in case I ever change my mind (see: https://www.arcade-projects.com/threads/finding-a-suitable-dimm-battery-replacement.8654/ ).
Hardware Setup and Configuration
With the essential preventative maintenance concluded on all the relevant parts, it's time to begin the process of setup and configuration.
This post will not cover setting up the Netbooter image on a WiPi unit- the WiPi folks cover that in their instructions. Having said that, the WiPi hardware configuration consists of a Raspberry Pi 3 module, ethernet patch cable, and custom power cable which uses a (JST, I think?) 4-pin connector to draw power from the back of the NAOMI. The Raspberry Pi is then housed in a plastic case, which can be affixed to the unit by way of hook and loop (Velcro) fasteners. The unit is powered by the NAOMI, and subsequently will turn off when the machine is turned off (and vice versa.)
Setup is routine, with the added step of plugging the WiPi unit into the NetDIMM ethernet port, and rear NAOMI power pins. Because I'm using a JAMMA interface, I also connected the NAOMI video, audio, and USB outs to the Capcom I/O. Finally, I plugged the SUN PSU directly into the unit, and used its last remaining connector to plug into my HAS supergun.
Once all the equipment is installed together, it's time to apply power and get everything configured. With everything all connected and operating as it should, I noticed the boots can take a while- somewhere between 30-40 seconds to splash screen from power off. In any event, once the system booted my BIOS update success was confirmed: the NAOMI splash screen now displayed the words "NETWORK SYSTEM" in a banner. Confirmation was reinforced upon entry to the service menu, where "VxWorks" signature could be observed in the top right of the menu. From the service menu, I selected DIMM BOARD TEST in order to check the state of the NetDIMM and verify its RAM modules were good. The test results were good, so I proceeded to unit configuration.
NetDIMM WiPi Configuration
Before configuring for WiPi, it's helpful to consult the manual. The latest version can be found at the GitHub here: https://github.com/chunksin/WiPiNetbooter?tab=readme-ov-file
The unit broadcasts a wireless AP on initialization that allows for access to the web interface. The default password for the AP is "segarocks". The manual also includes a recommended network setup- making this task even easier- which I'll cover here:
- Boot the Naomi unit to the splash screen and enter the service menu.
- Once in the unit service menu, navigate to the NETWORK SETTING option.
- Select the NETWORK TYPE option, and change it to ETHER if it's not already set to that.
- Select the SET IP ADDRESS option.
- Select the REMOTE option and set it to DISABLE.
- Set the IP address to 10.0.0.3
- Leave the Net Mask at 255.255.255.0.
- Exit the service menu.
Interestingly, after exiting the service menu following these changes, I was greeted with Error 31 (see error notes). I rebooted the system to resolve the error, and that worked. The system then booted to splash, and displayed a "CHECKING NETWORK" status. At that point, I connected to the WiPi's access point. Once on the network, the web interface for the module has a convenient loopback address, http://netbooter.local, which I used to gain access to the system configuration.
To configure the NetDIMM unit using the WiPi module I selected the "Setup" menu. From there, I accessed the "Manage NetDIMMs" option. Once the page loaded, I observed that it already had an entry that matched my NAOMI's IP address, and was showing green. For the purposes of learning, I opted to delete the entry and remake it. Once deleted, I added another and input the IP address as I had set it (10.0.0.3 in the example,) then I gave it a generic name, left the default game option blank, and saved the entry. The page refreshed and after a few moments I saw that it had successfully spotted my NAOMI and was again ready for operation. If you've got a NAOMI 2, select that from the relevant drop down instead, the instructions are otherwise the same.
With everything working as expected, it was time to see to the matter of updating the NetDIMM firmware. In my case, my unit was on firmware v3.03 and needed to get to v4.02. Fortunately, the WiPi web interface features a super convenient "Update NetDIMM Firmware" option in the settings menu. The Update NetDIMM Firmware page has a set of simple (but important) instructions that slightly alter how the process will go depending on what version the firmware is already. It's imperative to read and adhere to the instructions, as failure to follow them can result in creating a very expensive paperweight.
The instructions indicated I would first need to update to 4.01, then to 4.02. After selecting the appropriate update and confirming, the WiPi module sent the necessary file over to my NAOMI and directed me to follow the NAOMI's on-screen prompts. I did so, and after the first firmware update completed, I exited as directed, which caused the unit to reboot into Error 22 (see error notes.) I then power cycled the unit, which cleared the error and booted normally, allowing me to then send the second firmware update over. I again followed the instructions from the NAOMI, again was greeted with Error 22 after it rebooted, and (you guessed it) again I cleared it with a power cycle.
At this point, I observed my third error of the process. After power cycling following the final firmware update, the system booted into Error 33 (see error notes.) I presumed this was because the WiPi hadn't booted into a ready state by the time the NAOMI had reached out to it, and decided to ignore it. I logged back into the WiPi to try sending a game over, chose Marvel vs. Capcom 2, and hit send. The unit rebooted and the splash screen came up "NOW LOADING..." Meanwhile, the web interface on the WiPi module began refreshing rapidly (to redraw the progress bar for the upload.) Once it was done, the unit rebooted one final time and Marvel vs. Capcom 2 loaded as expected. A quick test match was sufficient to determine everything was good.
Success! I now had a functioning NAOMI multi!
Configuring with PC:
I'll take a moment to reiterate that I definitely recommend the dedicated WiPi route. That makes things tremendously easier from just about every single perspective. I've provided the PC configuration instructions here because I was curious about this method and looked into it myself. Having said that, like I mentioned earlier, I used a WiPi - so I did not actually use this method. I think it's still helpful to have the instructions for it laid out here, though, so I've provided them to the best of my knowledge.
Let's first outline the steps to setup the NAOMI for use with our PC, by setting its IP:
- Boot the Naomi unit to the splash screen and enter the service menu.
- Once in the unit service menu, navigate to the NETWORK SETTING option.
- Select the NETWORK TYPE option, and change it to ETHER if it's not already set to that.
- Select the SET IP ADDRESS option.
- Select the REMOTE option and set it to DISABLE.
- Set the IP address to 192.168.1.2
- Leave the Net Mask at 255.255.255.0.
- Exit the service menu.
Anyway, with the unit's IP set we can turn our attention to the PC side of the house. If you've got Python 3 installed, I recommend using netboot (see: https://github.com/DragonMinded/netboot ). The GitHub covers the install and syntax, and if you're comfortable with Python, I will trust you're capable of following the installation instructions. Otherwise, we'll be needing some additional software and files. Most notably, a copy of "transfergame.exe" as well as any appropriate firmware updates and decrypted games you intend to use.
Aside from that, documentation I could find identified that PC connections would require a crossover cable (not standard ethernet.) If- after setup- you can't see the NAOMI with a normal ethernet cable, try a crossover cable instead.
As far as transfergame.exe and the 4.01 and 4.02 DIMM updates, those can be found here:
https://mega.nz/file/ntQ2QYaQ#6Kb7XXQ_0qZaef2BeLKBxRai1jlRMfJ4Im5HWANVqic
The files were scanned with virustotal and determined safe. Use at your own risk.
With regards to the firmware updates, there are some specific instructions that must be followed (see: https://www.arcade-projects.com/threads/how-to-upgrade-your-netdimm-or-dimm-to-firmware-4-02.3296/ ) which depend on what firmware revision your NetDIMM unit is on:
- If your NetDIMM is on firmware 2.xx then flash to 4.01 first, then 4.02;
- If your NetDIMM is on firmware 3.xx (not 3.17) then flash to 4.01 first, then 4.02;
- If your NetDIMM is on firmware 3.17 you can flash straight to 4.02.
I'm assuming some basic competency here with regards to network configuration and command prompt usage. If you're not really super familiar with configuring your TCP/IP network settings it's not hard, but it's more work, and you'll have to undo it later. (Whereas, using a dedicated Pi solution like above doesn't require that, since the Pi will handle all the network business, and it also has the option for firmware updates, making things really simple. Seriously, go with the Pi route on this.)
With that said, it's time to set up the PC so that it's on the same network. Since we used 192.168.1.2 for the NAOMI, we'll use 192.168.1.1 for our PC. Enter the network TCP/IP settings, and change over to a static IP address as shown below. Besides our IP, we'll also set our subnet mask to 255.255.255.0, and gateway to 192.168.1.1. If you have more than one available ethernet port, make sure the one connected to the NAOMI is the one you're setting these options on.
After that's all set, open up a command prompt and type the following (make sure the IP matches whatever you actually set for your NAOMI):
ping 192.168.1.2
If your settings are correct, you should see several replies from the unit indicating it's present on the network. If you see nothing, it may be worth rebooting your PC and NAOMI to ensure the IP settings take hold. If both machines have been verified as properly configured, check your cable. If using a standard ethernet, switch to a crossover cable and try again (and vice versa.) Once you've established you can see the NAOMI it's time to make use of transfergame to start sending files to the NetDIMM module. Place the program as well as any files you'd like to transfer over together in the same folder, then open up a command prompt and navigate to that folder. From there, the syntax is:
transfergame 192.168.1.2 theFile.bin
Make sure the IP matches whatever you set for your unit, and the filename matches whatever file you're pushing. You should then see a flurry of activity indicating that the program is sending over the data, and once it finishes, the unit should reboot and load as expected. For firmware updates, after pushing them, simply follow the onscreen instructions when the NAOMI reboots to complete the flash. Be aware that the unit may reboot after a firmware update to Error 22, a simple reboot should resolve this and let you proceed. Games will simply load like they would from a cartridge once transferred, and should operate as expected.
At this point, you can disconnect the unit from your PC and undo the network changes you made to your PC to resume your normal operations. If you don't have a battery pack in the NetDIMM module, you'll have to repeat this whole process the next time you reboot it (which is another reason it's super useful to have the dedicated Pi for the unit).
In any case- that's that! Thanks for reading.
Error Notes:
"Error 22 - Communication Error Occurred Between Main Board and Option Board"
- This is typically a fault caused by the module not being fully seated on the unit. Having said that, as noted throughout this experience, it erroneously cropped up a few times and was resolved with a simple reboot.
- If your unit is properly seated, and you're still having issues with this error, it may be worth investigating the SMD buffer chip 74LCX16245A, located on the bottom of the NetDIMM unit, as that is a common failure point which results in Error 22 (see: https://www.arcade-projects.com/threads/sega-naomi-error-22.30847/ ).
- I received this error before I updated my BIOS, so I suspect it occurs when the unit does not support the NetDIMM module. I also experienced it once after changing the network settings on the unit- but a reset resolved it without issue.
- This error can occur for other reasons too, for instance a RAM failure (see https://www.arcade-projects.com/threads/naomi-netdimm-error-31-solved.26796/ ). If it's persistent, it's a smart decision to run the system diagnostic test and ensure the system is not experiencing genuine hardware issues.
- I received this error after rebooting on one occasion. I presume it occurs because the system doesn't see the WiPi right away (since the Pi initializes on power on as well). In any case, in my experience, it had zero impact on operation. I was able to access the WiPi interface while that error was present and push games to the unit as normal.
Last edited: