What's new

rewrite

Multi Boyz Litigator
Immortal
Multi Boyz
Joined
Nov 9, 2015
Messages
8,166
Reaction score
7,766
Location
SoCal
Alright. So what are we building? @ack @Vortex @ArcadeTV and some other fine folks I'm forgetting in this moment (please chime in, I'll add you to the credits) reverse engineered, created a daughterboard capable of holding more games, and created an improved menu for the V3 MVS and AES 161-in-1 Multicarts.

Tons of details spanning the entire project here:
https://www.arcade-projects.com/thr...161-in-1-cartridge-to-change-rom-games.15069/

There was some discourse in that thread about the difficulty of this project, as well as things that should be considered pre-requisites of skill or whether a questions was "technical enough" to bother answering. I think that's in bad form, and I genuinely believe anyone willing to put some time in and who can already through-hole solder without butchering things is entirely capable of this. So I'm going to be as explicit as I can in how to make one of these, and hope you have fun following along. After it's written, if you run into issues, feel free to post questions, nothing is too simplistic.

Repositories you'll need:

https://github.com/xvortex/VTXCart/tree/main
https://github.com/jwestfall69/neogeo-161in1-daughterboard/releases
https://github.com/jwestfall69/neogeo-161in1-dual-daughterboard
https://github.com/ArcadeTV/neogeo-menu

Tools you'll need (with my recommendations):

Solder (try to stay at 0.20 or below) - Kester 24-6337-0010
Flux paste - MG Chemicals 8341
Some sort of brush for the paste
Desoldering iron
Soldering iron
Hot air (with separate heat and air controls)
6mm tip for hot air station
Some sort of JTAG Programmer, any will do
Heat resistant gloves
Isopropyl alcohol (99% or 91%)
ESD Safe tweezers (needle-nosed AND a wide flat set)

Recommended but not necessary:
Hot plate

Items you'll need:

V3 Neo-geo multicart (AES or MVS)
1.27mm 2x25 or 2x50 pin rows (will be cut down to 2x22)
1.27mm 2x25 or 2x50 female pin headers (will be cut down to 2x22)
WeAct STM32H750 (you NEED a model with the screen)
2.54mm 2x25 or 2x50 female pin headers (will be cut down to 2x22)

PCBs you need to order (I recommend JLCPCB):

1 of each dumper board from Vortex's github (P, SM, and CV_DIP)
1 dual daughterboard from Ack's github
2 single daughterboards from Ack's github

I'll keep updating this as time permits. And I'm going to snag the next few posts here for the rest of the guide.
 
Last edited:
Using VTXCart. This step is semi-intertwined with the custom menu.

Download the entire VTXCart repository as a zip, and extract that into at the root of a drive.
Download the entire neogeo-menu repository as a zip, extract that into \VTXCart-main

Take all your Darksoft-type Neo roms and put them in \VTXCart-main\Compiler\Games

Use the neogeo-menu generator to build your menu and game list. Follow the instructions on the website UNTIL STEP 7.
https://ngmenu.arcade-tv.de/

Step 8 is incomplete. The files in copy_to_vortex_repo need to be copied to \VTXCart-main\Compiler\Menu\(AES or MVS depending)

Complete steps 9 and 10. We are done with the custom menu site now.

Now in \VTXCart-main\Compiler\bin open _run.bat in a notepad. Your 3rd line needs to look like this:

VTXCart.exe games.txt MVS GenIX GenMAME GenROM c3g

or for AES:

VTXCart.exe games.txt AES GenIX GenMAME GenROM c3g

Save the file, and run it.

Open VTXCart.txt now. Scroll to the bottom. If there are any errors, it will tell you and you'll need to resolve them and run it again until you are error free.

The files we care about moving forward are in:

\VTXCart-main\Compiler\bin\ROM

\VTXCart-main\Compiler\bin\Verilog
 
Last edited:
Last edited:
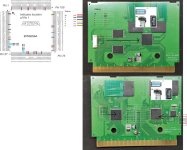
Programming the CPLD's.

Do this FIRST. Do it now. Do it first. Any amount of flux or anything having touched these will make it all but impossible to find a proper connection to do so.

Thanks to @pluger for this image:
oaltera max jtag pinout_alt.jpg
 
Last edited:
Prepping the boards.

Here's where the labor comes in.

First you'll want to remove the P roms. These are the 3 SSOP70 chips labeled P1, P2, and P3.

My method is to brush the legs of all 3 chips moderately with flux paste. Place the board on the hotplate at 100C (this heats the entire board evenly and prevents warping), chip-side up. Place the edge of one side of a set of needle-nosed tweezers under the edge of the chip you're working on. Don't apply any real pressure, JUST enough to hold the tweezers in place. Using a 6mm tip, set your hot air to 290C, low air (mine is about 3/10), and start making passes along the chip legs. Make sure you're perpendicular to the board, heating the legs and pads not the chip. Do not rest anywhere, keep moving. I do 3 1-second passes per side, then to the other side of the chip. In about a minute the chip will start to lift from the PCB. Stay patient, don't just yank it, and do a few more passes on each side until it slides right off and you can grab it with the tweezers. It should come off pretty clean and with no damaged pins/traces.

Repeat for the other two chips, then let the PCB cool a few minutes on the hot plate, then set it somewhere safe. Once it's been a few minutes give it a light spray with isopropyl alcohol and clean the flux off. It's easier to do while it's still warm.

Next are the S1 and M1 roms. Same concept, same settings, heat both sides evenly in short passes, never stopping. Rest the tweezer end against one of the no-pin sides and apply very light pressure. NEVER pull up on the chip, it's very easy to pull a pad up with you. After 40-50 seconds it'll give way and try to slide off on you, just grab it with the tweezers and set them to the side. Same story letting the PCB cool and cleaning it.

You can clean the legs on these with desoldering braid if needed. I find sometimes it's easier to use the desoldering gun on the lowest setting and suck it off of the SSOP70s.


Now that the flash roms are removed, it's time to look at the daughterboards. 88 pins a piece and the most labor intensive part of this.

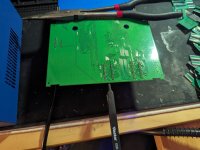
Pre-heat the PCB again so we can avoid risking warping. Chip-side up. Once it's warmed up, flip it over the edge of a box and glob a bunch of flux paste down the pin rows. Take a wide set of flat tweezers and rest one arm of them between the daughterboard and PCB as far as you can go. Set your hot air station to 400C, and air to maybe 6/10. Don't go any higher, it's not necessary and will risk burning the board. Take 3 2-second long sweeps down the row of pins and then go to the next row of the daughterboard you're working on and back and forth. In about a minute the chips will get shiny and you'll see the pins kind of "fall" into the holes (usually unevenly). IT STILL ISN'T READY TO BE PULLED OUT! Give it another 15-20 seconds of heating back and forth but shorten it to 1 sweep per row. Then continue heating and with the other hand gently straighten out the daughterboard with your tweezers and pull it out straight, it should take 0 effort.

PXL_20231126_232951559.jpg

Video:

https://photos.app.goo.gl/iTdJ27CrNRJnutQH8

The STILTs will likely be intact AND clean this way. If not, that's fine, but it can save you a step if they are! I'm roughing out 4/5 coming out clean enough to program without moving to another daughterboard with this method.

Back to letting the PCB cool on the hot plate, then off, then cleaning it of flux.

Now re-flow all of the 88 holes with solder, then run your desoldering gun over them. With my FR-300 with a 1.6mm tip you can set it to 2 notches past "2" for heat and it won't be enough to damage the board. Then set the tip over 4 holes at once. 12 seconds on the ground plane pins, 7 seconds on the other ones. Should be able to clean out 3-4 at a time this way.

Video:

https://photos.app.goo.gl/pBRrtYwo6BvbZ5t3A

Congrats! You've got the hard part done!

Now cut your female pin headers to 2x22, and solder them in place where the daughterboards had been installed.
 
Last edited:
Reassembly

This bit is easy.

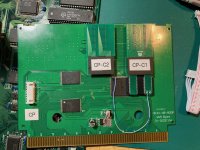
Pop V-Rom and C-Rom daughterboards into the respective sockets (dual daughterboard on the right). Thanks to @ack for this image:
IMG_1058.jpg

Solder the P roms into their respective spots. I do these pin by pin because drag soldering seems to cause more mess than anything with this large of pin spacing.

Solder the S1 and M1 roms onto the PCB. You've got a few options here

- Drag soldering
- Go pin by pin with a magnifying glass
- Purchase a stencil, apply solder paste, and either use very low air and 280C-ish heat until they form nice solder joints, or toss them in a reflow oven (or a real oven if you're a madman).

PUT IN HOW TO WIRE THE WIRES TO THE DUAL DAUGHTERBOARD

Now reassemble the cart and test!
 
Last edited:
@ManCloud has a version of the compiler, that takes the alternative menu with all its roms as input and creates the correct output.
Hold on until this is released. You can then just use the files created in the menu build-process from the folder "copy_to_vortex_repo".
 
@ManCloud has a version of the compiler, that takes the alternative menu with all its roms as input and creates the correct output.
Hold on until this is released. You can then just use the files created in the menu build-process from the folder "copy_to_vortex_repo".
Well, until then this will be accurate. I'll update it once this is released! Thanks for the heads up!
 
Quartus

Modern versions of Quartus do not support the MAX3000A series of chips (which are the ones we need to program on the PCBs). You can get Quartus 9.0 and 9.1 on archive.org here:
https://archive.org/details/90-quartus-free

For this step you'll need the 3 files in \VTXCart-main\Compiler\bin\Verilog

To be continued.
Interesting... i just used quartus web 13.0sp1 edition and this worked pretty well 👍
 
Interesting... i just used quartus web 13.0sp1 edition and this worked pretty well 👍
That's been discontinued and no longer available for download (if by some chance you still have the installer, can I trouble you for that?).

13.1 Web Edition doesn't support MAX3000A, and 13.1 Subscription *might*, but I don't have a subscription, nor do I think most people here would.

1701031585323.png


There is no download for 13.1 Web Edition unfortunately. I DID find an older MAX3000A Subscription Edition download, but it's not compatible.

If anyone has a better solution than downloading ancient Quartus (or paying for current) that'd be fantastic.
 
Last edited:
Back
Top