

mathewbeall
Enlightened
Hi Folks,
@electric_monk is still finalizing some items before his new ODE goes on sale - so be a bit more patient with him! As a few folks are still beta testing it, I thought I would get this information out there for everyone to consume, and warm up their 3d printers if they are upgrading from the old ODE to the new one.
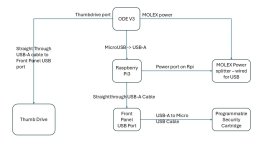
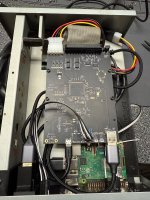
Attached is a diagram of how the new one needs to be hooked up (a bit simpler than the last one) - this is assuming you are using the 3d printed file with front mounted USB passthrough ports, if you are going to internalize everything - its even simpler.
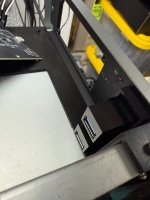
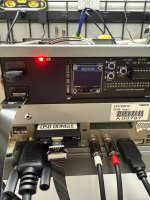
Attached are two zip files for the 3dprinted parts - one is STL, and one is a 3MF file (Bambu). You don't HAVE to change the front faceplate if you are upgrading, but there is a new faceplate here that has some holes to glue in some LED's off the main board. I used these LED's - https://www.amazon.com/dp/B0D25GK3S6?ref=ppx_yo2ov_dt_b_fed_asin_title&th=1 , and a (sixty eight) ohm resister for the green LED, and a 150 ohm resistor for the red LED.
For the ODE mount - I used these M3 heat press fittings, makes it super easy. https://www.amazon.com/dp/B077CJV3Z9?ref_=ppx_hzsearch_conn_dt_b_fed_asin_title_1&th=1 . I use a soldering iron to just gently push them into the posts and then screw a small M3 screw in. If you don't want to use the heat press fittings - I suspect you can just thread a M4 in there (someone can likely verify this).

For this new Rpi image - it is much more complete set, and has support for HDD images. To prepare the files to move onto the USB stick, you will need a 256GB thumbdrive to hold everything. You are going to want to go to archive.org and look for the "Namco System 2X6" set - this was uploaded by @defor a while back and is very complete. You will want to grab all of those files and put them into a directory, and then grab this powershell script: https://mega.nz/file/Z6wRFLjb#jXiLD01OBoioomHjl-Sze8eL05o31RaAb1WlxN0h3PY . put this script in the base directory, and then run it.
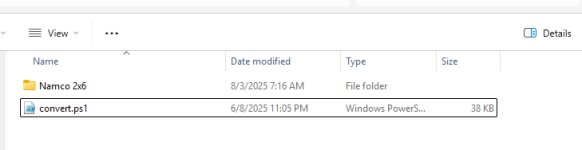
Open up a powershell as administrator and run the ./convert.ps1 command (feel free to look at the script ahead of time if you like). It is going to uncompress all the files, rename most of them, and trim down the HDD images to remove the blank space. As it's doing all of this - it will move the files into a new directory it will created called "USB Drive" and delete as it goes (to save on actual space needed). This process will take a while (a little over an hour on my 12th gen intel and SSD system) - and when it's all done, it will compare the SHA5 hashes against known good. It is possible that you will have some errors on 9 of the CD rom images if @defor hasn't updated his archive yet. If that is the case - grab the fixed images CD here - https://mega.nz/file/l34RlRzD#HOAO7ZVK8gMHMpLqYVVWKpYe0P3mpzvUvyr7S8Y61XU . Copy these into the USB Drive directory and overwrite what is there.
Once that is all complete, copy all of these files to the base directory of your USB thumbdrive.
Thanks to @BladeZX - here is an archive of all the files properly modified to use for this new ODE and image. You will want to grab the file called "usb_drive.zip", unzip that into a directory and copy all the files in the "USB Drive" directory (78 of them) onto the root of the USB thumbdrive you intend to use:
https://nextcloud.btmaslen.com/s/riRX4XZGdGp8fnK
or
https://mega.nz/file/hjgBlDSQ#ejn1Wxeg5nOfEjK9Rr0buSmMEc0SPMCktSbHCRQnfXQ
Here are the Rpi images that work with this new ODE/ image set.
246 image: https://mega.nz/file/1rJABKrZ#GB17MTWUizeBRGQ3OTwlskjA7fPDxC0tM2ezTB0v1HM
256 image: https://mega.nz/file/wrxVnZ6L#0XH9CCQ4bEXg7NF1b--XBAKbiLSe0qRLSLDxg-NhYkc
This is a compressed/zero'd out image - so when it first boots it will expand to fit the size of the SD card you have written it to - I tested a 16GB and 32GB - you might even be able to use an 8GB. The first boot does take longer as it expands the volume.
The *only* difference between these images is that one has "246" selected as the game system in the menu, and the other has "256" selected.
I think those are the complete instructions! As always - post questions here. Thanks to @electric_monk for a great update to the ODE (v3) that now supports HDD images, and I especially love the LED breakouts so that you have a visual indication that something is happening with the drive!
Thanks to @twistedsymphony who built the new mappings and romsinfo file to map all the new .iso/.hdd images over to the correct dongles and performed testing to get the ball rolling on all of this!
Thanks to @BladeZX for the work on the multi and the initial Rpi image!
UPDATE! Big QOL updates on this one - links for the images above are all new, to be used with the new ODE.
Please give me feedback.
Matt
@electric_monk is still finalizing some items before his new ODE goes on sale - so be a bit more patient with him! As a few folks are still beta testing it, I thought I would get this information out there for everyone to consume, and warm up their 3d printers if they are upgrading from the old ODE to the new one.
Attached is a diagram of how the new one needs to be hooked up (a bit simpler than the last one) - this is assuming you are using the 3d printed file with front mounted USB passthrough ports, if you are going to internalize everything - its even simpler.
Attached are two zip files for the 3dprinted parts - one is STL, and one is a 3MF file (Bambu). You don't HAVE to change the front faceplate if you are upgrading, but there is a new faceplate here that has some holes to glue in some LED's off the main board. I used these LED's - https://www.amazon.com/dp/B0D25GK3S6?ref=ppx_yo2ov_dt_b_fed_asin_title&th=1 , and a (sixty eight) ohm resister for the green LED, and a 150 ohm resistor for the red LED.
For the ODE mount - I used these M3 heat press fittings, makes it super easy. https://www.amazon.com/dp/B077CJV3Z9?ref_=ppx_hzsearch_conn_dt_b_fed_asin_title_1&th=1 . I use a soldering iron to just gently push them into the posts and then screw a small M3 screw in. If you don't want to use the heat press fittings - I suspect you can just thread a M4 in there (someone can likely verify this).
Open up a powershell as administrator and run the ./convert.ps1 command (feel free to look at the script ahead of time if you like). It is going to uncompress all the files, rename most of them, and trim down the HDD images to remove the blank space. As it's doing all of this - it will move the files into a new directory it will created called "USB Drive" and delete as it goes (to save on actual space needed). This process will take a while (a little over an hour on my 12th gen intel and SSD system) - and when it's all done, it will compare the SHA5 hashes against known good. It is possible that you will have some errors on 9 of the CD rom images if @defor hasn't updated his archive yet. If that is the case - grab the fixed images CD here - https://mega.nz/file/l34RlRzD#HOAO7ZVK8gMHMpLqYVVWKpYe0P3mpzvUvyr7S8Y61XU . Copy these into the USB Drive directory and overwrite what is there.
Thanks to @BladeZX - here is an archive of all the files properly modified to use for this new ODE and image. You will want to grab the file called "usb_drive.zip", unzip that into a directory and copy all the files in the "USB Drive" directory (78 of them) onto the root of the USB thumbdrive you intend to use:
https://nextcloud.btmaslen.com/s/riRX4XZGdGp8fnK
or
https://mega.nz/file/hjgBlDSQ#ejn1Wxeg5nOfEjK9Rr0buSmMEc0SPMCktSbHCRQnfXQ
Here are the Rpi images that work with this new ODE/ image set.
246 image: https://mega.nz/file/1rJABKrZ#GB17MTWUizeBRGQ3OTwlskjA7fPDxC0tM2ezTB0v1HM
256 image: https://mega.nz/file/wrxVnZ6L#0XH9CCQ4bEXg7NF1b--XBAKbiLSe0qRLSLDxg-NhYkc
This is a compressed/zero'd out image - so when it first boots it will expand to fit the size of the SD card you have written it to - I tested a 16GB and 32GB - you might even be able to use an 8GB. The first boot does take longer as it expands the volume.
The *only* difference between these images is that one has "246" selected as the game system in the menu, and the other has "256" selected.
I think those are the complete instructions! As always - post questions here. Thanks to @electric_monk for a great update to the ODE (v3) that now supports HDD images, and I especially love the LED breakouts so that you have a visual indication that something is happening with the drive!
Thanks to @twistedsymphony who built the new mappings and romsinfo file to map all the new .iso/.hdd images over to the correct dongles and performed testing to get the ball rolling on all of this!
Thanks to @BladeZX for the work on the multi and the initial Rpi image!
UPDATE! Big QOL updates on this one - links for the images above are all new, to be used with the new ODE.
- Now monitors the ODE via serial after commands are entered, as well as the progress of the dongle load to give feedback on both interfaces (LCD/Web) if one of those loads errors out you will see an error message and it will keep the system in hold mode.
- Visual progress on the dongle load on both interfaces (lcd/web)
- Reduced load time as much as possible so that it holds the system at reset now about 6-8 seconds into boot
- Reduced time across the board (aside from dongle load which is fixed) to load new games
- Some games weren't showing in the web interface, now ALL games are showing in the web interface
- Added graphics for all games - sorry, this isn't my area - some of them are ps2 game covers - if anyone wants to really go through that and curate a better list, send em over, and I will get them on it - but at least for now, everything has a graphic (web UI)
- WebUI is more streamlined - when you pick a game like Soul Calibur - you can see that it has 7 versions, and when you select it, you then pick which version
- Lots of little changes to make it more robust
Please give me feedback.
Matt
Attachments
Last edited:


