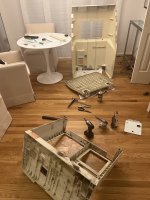
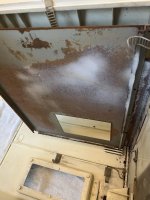
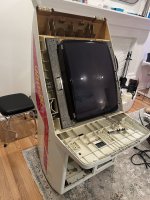
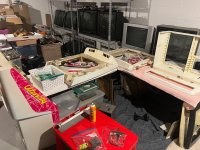
Picked up this beat-up Konami Windy locally for cheap. As you can see, she needs some work.
I love these cabs, been wanting one for a while, but they rarely pop-up. They're made of all thick ABS Plastic, barely any metal, has an awesome shape that's close to the dimensions of an Astro City, but thinner in the profile dimensions. Time to give it a new lease on life! Shhhh, it's ok, Windy. You're in a safe place now. The bad men can't hurt you anymore.

She's been used and abused. Scratches from vandals tagging her up. Scuffs, crust, gooey and rusty, security bars. Let's assess the damage and figure out a plan of action.
First, here is the more egregious damage to the plastic shell, the rest are minor scuffs or leftover adhesives but these are the deeper scratch issues:

Lots of tagging, and I removed one side of the security bars so there are holes to fill. All this damage is fixable with a little JB Weld products and a repainting.
Speaking of tagging, there's more on the monitor glass. Now this will be harder to fix. Assholes. I'm going to see if I can buff them out. They don't seem too deep, but I might not be able to remove them completely. Maybe lessen their depth:

The monitor is the original Toshiba tube, PB6640 chassis. Great scanlines and brightness when this monitor is working. This one unfortunately doesn't power up. I'll dig into this and see if I can get it working again. If not, I could always put my spare Nanao-MS9 into it. But I'd prefer the original monitor setup.

The marquee area is probably the best part of this cab right now, the acrylics look good:

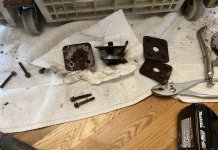
Of course the cab is missing the plexi marquee art holder, those things are pretty hard to come by for a good price. But it's also missing the 2 legs in the front, and both back wheels. Luckily it has the mounting plates for the back wheels, and I've already ordered replacements based on @Asobu 's great write-up on his restoration.

I took apart the control panel. I had to drill out the standard cam-locks that were on there, which wasn't a big deal with my carbide metal bits. You can see from the top, some dingus spilled soda or something all over the CP. It's all gooey and sticky under there. The panel itself looks to be a 2L12B that has been bastardized with a Happs IL 4-way joystick and buttons, probably to run a cheap x-in-1 multi board.

Also another security prevention feature, no plastic coin entry, just this metal plate with a slot. Well at least they didn't mangle the slot, just gotta fix those new screw holes.

Aside from the awful kitchen counter vinyl overlay someone put on this, it also has plexi over the CPO which isn't flush and extrudes out. After removing it and peeling back the gross sticky patterned vinyl, the original panel's CPO is revealed! It's too bad whoever converted this removed the second player's joystick mount. I might see if a metal worker friend can help me weld a mount back on it, because the metal of the panel itself is in pretty good shape. Just gotta fix the new holes, and get an overlay. Though, it might just be better to get an Alberto repro and save the hassle.

She's already looking like a Windy again!

First step to all of this is to take the cab apart completely, give it a good cleaning and disinfecting before I start tackling the physical fixes. I'd also like to gut it and start looking at the monitor in the near future.
Not going to rush through this restoration like one of my Aero City's (took 13 days!) , but I always like staying organized and planning these resto's out fully. I'll do some of this over the holiday break of course.
But my plan is to get this to a nice "house-ready good condition" within the next few months. I don't need a pristine fresh-from-the-factory looking cab. I've never been down with those types of restores, I respect those who do them, but they're not for me. I like my cabs to look good with a little patina to show their usage.
I'll keep this log up-to-date as I progress.
I love these cabs, been wanting one for a while, but they rarely pop-up. They're made of all thick ABS Plastic, barely any metal, has an awesome shape that's close to the dimensions of an Astro City, but thinner in the profile dimensions. Time to give it a new lease on life! Shhhh, it's ok, Windy. You're in a safe place now. The bad men can't hurt you anymore.
She's been used and abused. Scratches from vandals tagging her up. Scuffs, crust, gooey and rusty, security bars. Let's assess the damage and figure out a plan of action.
First, here is the more egregious damage to the plastic shell, the rest are minor scuffs or leftover adhesives but these are the deeper scratch issues:
Lots of tagging, and I removed one side of the security bars so there are holes to fill. All this damage is fixable with a little JB Weld products and a repainting.
Speaking of tagging, there's more on the monitor glass. Now this will be harder to fix. Assholes. I'm going to see if I can buff them out. They don't seem too deep, but I might not be able to remove them completely. Maybe lessen their depth:
The monitor is the original Toshiba tube, PB6640 chassis. Great scanlines and brightness when this monitor is working. This one unfortunately doesn't power up. I'll dig into this and see if I can get it working again. If not, I could always put my spare Nanao-MS9 into it. But I'd prefer the original monitor setup.
The marquee area is probably the best part of this cab right now, the acrylics look good:
Of course the cab is missing the plexi marquee art holder, those things are pretty hard to come by for a good price. But it's also missing the 2 legs in the front, and both back wheels. Luckily it has the mounting plates for the back wheels, and I've already ordered replacements based on @Asobu 's great write-up on his restoration.
I took apart the control panel. I had to drill out the standard cam-locks that were on there, which wasn't a big deal with my carbide metal bits. You can see from the top, some dingus spilled soda or something all over the CP. It's all gooey and sticky under there. The panel itself looks to be a 2L12B that has been bastardized with a Happs IL 4-way joystick and buttons, probably to run a cheap x-in-1 multi board.
Also another security prevention feature, no plastic coin entry, just this metal plate with a slot. Well at least they didn't mangle the slot, just gotta fix those new screw holes.
Aside from the awful kitchen counter vinyl overlay someone put on this, it also has plexi over the CPO which isn't flush and extrudes out. After removing it and peeling back the gross sticky patterned vinyl, the original panel's CPO is revealed! It's too bad whoever converted this removed the second player's joystick mount. I might see if a metal worker friend can help me weld a mount back on it, because the metal of the panel itself is in pretty good shape. Just gotta fix the new holes, and get an overlay. Though, it might just be better to get an Alberto repro and save the hassle.
She's already looking like a Windy again!
First step to all of this is to take the cab apart completely, give it a good cleaning and disinfecting before I start tackling the physical fixes. I'd also like to gut it and start looking at the monitor in the near future.
Not going to rush through this restoration like one of my Aero City's (took 13 days!) , but I always like staying organized and planning these resto's out fully. I'll do some of this over the holiday break of course.
But my plan is to get this to a nice "house-ready good condition" within the next few months. I don't need a pristine fresh-from-the-factory looking cab. I've never been down with those types of restores, I respect those who do them, but they're not for me. I like my cabs to look good with a little patina to show their usage.
I'll keep this log up-to-date as I progress.


