What's new
Auto reset setup
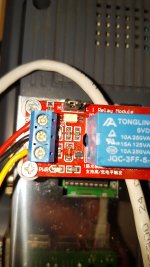
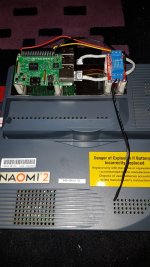
Just follow the guide above. I have a naomi 2 setup also. Make sure your relay is the same type as used in the tutorial. It has a permanent 5v and ground attached and uses pin 40 (gpio 21) output to switch to high to enable the relay.
This is a link to the relay I used http://www.ebay.co.uk/itm/161846583843
(there is a jumper on it to allow for high switching operation selection, marked "H" and "L" . Make sure your relay is not a low switching type as it won't work (and they are quite common))
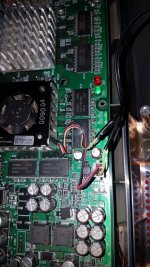
Also the tutorial mentions using both GPU fan pwm wires, I only used one fan pwm feedback wire and it works fine.
 
Last edited:
This is my setup using sticky pads on the pcb feet of the pi3 and relay. Pi is powered from Naomi 5v output and placed with SD card facing the front of the cab for easy removal for upgrades
Make sure to leave enough space between the pi3 and relay board for the crossover cable to be plugged in.
IMG_20170315_222110.jpg
Also notice that I have removed the tray for the sound amp and power supply from my Naomi, that was for another project. I'm not sure if the naomi with the pi attached like this will fit with the tray in place, peeps will have to measure first to make sure it fits.
 
Last edited:
Close up of my relay wiring. Make sure black jumper on relay is set on "H"
IMG_20170315_234323.jpg

Note jumper set to" H"
 

Attachments

  • IMG_20170315_235316.jpg
    IMG_20170315_235316.jpg
    479.5 KB · Views: 117
Last edited:
This is my setup using sticky pads on the pcb feet of the pi3 and relay. Pi is powered from Naomi 5v output and placed with SD card facing the front of the cab for easy removal for upgrades
Make sure to leave enough space between the pi3 and relay board for the crossover cable to be plugged in.
IMG_20170315_222110.jpg
Also notice that I have removed the tray for the sound amp and power supply from my Naomi, that was for another project. I'm not sure if the naomi with the pi attached like this will fit with the tray in place, peeps will have to measure first to make sure it fits.
With @Philbee90s setup, you can definitely use a Pi2. I don't think the NAOMI2 is wireless in this scenario.
 
The wireless function of the pi is for everyone to utilize the piForce web application using a mobile phone to access the pi's WiFi and then select and launch your games via your phone.
The Net dimm on the Naomi/Naomi2 itself will always be wired to the ethernet port on any model of pi used.
The pi2 would work but because it does not have WiFi built into it you would have to buy a suitable WiFi adapter for it in order to connect and launch your games via your phone.
The pi3 has WiFi built in which makes it as simple as write image to SD card, insert card to pi3, power up, sign into pi3 WiFi using your phone and launch game from the web menu.
I see. The built-in Wifi (or an adapter) is the access point.
That's it.
Really nice way to load your games and easy organize too thanks to the work of devtty0
 
Can someone show a good picture or description of how the relay actually connects to the fan on the inside of the Naomi 2? The pictures are great for the "outside" part - curious of how to connect on the inside of the Naomi 2 to make sure it is done right and something is not cut or changed that should not be. Looks like it is run through one of the "vents" of the Naomi so you don't have to cut any new holes in the Naomi case to get the wire through?
Thanks.
 
I can pull out my Naomi2 later, take it apart and take a pic for you. I passed the cable through the vent because I don't want to drill holes in or cut the Naomi2 case
 
That would be awesome. Thanks!
I agree - I didn't want to drill a hole in the Naomi2 case and glad that I don't have to; thought I might have to originally. This is much better.
 
Some pictures that should help
IMG_20170318_174256.jpg
IMG_20170318_175119.jpg
 

Attachments

  • IMG_20170318_174401.jpg
    IMG_20170318_174401.jpg
    635.5 KB · Views: 117
  • IMG_20170318_174328.jpg
    IMG_20170318_174328.jpg
    584.3 KB · Views: 113
Can i fix the game list by myself which shows on Piforce-Web (mobile phone) for supporting new-come\ free-editing game title?

If it can be done on FAT32 partition under the Windows OS platform, that will be nice.
 
Last edited:
Can i fix the game list by myself which shows on Piforce-Web (mobile phone) for supporting new-come\ free-editing game title?

If it can be done on FAT32 partition under the Windows OS platform, that will be nice.
Yes you can.
UPDATE - v1.2 - option to auto-load the last played game
UPDATE - v1.2 - option to auto-shutdown the file system after loading
UPDATE - v1.2 - config menu and shutdown links from every web-page
UPDATE - v1.2 - adds support for naomi2, atomswave, triforce and chihiro games
UPDATE - v1.2 - moves the game names, images and rom names to a .csv (excel) file in the Windows partition (/config/roms.csv) so its easy to amend or changing the pictures and text that are displayed for each game on the web page.
UPDATE - v1.2 - move the image folder to /config/images/ on the Windows (fat32) partition so the image files/pictures can be swopped easily.
UPDATE - v1.2 - integrated GPiO support for this project: Games that won't allow for auto reset when netbooting

Props to devtty0 for this.
 
Last edited:
I am so happy I started this thread. Moving the stuff to the Fat32 partition is CLUTCH!

PS, you misspelled swapped :)
 
@devtty0 Finally got around to updating my card with this build. Having everything on the FAT32 side is awesome!

I am updating both the CSV and the image folder and will attach the updated ones to this thread. You were missing a bunch of Atomiswave games and Ive been replacing the pix with cropped versions of logos and copying/editing existing ones for the hacked version (such as MvC2, KOFXI, etc)
Hey, did you get a chance to compile the additional images and the text for the CSV - would save me doing it :D . Cheers
 
Back
Top