What's new
Hello everyone. I got mine a couple days ago and decided to start it today.
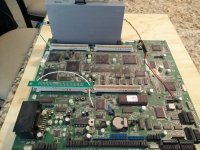
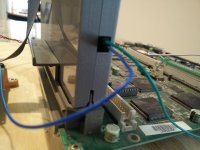
I followed a video on how to solder a power connector so the LCD is powered on. And installed a reset wire.

I connected this to my blast city and got a system assignment error, i guess, due to the fact that the game loaded by defaut was Sea Bass Fishing, wich need a fishing rod.

I selected another game (golden axe) and pressed the button, but nothing is happening. No "loading" led on the cart.

I turned the ribbon cable in case it was on the wrong side, but nothing either.

Did i miss something?
 
Try with a 100% working game that doesn't need any additional I/O or settings
For example the Cotton games or Radiant Silvergun
 
thank you for your reply.

Any game i was trying was giving me nothing. Using the STV LCD selector, or jumpers on the cart.

I had NO activity of the loading LED.

BUT, i found the issue. This was only my memory card improper folder built.

MC:\games\All-gamefolders-here --> correct way to make it

Not directly MC:\game_xx

It's loading now.
 
Annnnnnnnnnd i spoke too quickly.

Now that the jumper game selection is working, i was really happy and thought that it will be ok with the LCD selector.

When i select my game from the menu, i then push the button on the far left, , i get a ">" on the screen (on the game numer) but nothing on the loading led.

What can i try now?

Update1:

I received 2 of those devices, so i tested both. I noticed the "power" led on one is green, on the other it's orange. None are loading a game.
 
Last edited:
Did you also attach the two reset wires? There's one reset wire between the Multi and the STV board, and another reset wire between the Multi and the LCD selector.
 
I tried, but it may not be doing perfect contact.

Is it needed for the game to load?

I am doing this while wainting for your answer
 
do you need the reset wires for the display/updater to work?

I guess you only really need the power wires isn't it?
 
Yes guys. To use the LCD selector you need to have both reset wires connected. The cart has to be held in a reset state while it loads.
 
Great that this solved out - I had a really long working day and did not check the messages until just now...
 
Zoom of my setup, btw who's got my plexi case already! :thumbup:
IrGvBnz.jpg
 
I wanted to update this thread with new images of my STV, decked out in 3D prints from @twistedsymphony. :)
A0he2Di.jpg


Taking a page from @ShootTheCore I mounted the LCD case via inverted PCB standoffs superglued to the back half of the case...
CdxKPqD.jpg


Providing some feed back about the cart design, I love it but...
LxFRUj0.jpg


The case blocks the power/write statue LEDs on the multiboard, I like being able to see these...
Also, the Pin header needs to be open/unblocked to use/accomodate a connector (like the one I'm using from @Mitsurugi-w wire kit).

Could you please update this cart half only, adding a nice/clean looking access hole to satisfy both requests above?
My dremel job looks pretty nasty haha. ;)
 
Last edited by a moderator:
My wires are not long enough to use that hole, if it was on the opposite side of the case closer to where I mounted the LCD it would be fine.
But I'm guessing no place to mount a connector on the right hand side of the PCB.
 
Gotta say I like this even better than the original ST-V cartridge shells. Hopefully no one sacrifices an OG shell when this is out there!

I added the header as twistedsymphony shows in his pics, but I left the fourth pin in place so there is an extra spot to hook up the LCD selector reset pin.

Back two pins are GND and Line Out, front two are mobo reset from DS cart and DS cart to LCD reset line.
 

Attachments

  • IMG_20170814_161725.jpg
    IMG_20170814_161725.jpg
    825 KB · Views: 250
  • IMG_20170814_161515.jpg
    IMG_20170814_161515.jpg
    587.8 KB · Views: 242
  • IMG_20170814_162406.jpg
    IMG_20170814_162406.jpg
    697.6 KB · Views: 227
Back
Top