lukemorse1
Professional
I recently picked up a Sega Model 3 board The Ocean Hunter which has almost zero info as to wiring goes on the net, especially for the guns so Im providing the information I found when wiring mine up. (I still have yet to make a video of it in action although Ive already beaten it a couple times) I need to get on that.
Nonetheless, here is how it goes.
After taking a look at some of the other Model 3 boards and the filter board pinouts, I was able to find the correct pinouts to wire it up. Some things I found for my own set up were that although the Y axis pots were wired normally with +5 and GND on the pot, I had to reverse +5v and GND for the X axis on both for Player 1 and 2. (Im using original mounted guns for Beast Busters)
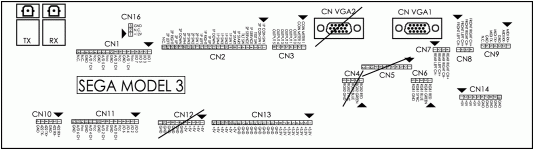
The connectors used for wiring this system are as follows:
CN VGA 1 (Video Display)
CN 1 (Player 2 gun positioning X,Y)
CN 2 (Player 1 and 2 Start Buttons and Trigger buttons)
CN 8 (Sound Left and Right + and -)
CN 13 (3.3v , 5v, GND Input)
*CN 12* (5V and GND *OUTPUT* ONLY) Best Not to use.
CN 11 (Player 1 Gun Positioning X, Y)
CN 14 (+5 and GND INPUT ONLY)
CN 16 (+12v and Gnd. Pin 1= +12 , Pin 3= GND , Pin 2 not used)
On CN 2, Pin 1 is Player 1 Coin In, Pin 2 is Player 2 Coin In (if set to Freeplay, you do not need to wire these pins in) Inside the cage on the pcb are service and test buttons as well so no need to wire those either). Pin 7 is Player 1 START, Pin 8 is Player 2 START. Pins 9 and 10 are for Player 1 trigger buttons. Pins 17 and 18 are for Player 2 Trigger buttons. The original cab had 2 trigger buttons but if you are using a single shoot gun set up you can wire those 2 pins together for 1 trigger. You can get your GND from CN 12 if needed. These are all the pins you will need for wiring on CN 2
CN 13, CN 14, and CN 16 are your power inputs. (Im 99% sure of these inputs but always make sure that you double the screen print on the filterboard and it does say INPUT. Wire the voltages accordingly to the picture here.
*CN 12* is a special connector, originally used for the recoil on the guns I believe but not necessary to use. this should be OUTPUT only so DONT wire in your positive voltage here. (maybe even best to avoid using this one all together)
CN 11 is your Player 1 X and Y axis. A/D 0 CH will be your X (I believe its X ) and A/D 2 CH is your Y. VCC is your +5v and GND is your ground. Keep in mind that the X and Y may be reversed and to always use separate VCC and GND for each channel, its better that way. These are the only points you will use from this connector.
CN 1 Is your Player 2 X and Y axis. Once again, A/D 1 CH is your X (I believe its X) and A/D 3 CH is your Y. Just like player 1 controls, make sure to keep the power separate for each channel and if you notice that your guns for whatever reason are backwards i.e. X and Y are switched, just change the middle pin channel wire.
If you find that the directions are reversed, change the VCC and GND wires to the opposite posts.
These are the only connectors you will need to get the system to work. There is no separate I/O board used for controls or video, just the connector I mentioned here.
Please use the pinout on the filter board attached to help you out.
As far as gameplay goes, the game is not difficult (Even on Hard settings) but it is a fun game to play. It just could have been a bit longer, and more difficult to make it the perfect game.
Hopefully this will help you guys out there if you get this game and here is to keeping more of these systems going.
Nonetheless, here is how it goes.
After taking a look at some of the other Model 3 boards and the filter board pinouts, I was able to find the correct pinouts to wire it up. Some things I found for my own set up were that although the Y axis pots were wired normally with +5 and GND on the pot, I had to reverse +5v and GND for the X axis on both for Player 1 and 2. (Im using original mounted guns for Beast Busters)
The connectors used for wiring this system are as follows:
CN VGA 1 (Video Display)
CN 1 (Player 2 gun positioning X,Y)
CN 2 (Player 1 and 2 Start Buttons and Trigger buttons)
CN 8 (Sound Left and Right + and -)
CN 13 (3.3v , 5v, GND Input)
*CN 12* (5V and GND *OUTPUT* ONLY) Best Not to use.
CN 11 (Player 1 Gun Positioning X, Y)
CN 14 (+5 and GND INPUT ONLY)
CN 16 (+12v and Gnd. Pin 1= +12 , Pin 3= GND , Pin 2 not used)
On CN 2, Pin 1 is Player 1 Coin In, Pin 2 is Player 2 Coin In (if set to Freeplay, you do not need to wire these pins in) Inside the cage on the pcb are service and test buttons as well so no need to wire those either). Pin 7 is Player 1 START, Pin 8 is Player 2 START. Pins 9 and 10 are for Player 1 trigger buttons. Pins 17 and 18 are for Player 2 Trigger buttons. The original cab had 2 trigger buttons but if you are using a single shoot gun set up you can wire those 2 pins together for 1 trigger. You can get your GND from CN 12 if needed. These are all the pins you will need for wiring on CN 2
CN 13, CN 14, and CN 16 are your power inputs. (Im 99% sure of these inputs but always make sure that you double the screen print on the filterboard and it does say INPUT. Wire the voltages accordingly to the picture here.
*CN 12* is a special connector, originally used for the recoil on the guns I believe but not necessary to use. this should be OUTPUT only so DONT wire in your positive voltage here. (maybe even best to avoid using this one all together)
CN 11 is your Player 1 X and Y axis. A/D 0 CH will be your X (I believe its X ) and A/D 2 CH is your Y. VCC is your +5v and GND is your ground. Keep in mind that the X and Y may be reversed and to always use separate VCC and GND for each channel, its better that way. These are the only points you will use from this connector.
CN 1 Is your Player 2 X and Y axis. Once again, A/D 1 CH is your X (I believe its X) and A/D 3 CH is your Y. Just like player 1 controls, make sure to keep the power separate for each channel and if you notice that your guns for whatever reason are backwards i.e. X and Y are switched, just change the middle pin channel wire.
If you find that the directions are reversed, change the VCC and GND wires to the opposite posts.
These are the only connectors you will need to get the system to work. There is no separate I/O board used for controls or video, just the connector I mentioned here.
Please use the pinout on the filter board attached to help you out.
As far as gameplay goes, the game is not difficult (Even on Hard settings) but it is a fun game to play. It just could have been a bit longer, and more difficult to make it the perfect game.
Hopefully this will help you guys out there if you get this game and here is to keeping more of these systems going.


") Actually I'm interested in any pcbs they toss that you aren't!
Actually I'm interested in any pcbs they toss that you aren't! ")

