You are using an out of date browser. It may not display this or other websites correctly.
You should upgrade or use an alternative browser.
You should upgrade or use an alternative browser.
Blast City / Astro City / Astro City 2 / NNC - Restorations
- Thread starter Segafan1985
- Start date
erdrick1980
Professional
That control panel came out really good.
I tried getting that rust on pastic off but not 100% besides scrubbing, what spray you use?
I tried getting that rust on pastic off but not 100% besides scrubbing, what spray you use?
I just used simple green to get what I could, then some Meyer's Rust remover, still had some remnants so I just used sandpaper to get the rest, since the plastic is white I'm basically just removing the top layer and luckily white is still underneath.That control panel came out really good.
I tried getting that rust on pastic off but not 100% besides scrubbing, what spray you use?
----
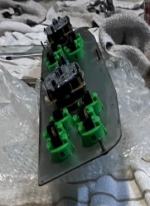
I'm finding the most difficulty removing the rust on the underside of the metal control panel where the buttons are
I used sand paper but messing up the finish on the metal. Since there is artwork on the other side i cant really soak it in vinegar. Anyone have any advice on this part?
Attachments
Kidkaos
Champion
As much rust remover as you can use on that under side(clr), then you'll have to use a rust stopping paint, like rustoleum oil paint for metal to seal it.I just used simple green to get what I could, then some Meyer's Rust remover, still had some remnants so I just used sandpaper to get the rest, since the plastic is white I'm basically just removing the top layer and luckily white is still underneath.
----
I'm finding the most difficulty removing the rust on the underside of the metal control panel where the buttons are
I used sand paper but messing up the finish on the metal. Since there is artwork on the other side i cant really soak it in vinegar. Anyone have any advice on this part?
man this saved my life, thanks this really made it much easier. Now i can get all my buttons oriented the same way and experiment with different colors etc!
Hey guys.
I have been looking at ways to restore my Astro marquee as it is dull like most of that age. I saw an article on another site where the person used transparent colored tape on the back of the marquee (green, pink, blue, etc) and it looked quite good and gave the colors that vibrant look again.
Any recommendations on ways to restore? I don't want to paint it, and I am not sure if there is a "perfect" repro out there either. But if I can use original parts with a little ingenuity I like that solution.
I was thinking of reaching out to that person to see if they could sell me the kit with the tape but wanted to consult with my team of legendary arcade bros first.
Thank you.
---
Update:
I found kidkaos's reply in a thread stating to go with Barry Bruise at Arcade Art Repro so I just went for it. lol.
Last edited:
I think I’m at the final leg of my restoration. Just gotta wait a bit for the repro marquees, build the stereo amp up connector, and install the pioneers. This amp has a line out so I may add a sonos or something stupid and impractical like that inside to see if that gives it some oomf.
Oh yeah and I have the locks just waiting on a key.
And a new monitor mine has too much burn in
Last edited:
Decided I needed to clean first

So I bought a sonos era 1. Was super stoked. Connected it to line in. Realized there is a 75 ms minimum delay even if you are just connecting to an amplifier with no other sonos speakers. So it sounds great but it’s just delayed 
Gonna keep it. Was looking at a Bose home speaker 500 but the reviews are very mixed.
Not sure what to do. Even considering a new Amazon echo with line in.
Gonna keep it. Was looking at a Bose home speaker 500 but the reviews are very mixed.
Not sure what to do. Even considering a new Amazon echo with line in.
advans14
Professional
For the cp surround rust plastic.
I always use krud kutter for first pass clean. Then I use a slurry of white vinegar, dawn dish soap and baking soda for the rust. Then i used a tooth brush to agitate it (bubbles from dawn) and let it sit. This will take away 90-95% after you let it sit on for about 15min. Repeat a few times. Lastly I use super high grit wet sand paper like 1500+ grit and do mini circles in the slurry Edit - the high grit plus slurry combo makes it so you remove barely any material. besides its under the cp anyways so no one will notice.
I always use krud kutter for first pass clean. Then I use a slurry of white vinegar, dawn dish soap and baking soda for the rust. Then i used a tooth brush to agitate it (bubbles from dawn) and let it sit. This will take away 90-95% after you let it sit on for about 15min. Repeat a few times. Lastly I use super high grit wet sand paper like 1500+ grit and do mini circles in the slurry Edit - the high grit plus slurry combo makes it so you remove barely any material. besides its under the cp anyways so no one will notice.
Last edited:
New coin slots!
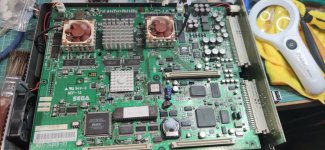
You have mounted the two noctua fan at reverse, is not a big issue but...


Didn’t realize these are the same Noctuas for the Dreamcast fan replacement. Since I have an extra I’ll be working on that next. Now that the Blast PSU, Sun PSU, and Naomi 2 all have new quiet fans it sounds like a dream and not like a rickety jet. Thanks everyone for showing me the way on these mods. Bought a noctua for my PC case as well lol.
Attachments
I thought I remembered the stock ones blowing down at the board which didn’t make sense to me but I mirrored what I saw inside. But it was a while ago so I’m fuzzy on it.You have mounted the two noctua fan at reverse, is not a big issue but...
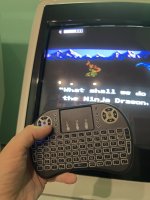
So one thing about my stereo setup was my amp had no remote and I didn’t wanna use the mister volume remote and have it sticking out of the cabinet. I almost bought a amp with a remote but then thought will that work through the closed cabinet door?
Well I’m stupid. You can adjust the mister volume with this bad boy. I totally forgot.
Well I’m stupid. You can adjust the mister volume with this bad boy. I totally forgot.
Attachments
Childhood dreams do really come true.


I guess I suck at crimping but I’m better now.


