What's new
Great work on the restoration Gilly. I wish you had YouTube page to document it all for a visual archive? But I understand YouTube videos are a beast in itself to make/edit.
Yeah sorry, but I have very little interest in doing video editing. I know how much time that consumes, and I really rather spend what limited time I have on actual projects than jocking for likes and subs. ;) But this thread (and when I finally get around to updating my blog) will be my only visual archiving documentation effort. I have tried to document as much as I can, and give you all comprehensive write-ups about each step.


Small update:

It's been raining so much lately, I haven't been able to do much outside. My next physical task is to fix the scratches in the monitor bezel and repaint it. Since that's just a matte asphalt grey, I can tackle the painting with rattle cans. For that, I need outside time.

BUT, I have made some progress.
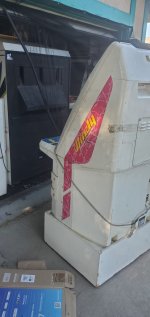
The cabinet parts have been dropped-off at the Auto Paint shop. I was quoted $300 and 4-5 days turnaround! Which i think it's a smoking price and timeline.
IMG_3684.jpg

Looking forward to how it turns out. The repro artwork should be arriving before they finish with the paint job, so once i get the cab parts back I'll reassemble and apply the art!

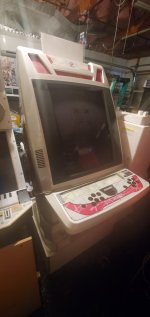
I was able to finish servicing the PSU recently. New caps, reflowed, new fuse (just in case).
IMG_3728.jpg


Now I'm able to hook up the monitor and see if I've gotten life back into it. But first, I need to build a temporary frame that can prop the monitor up for servicing. I really don't want to service it while it's in the cab. Doing convergence tuning while in a cab sucks.

Overall plan is to have this restore finished by the 2nd weekend of February. Well, finished to the point where I can move it into the house. That gives me 3 more weeks!
 
Dang dude, killer price for the paint job. May need to bring them both my Windy's 😅
 
Dang dude, killer price for the paint job. May need to bring them both my Windy's 😅
For real, I was expecting north of $500 and a much longer wait time. If all goes well, I'll post who I went with in case you or anyone else want to use them for paint jobs.
 
Last edited:
Well, got a call back from the painters, apparently they gave me the wrong quote initially.
The cost will be just a bit over $500, unfortunately. They said they didn’t factor in the pearlescent part to the price. Damn, I knew it was too good to be true…

But on the upside, it’ll be ready by Thursday.
I figured! 2 or 3 stage paint Jobs are PRICEY! BUT I'm sure it'll be more than worth it in the end. Thanks for letting me know. I think I'll enjoy my Windys with the lights off for now 😅
 
Top job, it's looking awesome.

Where did you rescue it from? Who the hell scratches their name into a candy cab! X(
 
Top job, it's looking awesome.

Where did you rescue it from? Who the hell scratches their name into a candy cab! X(
Got this out of East Los Angeles area. The seller had this in his storage for a while, but I didn't ask if he had this on-location somewhere. But yeah, who does that?? I managed to repair all the scratches out of the plastics, as well as fill the holes for the janky security add-on, but my next major hurdle is the scratches in the monitor. I'm looking into various solutions and will update the thread on my progress.
 
Been really into your thread, love seeing the huge progress. I have an Astro City that's not horrible, but still kinda rough--and still smells faintly of cigarette smoke. I'll be keeping your process in mind when I'm ready to tackle it. :)
 
Got this out of East Los Angeles area. The seller had this in his storage for a while, but I didn't ask if he had this on-location somewhere. But yeah, who does that?? I managed to repair all the scratches out of the plastics, as well as fill the holes for the janky security add-on, but my next major hurdle is the scratches in the monitor. I'm looking into various solutions and will update the thread on my progress.
I think yours came out of the same Nickle arcade as mine did
 

Attachments

  • 20230728_172026.jpg
    20230728_172026.jpg
    92.8 KB · Views: 64
  • 20230822_150244.jpg
    20230822_150244.jpg
    85.1 KB · Views: 82
I think yours came out of the same Nickle arcade as mine did
I think so too! Same security bars, same DIY riser.
Wow. They were doing all kinds of butchering BITD.


Got a nice package in the mail today. Windy Marquee Holder thanks to @PASTBLASTER !

IMG_3739.jpg


It does have a repaired crack along the base of the holder, but I'm not too worried about it. It's solid, and I doubt I will notice it much when it's on the cab.
I'll clean this up then polish the whole thing. Should look great after I'm done.

IMG_3741.jpg

IMG_3740.jpg


I'm happy to be able to get one, thanks again, PB!
Yeah dude I'm like 99% sure ours were side by side lol


Dude lucky dog. I missed out on YAJ on one for $300!! Opening bid was like $50
 

Attachments

  • Screenshot_20240105-072554_Chrome.jpg
    Screenshot_20240105-072554_Chrome.jpg
    73.2 KB · Views: 42
I don't remember what I paid for mine, but it was in the $300 range. I said fuckit, my Windy is super clean, I wanted to have it complete, and just paid up. They only get more rare, and are pretty much impossible to realistically duplicate.
 
One more update for today. I built a janky monitor frame so I can prop it up and be able to service it easier.

Just some scrap wood and L-brackets I had laying around the garage. Took me a whole 40 mins.

IMG_3749.jpg


I should have angled it back a bit more, because I'm worried it'll pitch forward and fall over. But I got clamps to keep it down, and this is totally just temporary so who cares. As long as it's standing up and won't fall over.
IMG_3748.jpg


Decided to power-up the monitor and chassis to see the fruits of my labor. Unfortunately it's still not getting any neck glow on the tube, and no buzzing or ticking sounds.
Fuse is good, the chassis has new caps, new HOT, new deflection IC, has been reflowed especially around the HV area... still nothing. I was hoping maybe my shotgun approach would have fixed something, at least to get the tube to power-up. <sigh> the problem is deeper. Back to the workbench it goes.

If I can't fix this by the end of next week, I'll throw my spare MS9 chassis on this tube so I can hit my self-imposed timeline.
 
I would just drop in an Ms9. It's what I ended up doing and wish I did from the start. Some money ans time wasted later 😅
 
I would just drop in an Ms9. It's what I ended up doing and wish I did from the start. Some money ans time wasted later 😅
This is sage advice.

I’m going to do just that and put this chassis on the back-burner for now.
Save time and money like you said.

I figured to at least try to do the common fixes first and see if I could get lucky. But it definitely needs more time and effort, and I already have a working chassis good to go. Might as well get it all complete first then look at the original chassis down the line.
 
I kinda built the same wooden monitor frame when i was restoring my Windy :D
The monitor had convergence massively bad and i couldnt get it fixed,maybe shadow mask was off due to heavy dropping while transport...
So luckily i could get my hands on a pristine original toshiba combo from some ebay guy in italy for 400euros and i just went for it.
Awesome work here,cant wait to see when it is finished :)
 
Funny, some cabs you don't pay much attention to and then you see a thread like this and realise how nice they can look.

Considering what I paid to have my Astro done last year $500 seems like a good price for a proprofessional paint job.
 
Last edited:
Nanao MS9 is in!

Cleaned off the tube and installed the MS9 yoke. The neck looks good:
IMG_3754.jpg


IMG_3758.jpg


I had a small issue though. The monitor would power up and the image would display fine for about 5 secs, then it would scramble:
View: https://youtu.be/CZ4rLESCtok


As it turns out, my Test Pattern Generator had a failing 9v battery! Turns out the TPG gets freaky with sync output when the battery gets low. I didn't even know this was a thing! I was pulling my hair out last night trying to get to the bottom of this. But thanks to @advans14 for the suggestion, I replaced the battery and all was well. Stable image.

Messed with convergence a bit and threw some magnets under the yoke for some quick geometry fixes. It’s “almost there”. I need to spend an hour just messing with the rings more but this isn't too bad.

IMG_3766.jpg

More magnets will help with the corners.

As for colors and brightness: All colors look good. I'll need to do a proper calibration, but I'm even thinking I’m going to raise the B+ a bit to get more brightness out of this thing. The MS9 flyback can be pushed a bit more without it frying out. One of the nicest features of the ms9, resilience.

IMG_3770.jpg


For now I'm going to leave this as is till the weekend. I'll calibrate and converge it then.

Next up will be to look at getting those scratches out of the glass. That'll be fun. ||
 
Back
Top