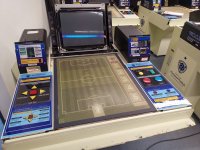
NAOMI 2/Chihiro/Triforce Card Reader Emulator (Initial D3/WMMT/Mario Kart/F-ZERO AX)

ID1~3 should work fine with YACardEmu. Just be sure to select the correct device settings, and always remember you don't own a card *before* you buy one in game -- meaning, don't create a blank card and "insert", let the game generate one for you.

No clue how nicely it'd play with wipi, never used it (but did write the UI with API at chunks request!)
I got it running last night & my PIN's arrived today from digikey, so I can confirm the WiFiPi - YACardEmu ran flawlessly for 3-4 hours. I set it up on ports 8080/8081 & used a different port for each side.

I needed to bump up the partition size for the 3rd party libraries which took a while (big!) but otherwise it's relatively plug-and-play w/your documentation.
 
For anyone who may use this emulator for Derby Owners Club (a few people), I have made some reproduction cards to use for card images. Access here.
I would just attach the .zip but the site doesn't want to let me. Probably because my account is new as-of writing.

These are pixel perfect (or should be) and I hope these are authentic-feeling reproductions. Aside from a couple of artistic liberties, they are pretty much identical to the original SEGA cards (which, fun fact, aren't pixel perfect). These are what I'm calling a "blank variant" without a picture of a racehorse like the original cards.

There are 63 colours, so more than enough to colour-code your horses if you so desire. Or to forget the last horse to use any one colour once they start repeating. Enjoy! :)
 
Hi, i'm not sure if you're still around here anymore, but I bought a MSR605X, and I'm having trouble getting it to read my cards correctly, so wondering if you could help.
Every time I swipe (i'm swiping them backwards like you suggested), I seem to get different values. After swiping a bunch of times, I did notice that some values appeared more often, it's like both tracks 1 and 2 are reading the same value. Could you shed some light on how you got the cards to read correctly?

Also, I tried to take the values you posted and convert them to ascii myself just to see if I'm doing the process correctly, but I wind up with a .card file that can't be read by the emulator. Is there a step that's missing?
Sorry to bring this up again, but has anyone else managed to get a real ID1-3 card read and saved as a .card file that can be read by Flycast or Demul?
 
Hi Guys, I wanted to let everyone know that I got Derby Owners Club World Edition Card readers working thanks to @whatnot YACardEmu https://github.com/GXTX/YACardEmu.

Here are the steps to get it working

Computer -> USB to RS232 ->RS422 ->Naomi
I bought this: https://www.amazon.com/dp/B075YGKFC1?ref=ppx_yo2ov_dt_b_product_details&th=1
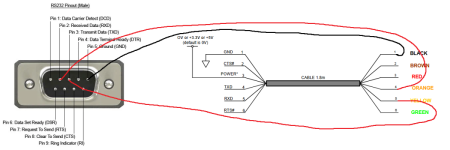
USB RS232 Pin out
Notes you only need 3 wires | CTS/RTS Bridged | You will have to modify a cable|
Pin 2 RXD
Pin 3 TXD
Pin 5 GND
**Pin 7 CTS Wire this together with pin 8
Pin 8 RTS Wire this together with pin 7

It should look like this:

Pining.png


Plug it into the RS232 Board Male DB9 Port.

Then you Down load the Binary here - https://github.com/GXTX/YACardEmu/tags
Down load to your computer
Extract Files
Make a copy of config.ini.sample
Rename it to config.ini

[config]
; basepath MUST end in a trailing slash!
;basepath = /home/wutno/cards/
;Very Important you must Specify a location and there has to be a folder. If the folder is missing you will get an error.
basepath = C:\docwe_c

; Linux
;serialpath = /dev/ttyUSB0
; Windows
serialpath = COM3
;serialpath = \.\pipe\YACardEmu
; Which device should we emulate?
; C1231LR / C1231BR / S31R
targetdevice = C1231BR
;
; Optional
;
serialbaud = 9600
;Acceptable even & none
serialparity = even
apiport = 8080
autoselectedcard = card.bin

Then Run YaCardEmu.exe.
Then Fire up the DOCWE Machine
works.jpg


Massive <3 to @whatnot and everyone here who made this possible.

On the chance you still have this cab, how is your RS422/RS232 board wired to the Naomi? Could you grab some pictures if possible?

I'm trying to run this emulator on my own DOC machine and I'm getting "card reader does not respond". Stumped a few people as it's all wired exactly like your post.
 
Sorry to bring this up again, but has anyone else managed to get a real ID1-3 card read and saved as a .card file that can be read by Flycast or Demul?
A friend of mine & I have been trading full tune ID3 cards between Demul<->Flycast<->YACardEmu which should confirm compatability on those. The default card emulator w/WiFiPi has some extra characters (215 vs 207 I think?) in the card so I wasn't able to get that one aligned.

I'm expecting to have mine rebuilt in the next few months and will be working on trying to do this as well given my encyclopedia of old cards.
 
Thought I'd write a more comprehensive, in-depth guide for using this card emulator with Derby Owners Club so others don't struggle like I had to.

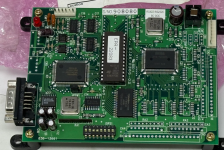
You will need the Sega Serial Conversion PCB #838-13661. I'll just call this 'Serial PCB'. This may change in the future as the protocol has been reverse engineered and so may be added to the emulator in the future.

This info MAY work for Virtual-On Force and other games that use this PCB.

Here's a picture of it.
Capture.png


1. Connecting to CN4 with a USB.
1a.
You will need a USB - RS232 cable, preferably one with an FTDI chip or similar. You can get pre-stripped ready-to-solder cables; I got this one. Parts # is USB-RS232-WE-1800-BT_0.0 <-- MAKE SURE you get the one with '0.0' on the end otherwise you will be sending 3.3v/5v down the red wire (usually a ground). Use the datasheet that comes with your cable (or just make sure you know the pinouts).

1b.
Get yourself a female 9-pin serial. I brought this as it was cheaper than a single serial port from RS/Digikey and came with a bunch of extras and some plastic shells to make it look neat.

1c.
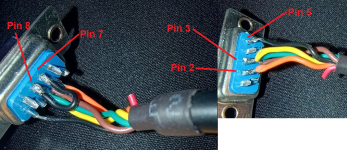
Wire it up; takes 5 minutes with a soldering iron. If you don't have one I suppose you can use heat-shrink to keep the wires in place against the contacts. DON'T do what I did and wire transmit into transmit and receive into receive. It won't work and you'll have a massive headache trying to figure out why it won't work. This wiring diagram image ONLY applies to the cable I linked above; so again make sure you know your USB pinouts or use the datasheet for your cable to correctly apply the information here to your specific setup.

1749333796244.png


Pin 2 on Serial (Receive) - Transmit on USB
Pin 3 on Serial (Transmit) - Receive on USB
Pin 5 on Serial (Ground) - Ground on USB

Pin 7 (Request to send) & Pin 8 (Clear to send) will need to be connected with a jumper. Do this on the serial port itself, not on the USB side.
1749333953366.png


1d.
Install the FTDI VCP driver so your device recognises the USB and it appears as a virtual COM port. Obviously, install the relevant drivers if yours has a different chipset.


2. Connecting CN7 on the Serial PCB to CN8 on the Naomi.

2a.
You will need two JST-NH 6-pin connectors and pins. I used 28 AWG wire and it works fine. The SegaRetro.org US manual for DOC is wrong. Please trust me on this.

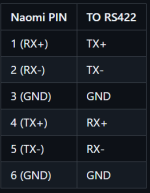
These are the pinouts, by Bobby Dilley.

1749334256720.png


Text guide:
Pin 1 on Naomi - Pin 1 on Serial PCB
Pin 2 on Naomi - Pin 2 on Serial PCB
Pin 3 on Naomi - Pin 3 on Serial PCB
Pin 4 on Naomi - Pin 6 on Serial PCB (US Manual messed up here, as it has Pin 4 to Pin 4 which grounds the TX+.)
Pin 5 on Naomi - Pin 5 on Serial PCB
Pin 6 on Naomi - Pin 4 on Serial PCB (US Manual messed up here, as it has Pin 6 to Pin 6 which grounds the RXD+.)

3. Powering the Serial PCB.

3a.
You will need a 4-pin and 8-pin JST-NH connector. I used 28 AWG wire and it works fine. Yes, for some reason the Serial PCB has an 8-pin for power but only uses 4 pins.

If you have a JVS Type 3 IO board you can use CN8, which is a 5v header. The IO board gets power from the CN7 header (there is a 5v header on the Naomi you can use to power it, but that's a different topic).

Pin 1 on 4-pin (5v) - Pin 1 on 8-pin
Pin 2 on 4-pin (5v) - Pin 2 on 8-pin
Pin 3 on 4-pin (Gnd) - Pin 7 on 8-pin
Pin 4 on 4-pin (Gnd) - Pin 8 on 8-pin

If you don't have a JVS IO board then you will be able to make a cable (or a split cable to power both IO & Serial PCB) coming off the 5v header on the Naomi, that will follow the same wiring scheme (the manual is actually correct for this).

 

Attachments

  • 1749331218262.png
    1749331218262.png
    161.5 KB · Views: 99
  • 1749332560470.png
    1749332560470.png
    13.3 KB · Views: 76
  • 1749331915316.png
    1749331915316.png
    999.9 KB · Views: 82
  • Capture.png
    Capture.png
    1,002.3 KB · Views: 535
Last edited:
Thought I'd write a more comprehensive, in-depth guide for using this card emulator with Derby Owners Club so others don't struggle like I had to.

You will need the Sega Serial Conversion PCB #838-13661. I'll just call this 'Serial PCB'. This may change in the future as the protocol has been reverse engineered and so may be added to the emulator in the future.

This info MAY work for Virtual-On Force and other games that use this PCB.

Here's a picture of it.
Capture.png


1. Connecting to CN4 with a USB.
1a.
You will need a USB - RS232 cable, preferably one with an FTDI chip or similar. You can get pre-stripped ready-to-solder cables; I got this one. Parts # is USB-RS232-WE-1800-BT_0.0 <-- MAKE SURE you get the one with '0.0' on the end otherwise you will be sending 3.3v/5v down the red wire (usually a ground). Use the datasheet that comes with your cable (or just make sure you know the pinouts).

1b.
Get yourself a female 9-pin serial. I brought this as it was cheaper than a single serial port from RS/Digikey and came with a bunch of extras and some plastic shells to make it look neat.

1c.
Wire it up; takes 5 minutes with a soldering iron. If you don't have one I suppose you can use heat-shrink to keep the wires in place against the contacts. DON'T do what I did and wire transmit into transmit and receive into receive. It won't work and you'll have a massive headache trying to figure out why it won't work. This wiring diagram image ONLY applies to the cable I linked above; so again make sure you know your USB pinouts or use the datasheet for your cable to correctly apply the information here to your specific setup.

1749333796244.png


Pin 2 on Serial (Receive) - Transmit on USB
Pin 3 on Serial (Transmit) - Receive on USB
Pin 5 on Serial (Ground) - Ground on USB

Pin 7 (Request to send) & Pin 8 (Clear to send) will need to be connected with a jumper. Do this on the serial port itself, not on the USB side.
1749333953366.png


1d.
Install the FTDI VCP driver so your device recognises the USB and it appears as a virtual COM port. Obviously, install the relevant drivers if yours has a different chipset.


2. Connecting CN7 on the Serial PCB to CN8 on the Naomi.

2a.
You will need two JST-NH 6-pin connectors and pins. I used 28 AWG wire and it works fine. The SegaRetro.org US manual for DOC is wrong. Please trust me on this.

These are the pinouts, by Bobby Dilley.

1749334256720.png


Text guide:
Pin 1 on Naomi - Pin 1 on Serial PCB
Pin 2 on Naomi - Pin 2 on Serial PCB
Pin 3 on Naomi - Pin 3 on Serial PCB
Pin 4 on Naomi - Pin 6 on Serial PCB (US Manual messed up here, as it has Pin 4 to Pin 4 which grounds the TX+.)
Pin 5 on Naomi - Pin 5 on Serial PCB
Pin 6 on Naomi - Pin 4 on Serial PCB (US Manual messed up here, as it has Pin 6 to Pin 6 which grounds the RXD+.)

3. Powering the Serial PCB.

3a.
You will need a 4-pin and 8-pin JST-NH connector. I used 28 AWG wire and it works fine. Yes, for some reason the Serial PCB has an 8-pin for power but only uses 4 pins.

If you have a JVS Type 3 IO board you can use CN8, which is a 5v header. The IO board gets power from the CN7 header (there is a 5v header on the Naomi you can use to power it, but that's a different topic).

Pin 1 on 4-pin (5v) - Pin 1 on 8-pin
Pin 2 on 4-pin (5v) - Pin 2 on 8-pin
Pin 3 on 4-pin (Gnd) - Pin 7 on 8-pin
Pin 4 on 4-pin (Gnd) - Pin 8 on 8-pin

If you don't have a JVS IO board then you will be able to make a cable (or a split cable to power both IO & Serial PCB) coming off the 5v header on the Naomi, that will follow the same wiring scheme (the manual is actually correct for this).
Regarding Virtual-On Force for anyone who is curious:
I worked on and tested the CRP-1231BR-10 code for it. This RS422 pinout looks accurate, IIRC. Though I never had to wire that part up, as I had actual VO4 cabs :P

It also worked just fine for me using an off-the-shelf USB/RS232 cable connected directly to the serial PCB via a female/female adapter.
https://www.amazon.com/dp/B0007T27H8
https://www.amazon.com/dp/B073GPVY32

I'm curious if the DIP settings on the serial PCB differ from Derby to VO4.
 
Last edited:
Hi guys, to all of you using Yacardemu, are you using the windows version or Linux? . I have been using it with with a Pi for more than a year and i always have problem selecting the proper card , i would press insert with proper card in view, but it would load another.

Is the windows version, Better ?? if yes, do you have a computer dedicated to it ??
 
Is there a YACardEmu (or whatever is the preferred method of virtual card-ing) for Initial D 1-3 tutorial? I'm not even sure where to begin. It will be used in an original cabinet ID3 running netboot. Full disclosure, I didn't set any of this up, so I'm going to need the "Explain Like I'm 5" version....
 
Is there a YACardEmu (or whatever is the preferred method of virtual card-ing) for Initial D 1-3 tutorial? I'm not even sure where to begin. It will be used in an original cabinet ID3 running netboot. Full disclosure, I didn't set any of this up, so I'm going to need the "Explain Like I'm 5" version....

How many cabinets/seats do you have? 1 or 2?
 
well.... I'm running WIPI which works for one cab but not for 2 ... the "multi cab" version of that card emulator has some script issues and doesn't work. which is unfortunate since I bought a NFC kit. I will investigate.

meanwhile, if someone has a multi cab running with YACardEMu, please enlight us !
 
Hi, has anybody run dual NFC card readers for each machine. I have a pair of ID3 cabs linked up running Wipi (I do have 2, one for each system).


Would I need 2 of each serial cable, NFC card reader, etc to connect to each Naomi 2 system?


Just curious what the setup would be to run a card reader for each cab. Thanks!
 
For InitialD 1-3 w/YACardEmu, you need to run 2 separate instances (on separate ports - I use 8080/8081) of it to use as a multi-cab version. You'll obviously need 2 separate Naomi2->Serial->USB adapters and then link em to whatever's running it (Pi). This should work the same w/an NFC card reader.

It's a bit of futzing around to handle multiple people on multiple machines with a phone. Having some sort of tablet per machine makes it a bit easier to manage but the UI could also use a bit of tweaking. I'd like to try and update a fork with it sometime but have been more focused on a) the physical wire troubleshooting -- my physical readers got back from Ken and needed some molex repair and b) solving the encryption of the cards themselves.
 
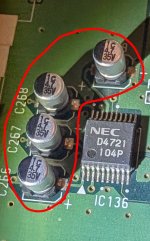
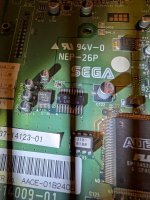
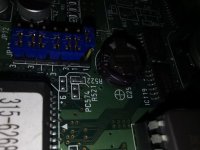
As this is the thread most people are likely to land on for card emulation issues, if after configuring the jumpers and making a cable you still can't get the Wipi to talk to the a Naomi 2 over serial, I would first recommend replacing caps C266-C269 on the board. They are 4.7µF 35v caps on the far side of the mainboard away from the filterboard, and they can cause the rs-232 to fail. If those aren't the problem, the NEC D4721 chip can also develop an internal fault that lowers its line level away from the rs-232 spec. You can still get these chips as old stock, but shipping is...slow. I recently got in two Naomi 2's as part of my ID3 Cab and both had serial communication issues, one was the cap replacement, the other was a the NEC chip.
 

Attachments

  • PXL_20260510_021114982~2.jpg
    PXL_20260510_021114982~2.jpg
    159.1 KB · Views: 16
  • PXL_20260510_021114982.jpg
    PXL_20260510_021114982.jpg
    248.3 KB · Views: 16
Hello,

thanks a lot to @winteriscoming @MetalliC @whatnot @Mrhide and the community for this great work!!!

As I mentioned earlier, I have the Sega WCCF World Club Champion Football (2005-2006 version) game with 4 satellites. It runs on NAOMI 2 and a Saxa HW210 card reader. As MetalliC mentioned in post 339, the emulator also works for WCCF :thumbsup:

Here’s what I’ve done so far:
- Cable and connection: Connected CN8 Pin 1 (RXD), Pin 2 (TXD) and Pin 3 (GND) to the D-SUB jack; connected Pin 3 (TXD), Pin 2 RXD) and Pin 5 (GND) to my laptop via an RS232-USB adapter.
- (I’ve also shorted Pin 7 and Pin 8 on the D-SUB jack, just to try)
- Installed YACardEmu and adjusted config.ini:
Tried targetdevice = C1231BR and C1231LR, and tried serialparity = none and even, and adjusted the settings accordingly in Device Manager (data bits 8 or 7, parity none or even)
- The jumpers on the NAOMI 2 are set correctly (otherwise the physical card reader wouldn’t work either :))

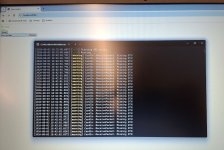
After I start YACardEmu, “Starting API server” and “Running” appear, so far all good :thumbup:
As soon as the game starts, the error message “warning CardIO::ReceivePacket: Missing STX!” appears.

I suspect there might be an issue with the start bit?

I know that WCCF is a very rare game, and probably no one has tested the emulator with WCCF yet. But maybe the community or one of the programmers can help me find the possible bug? Since it runs on NAOMI2 via CN8 with the well-known SAXO HW210 card reader, the protocol should be the same, right?

Or am I completely off base, and does YACardEmu “only” emulate magnetic stripe cards, whereas the SAXA HW210 uses RFID cards, which therefore cannot be emulated by YACardEmu? :nailbiting:

Thank you very much for any support.
 

Attachments

  • IMG_20240818_162836.jpg
    IMG_20240818_162836.jpg
    215.1 KB · Views: 36
  • yacardemuwarning.jpg
    yacardemuwarning.jpg
    206.8 KB · Views: 42
  • IMG_20240214_090755.jpg
    IMG_20240214_090755.jpg
    115.5 KB · Views: 39
Last edited:
The base ROM on these doesn't contain all of the font data. Here's the other flash on the board. Really annoyed I had to buy a card reader just to get a dump...

The emulator I'm about to release will use this to create 1:1 copies of cards.
 

Attachments

Hello, does this emulator support HW210 yet? I'm interested in using it for Quest of D.
 
I wanted to report that I just resolved a case where my adpater and jumpers seemed perfect by swapping out my naomi 2 unit.
The naomi would send out ACK 5 times, then go no further and fail.

The expected behavior is roughly -
  • Card reader sends ACK (0x06)
  • NAOMI sends ENQ (0x05)
  • Card reader sends response packet
ENQ never showed up. I can also attest that this was not simply 'wiggle the wires' syndrome. That was all checked and swapped, so was the net dimm. Just thought I'd share in case somebody else gets really stumped while trying to run YACardEmu for ID3.
 
Back
Top