Softdrink
Professional
Overview


A few months back, I designed a custom shelf to fit above the cashbox in the Astro and New Astro City cabinets. I've been very busy with work, so I only just finished documentation of it - but it's been working fine for me for over half a year. The project is open-source and I've made dimensional drawings, assembly instructions, and cutfiles freely available. It's a very easy lasercut job, and is designed to be cut from 1/4" thick plywood 2ft x 2ft project panels (the like of which can be commonly found at Home Depot and other US hardware stores). The entire project will probably take less than an hour if you have access to the tools and materials, or will be affordable to outsource if you do not.
You can find the full documentation, including cutfiles, material recommendations, and installation instructions, on Github here.
Process and Background
I've always found the interior of the Astro to be a bit of a strange layout from a functional perspective; because of the way the PCB mounting tray is positioned along the midline of the cabinet, the space is awkwardly divided up when in use. Combined with the bulk of the cashbox, this creates a difficult to reach (and harder to utilize) 'dead space' behind the cashbox and the PCB tray (when mounted).
I had been using this back corner space to store a spare MS9 chassis (in an old Kirin Milk Tea crate - it's good stuff! Thanks to @Hatsune Mike for the chassis and turning me on to the milk tea!), and one day I noticed that the height of the box made a sort of 'shelf' that could almost fit a NAOMI or other stuff.


I decided to run with this concept, and over the next few hours I measured out the interior space and made a first prototype out of foamcore. It's actuallly quite a substantial amount of space - more than enough for a full NAOMI setup including connected cables, and if routed correctly there is no interference with the operation of the coin door.


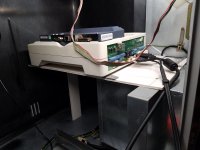
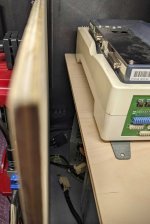
Then I refined the plans a little bit and made a more final prototype out of plywood. I unfortunately didn't take final photos of the shelf before posting this (hence the temporary support and the lack of a securing screw), but I figured it would be worth sharing regardless - I'll take new photos soon. I also decided to build mine from a double-layer of 1/4" plywood and laminated it myself - while I think the result is very aesthetically and structurally pleasing, I don't think it's necessary. A single layer of 1/4" is already quite sturdy.
Visible in these pictures is also my Service Light mod, which gives a great diffuse illumination inside the cabinet. You can find more information about that project on Arcade-Projects here, or on Github here.
I've been enjoying this shelf for months now, and found some fun uses for it. One of my favorite applications is holding a NAOMI system; there is enough room for cables to be routed in the front-right corner of the cabinet, so all the JVS power and IO signals can be cleanly tucked away under the shelf along with a Sun PSU. And there is zero interference with the PCB tray (by design), so I can have PCBs mounted to the tray and the NAOMI set up and ready to go, so switching between them is as simple as moving the JAMMA edge over and plugging in the Sun PSU (again, my apologies for the lack of a good picture demonstrating this - when I am near the cabinet again I'll try to take some photos).
I thought this might be useful to others here, and I'd love to see what else people can do with this concept and this otherwise akward part of the cabinet.
A few months back, I designed a custom shelf to fit above the cashbox in the Astro and New Astro City cabinets. I've been very busy with work, so I only just finished documentation of it - but it's been working fine for me for over half a year. The project is open-source and I've made dimensional drawings, assembly instructions, and cutfiles freely available. It's a very easy lasercut job, and is designed to be cut from 1/4" thick plywood 2ft x 2ft project panels (the like of which can be commonly found at Home Depot and other US hardware stores). The entire project will probably take less than an hour if you have access to the tools and materials, or will be affordable to outsource if you do not.
You can find the full documentation, including cutfiles, material recommendations, and installation instructions, on Github here.
Process and Background
I've always found the interior of the Astro to be a bit of a strange layout from a functional perspective; because of the way the PCB mounting tray is positioned along the midline of the cabinet, the space is awkwardly divided up when in use. Combined with the bulk of the cashbox, this creates a difficult to reach (and harder to utilize) 'dead space' behind the cashbox and the PCB tray (when mounted).
I had been using this back corner space to store a spare MS9 chassis (in an old Kirin Milk Tea crate - it's good stuff! Thanks to @Hatsune Mike for the chassis and turning me on to the milk tea!), and one day I noticed that the height of the box made a sort of 'shelf' that could almost fit a NAOMI or other stuff.


I decided to run with this concept, and over the next few hours I measured out the interior space and made a first prototype out of foamcore. It's actuallly quite a substantial amount of space - more than enough for a full NAOMI setup including connected cables, and if routed correctly there is no interference with the operation of the coin door.


Then I refined the plans a little bit and made a more final prototype out of plywood. I unfortunately didn't take final photos of the shelf before posting this (hence the temporary support and the lack of a securing screw), but I figured it would be worth sharing regardless - I'll take new photos soon. I also decided to build mine from a double-layer of 1/4" plywood and laminated it myself - while I think the result is very aesthetically and structurally pleasing, I don't think it's necessary. A single layer of 1/4" is already quite sturdy.
Visible in these pictures is also my Service Light mod, which gives a great diffuse illumination inside the cabinet. You can find more information about that project on Arcade-Projects here, or on Github here.
I've been enjoying this shelf for months now, and found some fun uses for it. One of my favorite applications is holding a NAOMI system; there is enough room for cables to be routed in the front-right corner of the cabinet, so all the JVS power and IO signals can be cleanly tucked away under the shelf along with a Sun PSU. And there is zero interference with the PCB tray (by design), so I can have PCBs mounted to the tray and the NAOMI set up and ready to go, so switching between them is as simple as moving the JAMMA edge over and plugging in the Sun PSU (again, my apologies for the lack of a good picture demonstrating this - when I am near the cabinet again I'll try to take some photos).
I thought this might be useful to others here, and I'd love to see what else people can do with this concept and this otherwise akward part of the cabinet.
Last edited:


