What's new

crashman

Student
Joined
Jul 1, 2019
Messages
47
Reaction score
35
Location
Vilanova i la Geltrú
Hi!

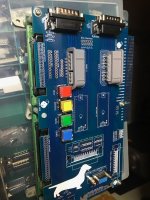
I want to show a WIP prototype board that I'm working on for the Sega JVS I/O Type 2.

Captura de Pantalla 2020-11-03 a les 20.07.47.png

It fits on the I/O connectors, and provides a way to connect a Dreamcast wheel controller, so you can play driving games with it.
On the right side, there's a detachable part, that will connect inside the dreamcast controller, so all the buttons and pots are connected to the I/O board.
You can also connect the VMU.
Additional DB15 pins to add a Neogeo style controller, and a pair of arduinos to add SNES controllers too.
To make it a little more functional, there's a Jamma connector, so you can put the system on old Jamma cabs.
As it's a Wip board, you can see that I have to add the rca's to add the sound.
And I have to check if something more is needed between the vga port and the rgb side on the jamma.

Feel free to say what you think!
 
This is great! Any timelines on when this may be available for purchase? Realize this is conceptual, but anxious for a final product. Keep up the good work!
 
Well, first proto on the way to the courier.
Captura de Pantalla 2020-11-09 a les 18.10.57.png

That's fast!
Now I think they need like 2 weeks to get home.

Let's remember what will add:
-Support for original Dreamcast wheel controller, just plug it and play. Possibility to let it inside without breaking original connection.
There's a detachable circuit on the middle of the PCB.
-DB15 connectors to usual supergun arcade controllers.
-SNES connectors converted via Arduino Micro-
-Pins accessible for lamps.
-You can choose if you want to power it from the original connectors or the jamma harness.
-Mapple pins to connect the wheel controller VMU reader to the Naomi.
-VGA and RCA input to send signal to the jamma harness.
-4 buttons for Service, Test, Coin 1p, Coin 2p.
-2 resistors to mimic Coin counter for 1 and 2 players.
-pins for the analogue inputs, for testing purposes.

Well, let's see how it goes on the first try...
Fingers crossed!
 
  • Like
Reactions: nem
Put me down for 1 on the first batch :)
 
Where's the kitchen sink? :D

I love the dog!
 
  • Like
Reactions: AMS
Put me down for 1 on the first batch :)
Me too - please put me down for one in your first batch!
Can this pair with the Multi JVS 1.0 to work with virtually any racing game on any JVS system?
 
This project seems pretty interesting, count me in for an inital batch too.
 
Can this pair with the Multi JVS 1.0 to work with virtually any racing game on any JVS system?
Multi JVS has its connectors in a different place than a Sega Type 2 IO. This will go on top of a Type 2 IO. Anyway, a lot of the functionality is redundant in the Multi JVS with one of these.

For a pic of a Type 2 IO, see here:

http://triplemoonstar.brinkster.net/theshed/default.asp?stockid=2098
Thanks for the clarification. In terms of compatibility - would this add-on allow for use with virtually all driving games for JVS systems? I am not sure about compatibility of Type 2 IO and other games - the Multi JVS 1.0 uses profiles to allow for use of driving games in one driving cabinet, would this add-on device offer similar compatibility options in using the Dreamcast wheel controllers? I love the idea of being able to plug and play with a Dreamcast steering wheel as I have one and instead of hacking it to use with the S-JHIP and Multi JVS 1.0, simply plugging it into a pcb board sound great. I guess wondering functionality and what separates the two options. Thanks.
 
Well, I'm no master here in JVS or Naomi or really anything, I just try to gather info and "easy" my life with the machines I have.
All this started as I got a F355 from Darksoft.
Then I got the Sega I/O type 2 for it.
As I saw from someone in youtube, I think... , he was playing with a Dreamcast controller, so I thought to myself, let's play Ferrari with it!
I made my testing with proto boards and a million cables around, a few at least... ;)
And from that I create my first prototype, smaller one, with flat cables.
As It has to be, it has some problems, but with a little work, it worked fine.
downImg.jpg
But with all the cables around the I/O it seemed ugly, and dangerous with the pcb floating around.
So I started to think on something to attach over the I/O.
Something like this:
Captura de Pantalla 2020-11-11 a les 20.11.13.png
But the PCB cost the same that size or all the full size, so I thought to add whatever fills in.
From that I/O you have plenty of signals, so this PCB is just a way to connect to them easily.
what you can find is that some games have the accel/brake handles changed.
I've tried Crazy Taxi and WaverunnerGP, for example, and one accelerates wtih the right lever, the other with the left one.
That could be added to a future version, if sometime I'm on the mood for it.
In this post you can take a look of what can be controlled with this type of I/O:

Sega JVS I/O Type 2 Dip Switch Settings and pinout
 
Hi,

what do you mean when you say "All this started as I got a F355 from Darksoft."

I have got a F355 sega naomi cartbridge out, so if you have a solution to remplace it...
 
Just that.

I've got a complete board with the F355 game.

What do you have?
Just the cartridge?
 
The board has just arrived.
There are some bit that are to be adjusted, but it fits very well right away.
I'm waiting for some components now to the fun begin.
IMG_8099 LQ.jpeg
IMG_8097 LQ.jpeg
 

Attachments

  • IMG_8095 LQ.jpeg
    IMG_8095 LQ.jpeg
    477 KB · Views: 60
  • Like
Reactions: nem
Well, the fun becomes sadness easily...
Time to make some changes.
 
Eagle mocked me and a lot of parts were upside down on the pcb.
After several tries, soldering, de-soldering... I managed to break down half the GND.
After been happy enough to play Crazy Taxi, I took a look at the joystick side.
Well, that was also one of the twisted parts.
I soldered the other way and it worked, well, kind of...
From where ever I check the control pins, like this post:
Sega JVS I/O Type 2 Dip Switch Settings and pinout
My I/O board has the directions changed:
Up/Down is Left/Right
Left/Right is Up/Down
I've tested several games, and all behave the same.
Do I have a wrong I/O or the data everywhere is incorrect?
All the other buttons and switches are right, only 1P and 2P directions are changed.

Anyone can help checking on his Type 2 I/O?
 
Last edited:
Back
Top