What's new

MostroVeneno

Grand Master
Joined
May 21, 2018
Messages
598
Reaction score
794
Location
Argentina

Howdy Ap friends!


I wanted to share this thread with you; here you can read about some restoration process I went under for 2 of my Capcom Q-25 cabs (カプコン Q グランダム 25 ).

The first one is standard cab and the second one holds a rotation mechanism inside.
Needless to say when I got into this, I never thought I would come across such iconic machines.
I barely knew anything and just wanted to play Street Fighter II in real Arcade Hardware, as this was the game responsible for countless and incredible experiences during childhood with brothers and cousins, where we would sit and play on the SNES for hours. Those times really felt like an endless Era.

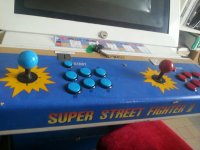
LET´S START WITH THE STANDARD

This Q-25 came home 3 years ago, with a Frankenstein 20” monitor attached to a wood that almost fell off during the shipping, it was pending from one and only bolt in the upper-right corner.

20220203_112458.jpg


WhatsApp Image 2020-09-08 at 18.01.05.jpeg


I was so obstinate with the idea of at least giving back some of its past glory I didn’t even test it with the 20” monitor in, didn’t turn it on, didn’t play for one second for a year, and it sure was a bittersweet sentiment to have this beautiful machine without actually sitting down to play some rounds.

I searched for 25” tube and chassis cabs for a long time with no results, practically there aren’t cabs to source these in here, mostly national wood made from the 80´s that housed from 20” to 22”.
Then again, It had grown on me the idea of making RGB mod to a suitable TV set.
There are some 25” model TV’s candidates around, just had to narrow them to curved screen and gambling on possible RGB chassis capabilities. I had tried this before with 29” models with the hope that studying the manual and schematics prior to buying would lead me to some certainty about this aspect. Well I learned the hard way, disassembling a TV I could find any tube brand, any chassis model not listed in the manual. So… yes, gambling.

This time around luck was on my side. I found a 25” Phillips TV that turned to be perfect match. When dismantling I found to my surprise it came with a Toshiba tube A59LAM94X01 original being A59JMZ193X….
I was really happy to be more close to original as possible.
I tried the RGB mod in the chassis tapping RGB lines from jungle chip ( TDA8362 ) and went great. Gorgeous and crisp image!

20210406_193647e.jpg


As I said, it was difficult to source 25” cabs, so to find a suitable metal structure to hold the tube would follow the same luck. I talked to a friend and got me a 27” Wells-gardner structure and I ended up trimming it to fit the required 25”, it was not the prettiest job but did the trick and worked just fine.
20210407_202913.jpg

20210508_2054257.jpg


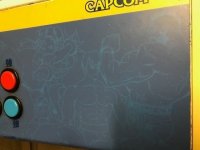
One other thing needed to be done was get the original coin feeders (and I just had one), the other was replaced by OP to feed customs coins from here.
So i had to think how to do something similar.
20200910_203940.jpg


I made these in CNC aluminum, they had a rough finish.
WhatsApp Image 2020-10-27 at 10.58.37.jpeg


So i sanded and aplied Brasso with brute force and the results were incredible. Here´s a comparison picture.
WhatsApp Image 2020-12-06 at 14.41.17.jpeg


Other things done:

- Sand and repaint metal base floor

- Replace keylocks ( had to drill to get into coin box )

- I added Original Plexi marquee for promotional flyers

- I have yet to replace side Capcom vinyl from one side


20200913_120132.jpg


Aside from the tube & chassis this Q-25 came with, I can say it was in good condition.
Didn’t urge to me the need to restore its aspect but of course i did minor things, mostly to the control panel and general cleaning.
Whenever I can maintain originality (even on paint and materials) I will do, I believe these machines have some sort of soul and changing its formal properties relatively change its soul.
For the second cab, major restoration was inevitable and a must done, at least repaint doors, replace side contact vinyl and broken parts (it was a mess)

1Q25.jpg

Still some work to do but things are looking much better now :)
 
Last edited:
Before moving to next Q-25 let´s stop for a moment and let´s take a look to the front door´s label that is inside.

Q25 label.jpeg


検査

Inspection​
Certificate​
Year - 1993​
Month - October​
Day - Not Filled​


製造
253593​
AS ( Lot.09 )​
Manufacture; Production Number​
253593​
AS ( Lot.09 )​


組立
検査
承認
Construction/ Manufacture​
Inspection​
Approval​

沖田

近藤
平井
Okita/ Okida
Kontou/ Kondo/ Kondou/ Kondouko/ Kondoo/ Kondoka
Hirai

Co.; Ltd.​
?​


平成6年3月
March 1994​


(株) カプコン
(Co.; Ltd.) CAPCOM​
製造第二部
藤石
上戸
Manufacturing Second Division​
Fujiishi
Ueto/ Uedo/ Uendo/ Uwado/ Kamito/ Kamido/ Kanbe

検査 inspection censorship; inspection; examination
evidence; proof; certificate

year - 1993
month - October
day - Not Filled

製造 manufacture; production Number - 253593

Red circles are the seals by the person who signed off. Think of like a signature.
組立 construction/manufacture - 沖田 Okita/Okida
検査 inspection - 近藤 which has many possible readings. Kontou, Kondo, Kondou, Kondouko, Kondoo, Kondoka
承認 approval - 平井 Hirai

カプコン CAPCOM
製造第二部 manufacturing second division - 藤石 Fujiishi
平成6年3月 - Heisei 6 year, 3rd month, which is the Japanese calendar year for March 1994
上戸, which can be read Ueto, Uedo, Uendo, Uwado, Kamito, Kamido, Kanbe, and probably some other ways

A general idea of what it says:

Inspection certificate
October 1993
Manufacture Number 253593 from LOT 09

Anyone versed in Japanese can translate kanjis and chars from this label?
Edit: Many thanks to @Stupid Dufus this is now more clear!

LET’S MOVE ON -

Q-25 W/ ROTATION MECH

The state of the cab was…well judge by yourself.

2q25.jpg


Cab was full of marks and oxide.
The foot was literally torn; they had previously attached and soldered a 2 sit stool.
Previous owner, OP from north of the country, had marked the door with number 4, monitor bezel had an ID badge stamped. And they had incorporated an ashtray just above the control panel adjusted with a bolt.
The original coin feeder metal slots were replaced for other slots to fit custom coins from here.
Q-sound sticker had been torn and a birthday card invitation was placed nearby.
The control panel was modded to fit National Joystick levers, buttons and stuff, but you give yourself an idea.

- Some pictures of the process -

2 q25 floor.jpg

The metallic base floor - I hammered the structure to recover the shape as possible as i could, then applied Epoxy filler, sanded and sprayed white paint + crystal clear coat

2 q25 doors.jpg

Doors - Used paint removal, applied a bit of grinder sanding disc to remove rust.

2 q25 Self-Adhesive Vinyl.jpg

Preparing the shape of the side blue vinyls.

2 q25 pcb wood.jpg

Cleaned and sanded PCB wood support.

20211207_210204.jpg

Blue door repainted and ready to install.
Screenshot_20220104-121623_Instagram.jpg

The beast inside.

20211219_215955.jpg

20211219_220046.jpg
 
Last edited:

ABOUT SSFII EDITION PANEL


This panel was included as a Special Edition Q-25 destined to tournament play SSFII in Japan. Here we can see some photos taken from Amano Game Museum (90's) - Credit to chiikyujinn from Instagram.

chiikyujinn.jpg


I want to recreate this panel for one of my Q-25.

I must say it´s been a challenge and currently is.
Almost impossible task to find images that even help get sight of where each character is situated on the canvas, let’s not mention the resolution of the drawings which, if any, to help trace the lines. Alright, i searched like crazy on the net, googled images, blogs and forums and ended auctions to help spot some of these details.
I´ve spent hours of work, searching and a lot of imagination and creative liberties as well for some parts. ATM it`s at %80.
And I must say I feel there’s some sort of greed, snobbery or mixed nonsense about this matter. Yes, I´ve asked many arcade collectors, fancy instagramers accounts that like to show their arsenal and pretty stuff. I’ve asked them if they would share any picture of the control panel, some details, something/ anything, which ended mostly in “seen” and null responses. I guess they are not prepared to share.

That is motivating me to try to get the design as close as possible for the interested users and preservation purposes. Though I think the results are coming pretty good and close to original art, there’s a better and easy way to do this. If anyone can scan/photo the control panel art in good resolution I may want to redraw this again or I bet there are people here that can too.

When working with no good references you come across these problems to name a few:

Perspective and Skewing problems
Position, scale, rotation and shape distortions
Lack of details, general references and resolution
Etc

Teaser:
2.png


22.png


SSF2 Cpo .jpg


View: https://youtu.be/lJKdtx0CGf8


So, one thing that called my attention was the creative concept of this piece.
We can see for the time this cab was released was the year 1993.
Super Street Fighter 2: New Challengers was released on 1993
Street Fighter 2 Champion Edition was born on 1991.
The art for this panel is a mix of SFII ce and SSFII.


- sf2ce.jpg

All old school characters are used in SF2 ce Artwork style except Sagat.


- ssf2.jpg

I have marked in BLUE what chars are displayed in this art style from SSFII.


The whole art for SSFII was already out there. So I don’t think there would be issues including all characters in same style.

A thought:
Maybe in some way the idea was to contrast the new characters added on SSFII more, due to the fact that previous art was already spread and well known at least in Japan for promotional purposes, maybe the idea was to produce a more shocking effect with older and newer art coexisting together instead of the new art consolidated style among the whole characters. But then again Sagat was an old char and it´s displayed in SSFII style art.

Anyway if anyone can comment about this, it´s something that at least intrigues me.
I don’t think it was a common practice.
 
Last edited:
組立 construction/manufacture
検査 inspection
承認 approval

Red circles are the seals by the person who signed off. Think of like a signature.

平成6年3月 - Heisei 6 year, 3rd month, which is the Japanese calendar year for March 1994
Hey! thank you so much for the precise info you are sharing, i just used an OCR translator to try to get some clues.
Can you read the names of the signature in the seals?
 
Kanji can have a few different readings, especially when it comes to names. But here are some possibilities.
組立 construction/manufacture - 沖田 Okita/Okida
検査 inspection - can't read
承認 approval - 平井 Hirai

製造第二部 manufacturing second division - can't read

I asked a friend to help with those two seals, and if he responds I'll let you know, though someone else here may chime in before then. =)
 
You're doing great work. I wish others would help out the community more than just flexing countless rare pieces that they have 😒
Hey thank you for the words, I hope to have it done soon to share it and give back something in return here for the AP 💙
 
Great restoration projects, great work, great drive ! @MostroVeneno
And thanks for sharing the WIP with us, even if I will never find a Q25 to own, it still is very interesting to discover your "quest for the holy Q25" :D
Best of luck in your resto projects, it's looking very good !
 
Great restoration projects, great work, great drive ! @MostroVeneno
And thanks for sharing the WIP with us, even if I will never find a Q25 to own, it still is very interesting to discover your "quest for the holy Q25" :D
Best of luck in your resto projects, it's looking very good !
Thank you!
I really appreciate all of your comments and the positive vibe and certainly this machine is full of wonders
And never say never, you may find one for you any day :)
 
Good work you're doing here. I want to help out more but I'm pretty busy with my projects at the moment to draw them out.
I've sized and positioned all characters. Turn down the opacity in the AI file, you can see the placements.
[ AI FILE ] I got the Hi-Res characters from sfgalleries.net. A few of them are not though.
I used 2 other references for what characters are on the panel.
SSF2-Character-Panel.png

I also Attached is the 1 player pic.
 

Attachments

  • capcom q 2p ssf2s.jpg
    capcom q 2p ssf2s.jpg
    57.1 KB · Views: 121
  • capcom q 2p ssf2.jpg
    capcom q 2p ssf2.jpg
    40.9 KB · Views: 121
  • capcom q 1p ssf2.jpg
    capcom q 1p ssf2.jpg
    31.7 KB · Views: 136
Good work you're doing here. I want to help out more but I'm pretty busy with my projects at the moment to draw them out.
I've sized and positioned all characters. Turn down the opacity in the AI file, you can see the placements.
[ AI FILE ] I got the Hi-Res characters from sfgalleries.net. A few of them are not though.
I used 2 other references for what characters are on the panel.
SSF2-Character-Panel.png

I also Attached is the 1 player pic.
Thank you for your contribution I really appreciate it and will compare with my files, position and scale to make something more accurate possible
 
Back
Top