What's new
A quick question, are the magnets more to correct the tube or the yoke?
Mostly for the yoke, because of the shape of the glass might have a curvature that the yoke can’t properly direct the color beams onto without some help.
This happens mostly on the sides and the corners.
Magnets are awesome for helping with convergence. But they shouldn’t be relied on as a main fix. You need to go through the proper convergence process first.

I put a few magnets on there temporarily till I go through a more hardcore pass this weekend.
Static Convergence (center screen area) is mainly adjustment of the rings. Dynamic Convergence (screen edges) involves tilting the yoke up/down, left/right to get the colors to align along the outside area of the tube. Both adjustments are really time consuming.
Once you get as far as you can with these two processes, adding magnets can help finish it off.
 
Ok, before I look at the monitor scratches, I wanted to get some practice in on my polishing skills.

The monitor glass is going to be tricky. I'm likely going to use Novus 2/3 and remove the antistatic film to reduce those scratches down. Then look at how deep the actual glass was scratched.
Reading up on this, it looks like there's no other way around it. Gotta remove the film. BUT, I'm thinking perhaps I could apply a light tinting film used on windows to it once the scratches and film are removed. Something like 50% VLT to cut the antiglare and add some contrast to the brightness.
But first, let's finish off the bezel.

If you recall earlier in the thread, the bezel was pretty scratched up. These vandals scratch tagging this cab all up need to be dragged out onto the street and flogged.
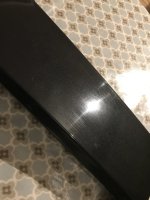
Here's an example of one of the worst areas on it:
IMG_3779.jpg


These are pretty deep.
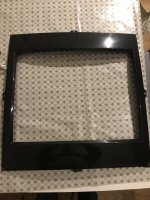
I didn't take many photos of the process, but I sanded them down with 180 grit sandpaper, that really roughed them up, then wet sanded with 400 to tame and smooth the surface. Then 4000 to further fine-tune sand it. After I was happy with the smoothness, I hit it with some car polish.

Really happy with the results!

IMG_3781.jpg


IMG_3784.jpg


IMG_3783.jpg


In direct light:
IMG_3786.jpg


It's almost like new! and I didn't have to paint it, which I was hoping to avoid due to time.
 
The yoke you are using was made for ms9-29SU Hitachi tube, this tube is more flat than Toshiba one and also the H stage was modified accordingly, the difference is not big but enough to have a not perfect geo and convergence, the best you can do there, is find an ms9 yoke for Toshiba set.
Another great solution is, already in you hands, you can directly use the pb6643 yoke with your ms9, it'll works flawlessly!
 
Last edited:
The yoke you are using was made for ms9-29SU Hitachi tube, this tube is more flat than Toshiba one and also the H stage was modified accordingly, the difference is not big but enough to have a not perfect geo and convergence, the best you can do there, is find an ms9 yoke for Toshiba set.
Yeah I was wondering why it looked different than the ones in my Astro City’s.
Thanks for the info. 👍
I’ll start searching for a MS9 yoke for the Toshiba tube.

In the meantime I’ll use this to get the cab finished and functioning.
 
Yeah I was wondering why it looked different than the ones in my Astro City’s.
Thanks for the info. 👍
I’ll start searching for a MS9 yoke for the Toshiba tube.

In the meantime I’ll use this to get the cab finished and functioning.
Maybe you do not need an ms9 yoke for Toshiba tube, you can just use the same pb6643 yoke, you have to make an adapter for the H stage pin, this because in the pb6643 the H yoke is a small gauge... I have already tested this combo, no issue!
 
Maybe you do not need an ms9 yoke for Toshiba tube, you can just use the same pb6643 yoke, you have to make an adapter for the H stage pin, this because in the pb6643 the H yoke is a small gauge... I have already tested this combo, no issue!
yes, it's working now. But I will try to find the proper yoke so I can get better convergence, and put this one on my backup Hitachi tube.
 
Yoooooooo! I am so happy with how this turned out!

IMG_3812.jpg


IMG_3810.jpg


IMG_3811.jpg


Hard to photograph the pearl, but it has a nice sparkle.
IMG_3813.jpg


IMG_3823.jpg


Speaker grills looking nice too.
IMG_3814.jpg


You can't even tell there used to be scratches and 2 ugly holes drilled into the sides.
IMG_3815.jpg


IMG_3828.jpg


Doors are fressssssh
IMG_3816.jpg


This is incredible. Everything is super clean. The painters said this is the same pearl white they use to paint Lexus'. :D luxurious!
This is the home stretch, I should be done with everything in about a week, maybe less. I'm hoping the repro art will arrive soon so I can apply it to the cab. But I'm glad I went with the pro painting route, this finish is something else!
 
I think it's awesome, so the Konami windy was pearl white and not simply white?
 
I think it's awesome, so the Konami windy was pearl white and not simply white?
Yes, the Windy and Windy II both have pearlescent White paint from the factory.
It looks great in person. I’m looking forward to seeing how the light from the monitor and marquee illuminates it when everything is put back together.
 
Man this looks great...i've always been like "i want patina and signs of use on my cabs",
but looking at this beauty now...awesome!
 
The painters said this is the same pearl white they use to paint Lexus'.
I would've told the salesman: "I highly doubt they use spray paint to paint a Lexus".

That being said, I think this is one of the best spray paint jobs I've seen. What brand was this?

Also, who did you buy your repro art from? I got a Windy 2 that could use some paint and some side art.
 
That looks amazing, I love the pearlescent effect.

Interesting how you dealt with the bezel i'll have to keep that in mind. Mine was covered with fine scratches that were deep enough that you could feel them.

IMG-2359.jpeg

I tried a few passes with novus 1-2-3 and it looked better, but I still decided to paint it.

IMG-2358.jpeg
 
I'm not 100% sure that isn't some fancy unreal engine render :). This looks really, really good!
 
I would've told the salesman: "I highly doubt they use spray paint to paint a Lexus".

That being said, I think this is one of the best spray paint jobs I've seen. What brand was this?

Also, who did you buy your repro art from? I got a Windy 2 that could use some paint and some side art.
It wasn't a rattle can job, this multi-stage automotive paint though a gun. Hence the comment about Lexus.
 
Also, who did you buy your repro art from? I got a Windy 2 that could use some paint and some side art.
I ordered from Arcade Art Repro all the way over in the Netherlands. Waiting on Side Art, Coin insert decal, and Instruction space art.

I tried a few passes with novus 1-2-3 and it looked better, but I still decided to paint it.
I spent a lot of time sanding, polishing, re-sanding, polishing. But it's in good shape for now. I could probably spend a bit more time on it to get it perfect. I might do one more session on it since there are a couple small areas that could use a bit more polishing.
 
Back
Top