What's new

Sega Lindbergh JPN (& Noir) Appreciation Thread

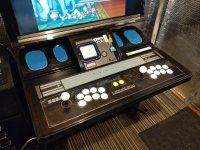
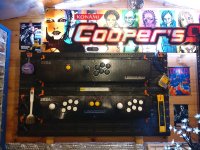
That instruction space insert is beautiful. Do you mind sharing where you got it? I'd love to get one for my cab.
 
I don't think any official art like on the Lindy was ever produced & I'm not a fan of moves strips.

I put the repro 2L16B panel on the Noir as it doesn't have those lugs on the underside of the cp which stop you putting on a official one without cutting.

One day I will take off the protective film, wiring & connectors is exactly the same easy swap.
 

Attachments

  • DSC_1459.JPG
    DSC_1459.JPG
    153.6 KB · Views: 119
  • DSC_1467.JPG
    DSC_1467.JPG
    243.4 KB · Views: 119
Decided to finally take off my protective film off the repro Lindbergh panel & add some new buttons with 7&8 plugged on both side:
 

Attachments

  • DSC_1464.JPG
    DSC_1464.JPG
    201.2 KB · Views: 135
  • DSC_1460.JPG
    DSC_1460.JPG
    224.2 KB · Views: 128
  • DSC_1461.JPG
    DSC_1461.JPG
    212.7 KB · Views: 122
For those of you who have missed it I upgraded the Noir monitor to a LG Ultragear 32GP850 as the stock monitor being a early 1080P screen was a bit fussy with resolutions:

View: https://youtu.be/jB0Wnwf7Ykc?si=MJCBqvDbtfZPGvAd


All went well & is well future proofed old monitor has been offered up on a few UK forums for free with zero interest so will be scrapped.
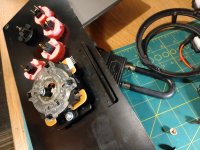
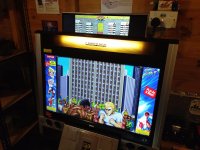
What access did you have for the 3d printed brackets? Best way to get those? Thank you for the video, Chihiro.
 
As I was having problems with the JVS-PAC 2 & Pi4 images I got a encoder off eBay & it works great with:

256gb Batocera Raspberry Pi 4 Image from Derek’s Pixeltorium and Quoc Le

It will keep me going until a joypad firmware is made, I had some jst connectors so it will be easy swap back with no oem wiring touched.

Hot key is credit button so easy game exit with start & credit.
 

Attachments

  • DSC_1710.JPG
    DSC_1710.JPG
    203.5 KB · Views: 104
  • DSC_1711.JPG
    DSC_1711.JPG
    198.3 KB · Views: 98
  • DSC_1713.JPG
    DSC_1713.JPG
    163.4 KB · Views: 95
Last edited:

Attachments

  • DSC_2101.JPG
    DSC_2101.JPG
    74.6 KB · Views: 74
  • DSC_2099.JPG
    DSC_2099.JPG
    209.8 KB · Views: 73
  • DSC_2128.JPG
    DSC_2128.JPG
    96.5 KB · Views: 74
  • DSC_2131.JPG
    DSC_2131.JPG
    82.4 KB · Views: 74
  • DSC_2122.JPG
    DSC_2122.JPG
    212.2 KB · Views: 77
Last edited:
Fixed my JVS-PAC 2 to my pc case (screwed) with a break-out usb for the JVS input.

Just need to get a 1070 GFX card still.
 

Attachments

  • DSC_2151.JPG
    DSC_2151.JPG
    177.7 KB · Views: 73
Nice one mate, ideal spot for it there. Lucked out with the PCB hole pitch vs hex vent alignment :thumbup:
 
I use mine with the Artax community image & posted this ini file for the controls (just replace the stock sd card files with this) in the main thread ages ago but here it is again, works just like how native jvs was set:

Otherwise you have to manually most games in Windows:

[main]
shiftmode=full
linkmode=2player
analog=0
rotary=0
rotaryIoButtons=off
[keyboard]
M_TEST=KEY_F2
M_COIN1=KEY_5
M_COIN2=KEY_6
M_COIN3=KEY_NONE
M_COIN4=KEY_NONE
M_P1START=KEY_1
M_P1SERVICE=KEY_9
M_P1UP=KEY_UP
M_P1DOWN=KEY_DOWN
M_P1LEFT=KEY_LEFT
M_P1RIGHT=KEY_RIGHT
M_P1B1=KEY_Q
M_P1B2=KEY_W
M_P1B3=KEY_E
M_P1B4=KEY_A
M_P1B5=KEY_S
M_P1B6=KEY_D
M_P1B7=KEY_C
M_P1B8=KEY_V
M_P2START=KEY_2
M_P2SERVICE=KEY_0
M_P2UP=KEY_U
M_P2DOWN=KEY_J
M_P2LEFT=KEY_H
M_P2RIGHT=KEY_K
M_P2B1=KEY_KP7
M_P2B2=KEY_KP8
M_P2B3=KEY_KP9
M_P2B4=KEY_KP4
M_P2B5=KEY_KP5
M_P2B6=KEY_KP6
M_P2B7=KEY_J
M_P2B8=KEY_L
M_P3START=KEY_3
M_P3SERVICE=KEY_NONE
M_P3UP=KEY_J
M_P3DOWN=KEY_L
M_P3LEFT=KEY_I
M_P3RIGHT=KEY_K
M_P3B1=KEY_RIGHTCTRL
M_P3B2=KEY_RIGHTSHIFT
M_P3B3=KEY_ENTER
M_P3B4=KEY_NONE
M_P3B5=KEY_NONE
M_P3B6=KEY_NONE
M_P3B7=KEY_NONE
M_P3B8=KEY_NONE
M_P4START=KEY_4
M_P4SERVICE=KEY_NONE
M_P4UP=KEY_KP8
M_P4DOWN=KEY_KP2
M_P4LEFT=KEY_KP4
M_P4RIGHT=KEY_KP6
M_P4B1=KEY_KP0
M_P4B2=KEY_KPCOMMA
M_P4B3=KEY_KPENTER
M_P4B4=KEY_NONE
M_P4B5=KEY_NONE
M_P4B6=KEY_NONE
M_P4B7=KEY_NONE
M_P4B8=KEY_NONE
M_TILT1=KEY_T
 
Back
Top