What's new

Softdrink

Professional
Joined
Jun 26, 2020
Messages
101
Reaction score
282
Location
Southern California, USA
I've always loved these cab maintenance and restoration logs, so I figured it was my turn to contribute a bit!

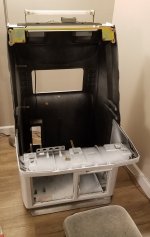
I've already done quite a bit of work on the cabinet and will be sort of 'backfilling' this thread with progress shots until it catches up to the present; here are a couple (potato) photos of the current state of things as of December 2020:
20201207_003732.jpg
20201207_004524.jpg


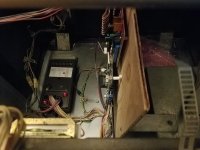
Work that's already been done and will be documented in this thread:
  • Full disassembly and cleaning
  • Monitor recap
  • Monitor repair (reflowing some joints and fixing vertical collapse)
  • PSU recap
  • JVS prep (JVS/JAMMA IO, stereo amp)
  • Earth grounding (3-prong power cable)
  • Wheel replacement
  • Mod: headphone jack (to fill a preexisting hole in the control panel)
  • Mod: internal power strip
  • Mod: internal service lighting


Background

I bought this cabinet about five years ago from a collector in SoCal who doesn't usually sell; it was not in the best cosmetic shape, but the monitor was good and it was at a great price (approx $550 USD). After owning it for a couple years, the monitor started to develop an issue where it would randomly lose sync. This would happen at inconsistent times and last for varying lengths of time, so it made playing on the cabinet basically impossible. Some experimentation and percussive 'diagnostic tests' suggested a cold solder joint was likely the issue, but at the time I didn't have the knowledge or tools to handle it myself...

...and so it just stayed in storage, unused, for about three years. Every once in a while I would power it on for a couple credits, but it would always have the sync issue come up again sooner or later. I had a lot of stuff going on in my life over this period (graduating from college, moving to a full-time job, moving to a new apartment, etc.), so it was a relatively low priority - but it always bugged me that I couldn't play on it.

About three months ago, I got fed up with that situation and decided to just jump in and try to figure things out! After doing some research, I found that there were a few people nearby who would be able to service the monitor for me. All I would need to do is remove the chassis board.

Except that after thinking about it a bit more, I realized - Hey, I can solder and do electronics work now. If I'm gonna go through the effort of pulling the chassis out, I may as well try to fix it myself.

And that led to: If I'm gonna go through the trouble of pulling the monitor and taking out the chassis, why not pull the whole cab apart and go for a proper deep-clean and restoration job?

So, this is where our story begins...


September 28, 2020

This is the day when I finally said "screw it, I'm gonna do this". So logically the first step was to tear the whole machine apart. I unfortunately don't have a 'before' photo of the entire cabinet. Suffice to say I gave it a good exterior cleaning when I first acquired it, and routinely wiped up dirt and grime in the easy-to-reach parts of the interior, but to my knowledge the machine had never seen a proper cleaning before I started this job.

I'm sure you're all pretty familiar with the teardown process of a New Astro City by now, so I'll spare most of the details.

20200928_141616.jpg

Control panel area was mostly clean when I started, but you can see a lot of dirt and nastiness deeper in the cab. In the lower-right corner you can see a hole that the previous owner drilled into the control panel - it used to house a button to manually add credits (since apparently opening the coin door to trigger the switch manually or using the service button was just too difficult X/ ). I'll be addressing this hole a bit later in the log.

20200928_111001.jpg

This was the first piece where I came to realize just how much dirt was built up on some of the parts. On the left is a couple minutes of effort with water and isopropyl alcohol for particularly stubborn spots; the right is how it was when I first removed it from the cabinet. Gross.

20200928_141718.jpg

I started off by cleaning the monitor bezel and the front upper shell. It cleaned up pretty nicely with little effort, except for the areas around the speakers - more on that in a moment.

20200928_151853.jpg

I pulled both speakers and used a flashlight to check for damage to the drivers. Gave them a little shake to try to dislodge dust. There's still some dirt left, but I don't want to use more invasive cleaning methods on the speakers yet - both of mine still work fine for now. I considered using a vacuum or compressed air, but I didn't want to risk damaging the drivers with an air pressure change like that.

20200928_152545.jpg
20200928_152536.jpg

I don't know if this is a common problem with New Astros, or if I'm just particularly lucky, but my cab had a lot of caked-on grime inside the speaker shrouds. Before cleaning on the left, after on the right - much better!

I also pulled the monitor solo for the first time. The first few seconds of that process were really scary, but once the weight of the front-glass was tucked in to my body it really wasn't bad at all!

More updates coming soon...
 

Attachments

  • 20200928_141633.jpg
    20200928_141633.jpg
    159.2 KB · Views: 339
Last edited:
October 4th - 11th, 2020

20201010_235553.jpg

A bit farther along in the disassembly process. A lot more dust is visible now that things are starting to come out of the cab.

20201010_230513.jpg

Generally the disassembly process didn't surprise me much, but this connector for the cashbox coin counter was not fun. It's not too hard to deal with once you know about it, but it stumped me for a few minutes when I first saw it. This is basically the back side of a panel-mount 2x2 AMP-UP connector; using pliers you can depress the side locking tabs and slowly 'walk' it backwards out of the cashbox frame.

20201010_235628.jpg
20201010_235609.jpg

The previous owner apparently did not want to take any chances with the JAMMA edge - the labels are FRONT and NO. ;)

I cleaned all the tape residue and permanent marker off and added a new label. One of the first things I did when I got this cabinet was add a key to the edge connector:
20201011_000454.jpg

If I ever get any unkeyed boards I'll make an adapter I guess, just don't wanna take any chances here. I've had a couple friends blow boards by accidentally plugging things in backwards... even though I trust myself to double check, it's just not worth having even the possibility of that happening, in my opinion.

20201011_215356.jpg

While cleaning the harness I noticed that P1 and P2 button 4 is not fully wired up. They're connected up to the CP connectors, but not all the way down to the JAMMA edge. I'll need to fix this.

20201011_183039.jpg

Even though it shouldn't be strictly required for the MS9 (as they have a bleed resistor) I learned how to use a discharge tool and made the monitor safe. The red lead here is connected from the anode to the ground strap - according to a couple service manuals I read, this is recommended on larger monitors if you're gonna leave the chassis disconnected for more than a couple days.

You can see in this image that the chassis and the back of the tube is absolutely filthy. Every time I touched it my hands would come back black with dust. Quite honestly one of the dirtiest objects I've ever interacted with; just caked with a thick layer of dust and grime. I imagine that's probably because of the voltage attracting dust from the air?

20201011_204512.jpg

Pulled out and cleaned the entire JAMMA harness. At this stage I was still a bit confused about how everything was connected together, but while cleaning it I decided to sleeve each of the major 'clusters' of related wires. In retrospect I don't think this was really worth it - the aesthetic result isn't quite as clean as I was hoping - but the effort of tracing out each wire and learning how the connectors interact was immeasurably useful in understanding how JAMMA and arcade wiring works overall.

20201011_213727.jpg

Here's an example of an almost-finished sleeved cable. I did this for all the major connections in the cabinet - I think in isolation they look pretty great, but in the actual cabinet the effect isn't quite as clean as I had hoped. It's easily reversible if I decide to do so, at least. I also labeled the ends with printed labels.

If I were to do the sleeving again, I think it would look much better to use non-split sleeving and heatshrink. But doing that requires depinning or building your own harness from scratch - which just wasn't a step I wanted to take with this project (and frankly, I still don't think it would be worth the effort unless you're just very, very invested in the look).
 
Last edited:
Glad to see you posting and sharing all the work you put into that NAC. Looks great and know it will be getting some good use for many years to come!
 
October 17th - 24th, 2020

20201016_204939.jpg

I ran into some serious trouble with the screws that were holding the cashbox into the lower shell - one of them stripped completely. It was completely rusted in place; my cab had quite a bit of rust on some of the doors. I had to drill out the head and use pliers to get it out of the cabinet.

I'd like to take a moment to thank @Hatsune Mike for all his help during this process - his advice and guidance was incredibly useful throughout the entire restoration, and he came through again and again with exactly the information I needed. He's truly an excellent source of knowledge for this cabinet. I really cannot thank him enough for his support!

In this particular case, he pointed me to the Vessel MEGADORA - a screwdriver so good, it's now part of the pantheon of 'tools I absolutely must have'. It's a JIS driver with a magnetic tip and special 'teeth' that give it extra grip on screws. And it truly works; the command it has of stuck and stripped screws is nothing short of magical. Not only did it help me get out some of the stickier cashbox screws, but it also made quick work of the infamously difficult cabinet seam screws, even managing to get out some that seemed totally hopeless.

20201017_155410.jpg

We are not worthy of your glory.

20201017_161454.jpg

With the cashbox and PSU out, you can see all the dirt built up down here. Not as bad as some other Astros I've seen photos of, but certainly not great either.

20201017_165351.jpg

After a serious arm workout getting all the seam screws undone, the shell halves are separated! Now we can really get to work.

20201017_171930.jpg

One of the leg levelers was rusted in place on the footplate; you can see it on the right here. It's a bit tricky to get out, because unlike most leg levelers I've dealt with before, these don't have a squared or hexed section that you can grip with a wrench to raise or lower them (which begs the question - how exactly are these supposed to be used? If you can't exert enough torque on them to raise or lower the cabinet, how can you use them for leveling? But I digress...). So I had to get a bit creative.

20201017_175622.jpg

I ended up chucking the exposed threads of the leg leveler into my drill from above, and was able to give it enough torque to break the rust. Pretend my finger here is the footplate; by spinning the drill back and forth, I was able to work it loose. You can see a thick band of rust here from where it was stuck.

If you use this method, a couple tips:
  • Start at a low clutch setting on your drill and work your way up. You want to provide just enough torque to break the rust, but not so much that you're stressing the bolt or the nut on the footplate.
  • Use a piece of heatshrink or some other thin 'grippy' substance around the threads - you don't want the chuck to mangle them, or you're just trading one problem for another!

20201018_143328.jpg

At this point I tried using some metal surface cleaner (Barkeeper's Friend) on the leg leveler plates - but it ended up etching away the zinc coating. I'm glad I tested on these pieces before moving on to other parts of the cabinet! I opted not to continue using highly acidic and/or abrasive cleaning on the metal parts unless absolutely necessary after this experience.

I actually quite like the 'plain steel gray' look compared to the yellow coating the metal parts have originally, but I don't think the corrosion is bad enough to warrant this kind of treatment on most of the parts in my cab.

20201018_195009.jpg

Starting to clean up!

I live in an apartment building which doesn't have a lawn or a communal hose, so I did all my cabinet cleaning hose-free. A lot of hand towels, Simple Green, and many, many changes of washwater in a bucket.

20201018_232055.jpg

I pulled the wheels off the cabinet next. Maybe this is just my cab but - they smelled horrendous. Something about the grease between them and the axles, maybe? Either way, truly gross for the first few minutes of the cleaning process. And they're just in terrible shape; as you can see, lots of chips, a very coarse tread... certainly they've seen better days.

20201021_214938.jpg

So, inspired by @stringbean 's thread (here) and @FluxChiller 's thread (here), I replaced the original wheels with skateboard wheels. I'd highly recommend anyone looking to do this have access to a powered sander; it took me about an hour to get one wheel sanded down enough to fit by hand, but about five seconds with a belt sander at work. In this image the original wheel is on the left, the new one on the right.

This mod has several advantages:
  • Skateboard wheels are much softer and smoother, so they're much friendlier on floors - in my apartment, this is essential!
  • Skateboard wheels can use an actual bearing, instead of just the plastic on metal of the original wheels
  • You can space the wheels out so that they don't rub on the sides, which eliminates squeaking (a big problem with my original wheels)
Anyone looking to do the same to their cabinet should look for wheels of approximately 50mm diameter x 30mm width - that's what the originals are. I used this set of 52mm wheels from Amazon - they're a tiny bit too big, but I had a hunch that the extra diameter would raise the footplate 1-2mm. In my case this was actually highly desirable, as I wanted to put furniture pads underneath the footplate to keep it from scraping the floors. Win / win!

The only downside to this mod is that (as mentioned above) you will need to sand the wheels down laterally a little bit so they fit inside without rubbing. This is easily accomplished with a power sander, and in the worst case is doable by hand as well.

Also - I originally tried to use 'speed rings' to space the skateboard wheels out from the brackets, but found that the specific rings I ordered did not fit the axles. A much quicker and cheaper solution: just go to the hardware store and grab some stainless 5/16" flat washers!
 
Last edited:
October 24th, 2020 - 400-5198-01X PSU Recapping

I decided to recap my PSU as a form of preventative maintenance - it wasn't causing me any trouble, but I also had no way to know the age and health of the components. Since I was going to be recapping the monitor anyways, I figured it was a good idea to work on the PSU too. I ended up working on the PSU first to practice and build confidence for the monitor repair.

My cab uses the 400-5198-01X PSU, which (at least according to the Arcade Otaku Wiki) is an older model of New Astro City PSU shipped mostly with original Astros or early NACs. I've never seen a teardown of one of these posted before, so here are a couple pictures of the process.

In these images, screws marked with an "X" are not essential to the disassembly process, while screws marked with an "O" are essential for disassembly.

20201024_183412.jpg
20201024_183535.jpg
20201024_183805.jpg


Once you have it open and remove the three screws marked above, the main board simply pulls off of a set of headers - there is an upper board for the connectors and switches, which doesn't (to my knowledge) contain any critical capacitors.

Then it's just a matter of performing the recap.

Before - I didn't see any obvious signs of problematic caps, so it's just a preventative measure at this point:
20201024_183819.jpg


After - I've marked all the caps I replaced in green, so that if I ever open it up again I can easily tell that someone has worked on it. I also added a sticker with the date of service, and gave the whole board a good cleaning.
20201025_182743.jpg


Then it was just a matter of replacing the thermal paste between the heatsink and chassis (I just used some leftover PC thermal paste) and plugging the lower board back in. I used a multimeter to test all the voltages and verify that it all worked correctly. My 5V needed some adjustment after the recap, which suggests to me that the original components may indeed have had some wear on them!
 
Last edited:
Wow man, looking great!!! You just gave me some great advice with that method for the foot removal. I too have one stuck, luckily its stuck at the right position where i need it, but stuck none the less and it bothers me. I tried so many things to get it loose with no luck, but im gonna give your method a try once I get back around to taking it off and trying. Good stuff on the skateboard wheels too!
 
October 28th - 31st

More cleaning!

20201028_010040.jpg

Spent quite a bit of time working on all the metal parts and 'small bits'. Many hours with Simple Green and a sponge. In the end, most of them came out looking great - a couple pieces have some persistent grossness, but I'm pretty confident that I couldn't have gotten it cleaner without using more invasive techniques.

The coin box in particular cleared up really well; it was kinda gross beforehand but it looks nearly new now.

I also got a couple replacement locks and tangs from some members of the community (once again @Hatsune Mike coming to the rescue) so I could fill out some doors that were previously using the wrong components.


20201031_230407.jpg

Washed down the tube. It's all nice and clean now!

20201028_215245.jpg

I think I must've replaced the washwater five or six times just for the process of cleaning the tube. It just got black with dirt and sludge. Bleh.

20201028_224237.jpg

Chassis out and ready for some work. I took tons of photos before removing it from the monitor so that I could get all the connectors back exactly as they were originally.

20201028_233151.jpg

During the recap I found a bodge - C407 was directly underneath this, so I had to carefully bend it away to work on that cap. All ended up okay though.

In addition to replacing the capacitors, I also reflowed many of the larger board components on the advice of some friends. Larger ICs, all connectors, large caps and resistors, the flyback, all transformers, etc.

Unfortunately, I neglected the vertical drive IC - a mistake which would come back to haunt me later!

Not shown - spent a looooot of time cleaning up the chassis board after I was done. It was pretty dusty and had some flux residue on it originally.

It took a while to finish the recap, and it was absolutely nerve-wracking finishing it and setting up the monitor again for testing. I did a couple tests first without a game connected, just to make sure nothing cataclysmic would happen. Then I hooked up Ibara and...

20201112_223205.jpg

Success!!!

It looked great already, and this was before I even did any calibration or adjustment. Left it on for a few hours out of the cab and the sync issue seemed to be cleared up.

I think the fix here was likely due to the reflow, rather than the recap, but again - preventative maintenance! And I had some other minor issues with the picture that cleared up with this recap (such as some asymmetric geometry distortion that I couldn't handle with the picture controls).
 
Last edited:
November 1st - 5th

Finished cleaning the cab shells and wanted to join them back together. But I noticed I had a very challenging problem - the screw holes would not align on one side if I tightened them in on the other!

I thought maybe this was an intentional design choice at first - perhaps sort of a 'stressed panel' design that holds the outer shell in tension. But after consulting some friends it seemed like this was not a common problem, so I wanted to be careful not to damage anything. I stepped back and reevaluated my approach a bit.

20201101_184501.jpg

Here you can see how misaligned the holes were. This is the most aligned one and it's still very incorrect.

It turned out that I had made a mistake by tightening the wheel brackets all the way - they needed to be loosened up a bit in order for the rear part of the cab to seat properly.

20201101_200022.jpg

Here you can see a bit of the gap in this area.

In the end, the successful order of operations for me was:
  • Install wheel brackets and wheels loosely
  • Position the shell halves together
  • Install screws on one side of the shell bottom edge, but don't tighten them fully
  • Align screwholes (should only take light effort) on the other side and install screws, but do not tighten fully
  • Install screws in the rear screwholes, but don't tighten
  • Then tighten everything up, starting with the sides, then back, then wheels

20201102_003717.jpg

Cabinet halves back together, footplate installed, and looking much much cleaner!

Note that there's still a bit of 'something' on the footplate lower right; this is actually some kind of surface damage. I think maybe someone spilled soda or some kind of acidic substance on the plate and it got left for a prolonged period of time; it seems like the surface has been 'eaten away' a little bit. It's probably possible to restore it with some serious polishing, but I can live with it for now.

I have a variety of different coins and tokens I wanted to be able to use in the cabinet:
  • 100 Yen coins
  • US quarters
  • Club SEGA tokens from my trip to Japan (I think I went there with @rancor a few years ago when I visited Tokyo, fun times!)
  • Game Underground tokens, from the arcade in Boston
  • A couple tokens from a place called "Japan Arcade" - I've never been, but it seems like this used to be a venue somewhere here in SoCal! I found them inside the cabinet while cleaning and wanted to keep them in service as part of its history
20201103_131923.jpg
20201103_215752.jpg

So, I 3D printed this "any coin" mechanism I found on Thingiverse. At 100% scale it worked perfectly for me in the Astro without modification - though I did need to clean the coin microswitch a little bit and move it about 0.5mm further out (just loosen the screws, push it 'away' from the coin chute, and tighten again) in order for it to accept the largest coins.

At this stage in the project, I noticed that it could get really dark inside the cabinet, and had the idea of mounting a light fixture near the bottom as a 'service light' for maintenance and board swaps. Here are some photos from early in the prototyping of that concept.

20201103_230754.jpg
20201103_230802.jpg

I liked this modification enough that I wanted to make it permanent, so I designed some 3D printed bracket clips to non-destructively mount the light fixture to the cabinet. You can find full details on that project, including the print files and the specific hardware I used, here.
 

Attachments

  • 20201102_003717.jpg
    20201102_003717.jpg
    118.1 KB · Views: 148
Last edited:
Great work @Softdrink! I'll be shamelessly copying some of the things you've done here. I like the idea of marking the service date on cap changes and the service light clips you designed look like an excellent improvement to any cab.

I used more aggressive cleaning products when removing rust from the metal on my blast city and stripped the zinc coating completely. Its an expensive lesson since I'm having the parts re-plated professionally now. You choosing to only use isopropyl and elbow grease was a solid choice. :thumbsup:

Re: speed rings
I initially thought the only purpose of the speed rings was to 'create space' between the bearings and the brackets that held the wheel axles, but they have a secondary purpose as well to prevent friction on the outer part of the bearing race which normal washers cannot do. This article explains it very well. I used both speed rings as well as standard washers. This probably isn't a huge deal but good to know for any others reading. I myself was unaware of the friction focusing purpose speed rings served until recently.
Ah, interesting - that does actually make some sense.

I still couldn't get the rings to fit on my axles, so I had to find an alternative regardless. But that's good knowledge for the future, for sure!

Glad you're otherwise enjoying the thread; I still have a number of updates to post before it's caught up.
 
@Softdrink using a belt sander for the wheels was a genius move too. I also need to key my JAMMA connectors like you've done as well because I'm always paranoid about that.
 
November 10th, 2020

Happy 25th Birthday to my New Astro City!!

While cleaning I checked the manufacture date stickers, and the latest one was for the control panel assembly - November 10th, 1995, if I'm reading this correctly. I had really hoped to have the cab playable at this point but it just didn't quite work out that way.

20201110_121214.jpg


November 11th - 30th, 2020

Progress slowed down a bit in the later part of November. Work and other obligations kept me busy.

Still, I got a lot of stuff sorted out:

20201104_000545.jpg

Cleaned up the AC plate.

20201106_004902.jpg

Wired up a 3-prong power cable for earth grounding. Also spliced in a power strip that I internally mounted to the cabinet.

20201027_164345.jpg

The cashbox door frame was really, really rusted on the back. On the front I was able to clean off most of the rust with some Simple Green and elbow grease (and I'll try again with vinegar and Krud Kutter soon too, seemed like that worked very well for @stringbean on his Blast doors - I was worried vinegar would wreck the paint but it seems like it doesn't!). But on the back it was so bad I decided to sand it down to bare metal and then seal it with topcoat.

20201108_184202.jpg

Here's after sanding and topcoating. I masked off all the front surfaces so the original paint is still preserved there for now. As you can see I didn't manage to get off *all* the rust, but it's all sealed up now with four thick coats, so I think the immediate issue is resolved.

20201116_084222.jpg

Spent a few hours learning to calibrate the monitor. It doesn't quite capture correctly on camera, but the colors are all balanced evenly, and black is very black. I'm very, very pleased with the picture now - and it was already pretty darn good before I started.

20201114_185517.jpg

Almost fully back together, just a shot taken as I was wiring stuff up and reattaching things. You can see some of the rust and dirt on the cashbox door frame in this shot - I really need to give it a second round of cleaning.

And then, finally -

20201124_001643.jpg


During the process of working on the cabinet I also put together a working NAOMI setup so I could get Ikaruga and Under Defeat running, among other things. Very pleased to be able to play this game on original hardware.
 

Attachments

  • 20201116_084222.jpg
    20201116_084222.jpg
    253.1 KB · Views: 140
Last edited:
Odds and ends - November 2020

20201112_203108.jpg

20201112_203234.jpg

Got a 2L12B panel from @ninjando for a very good price. The transparent matte layer of the overlay is peeling off (which I knew when I bought it - no surprises there), so I've been slowly scraping it up and polishing the top. It'll be a really shiny, clean panel when I'm done - not sure if I'll love the high gloss aesthetic, but it'll certainly look and feel better than it currently does. The underside of the panel is in perfect condition; it's just the top that needs some work.

20201119_132822.jpg

Got one of @buffi 's BetsuBetsu AV splitters, built by @RandomRetro . It's a great piece of kit; the improvement in quality compared to my old cabinet capture setup is absolutely incredible. Can't wait to do more streams in the new year with this gear.

20201119_132806.jpg

Snagged some Sanwa RGs and a Sega 'Rev B' JAMMA/JVS IO board from @Hatsune Mike and some other friends in NorCal. The RGs will go towards a 2L8B setup in the new panel, while the JAMMA/JVS IO is used for the NAOMI setup.

Speaking of -

20201119_191709.jpg
20201119_191725.jpg

Here's my NAOMI setup at present. The idea was to build something that I could use as a 'console' or stick into the cabinet as intended.
  • 1U Server PSU running into an ATX -> NAOMI adapter, from @JasenHicks (before he closed up shop)
  • NAOMI 1 + NetDIMM + multibios
  • Raspberry Pi for netboot, also running @bobbydilley 's OpenJVS - when used outside of the cab, I can just plug in an Xinput arcade stick
  • Everything mounted to a pegboard I bought at Home Depot, for easy portability
Though lately I've been thinking I'll trim it down to just the cabinet setup, since now that I have the Astro working again I find that I haven't been using the 'console' mode much.

20201202_125510.jpg

I very recently got a Sun PSU in the mail, so I should be able to make the NAOMI setup a bit more 'proper' with that soon enough, too.

I also put together a GBS-Control scaler while I wait for an OSSC:

20201121_215029.jpg

It's really quite remarkable what's been achieved with the GBS-Control project; I'll probably still keep one around. The mod was quite simple; the most difficult part was desoldering the existing RGB pots. That was... really really not fun, heh.

20201122_164130.jpg

My cabinet lacks a stereo amp, so for NAOMI audio, I'm using one of these inexpensive TPA3116 amps you can find on Amazon/Ebay/Aliexpress. It goes under a few different brand names. So far I'm quite pleased with the sound from this thing; for $35 it absolutely demolishes a lot of other cheap chipamps I've used before. This is driving the Pioneer BS22-LR bookshelves you can see in the opening post. I had them leftover from my college speaker setup; kept them in storage.

All things considered it's a great sounding setup, and I hope I'm not too disappointed when my Digikey order of AMP-UP parts arrives so I can properly wire up the cabinet speakers for stereo.
 
Last edited:
December 1st, 2020 - Vertical Collapse and Repair

Disaster strikes!

As I mentioned above, when I was recapping and reflowing the chassis board, I apparently overlooked the vertical drive IC. This came back to bite me, as on December 1st the cabinet suffered a vertical collapse. The monitor picture suddenly pinched in from top to bottom, drew a white line in the center of the screen, and then immediately shut itself off.

After freaking out for a bit and consulting some friends, I pulled the monitor and chassis and inspected things again - only to be greeted with this:

20201201_204646.jpg

20201201_204710.jpg

As you can see, the first couple pins of the vertical IC are in terrible shape. Somehow I must have completely overlooked them while I was working on the chassis - even though I even replaced some caps that were just a few mm away!

The first pin (closest to the camera) literally did not even have electrical contact at all between the pin and pad when probed with a meter - bleh. I have no idea how I missed this the first time! But oh well, it happens I guess... there are hundreds of joints on the chassis, I guess it makes sense I overlooked a few.

After reflowing all the pins of this IC and double-checking other joints on the chassis, I popped the monitor back together and put it back in the cab. That was the first time I reseated a monitor solo - quite an experience! Just like removing it solo, it's surprisingly not that difficult once you have the weight tucked against your body, but the first few seconds of lifting or the last few of trying to seat it into the cabinet frame are a bit intense.

20201203_014500.jpg

Powered up again aaaand - it's back! Left it running for several hours with different games on to make sure it was stable, and so far the issue hasn't come back at all.

So that was a really scary ordeal, but it turned around pretty fast. Fortunately I recognized the symptoms as likely vertical collapse, and was able to very quickly hone in on a probably cause (the vertical IC) thanks to input from some friends in the community.
 
Last edited:
Wow, nice restore Softdrink! That's gotta be really satisfying to play on that cab now.
 
December 5th, 2020 - Control Panel

As I mentioned above, the previous owner cut a hole into the control panel to install a small button to add credits. Apparently recalibrating the coin mech, manually hitting the coin switch, using the service button, or setting the game to Free Play were just too inconvenient...

Regardless, I don't want to completely repaint the panel right now, so I was trying to think of alternative solutions for the hole. In the end, I decided that a headphone jack would probably fit nicely:

20201115_210139.jpg
20201115_210202.jpg

Unfortunately, I did need to widen the existing hole slightly to mount the jack - it was less than 1mm of removed material, but it still felt bad to be doing that to the panel surround...

20201205_003751.jpg

20201205_003755.jpg

20201205_003806.jpg

After a bit of work with a round file, the new panel mount jack is sitting quite nicely in place. I think all things considered it's actually a pretty subtle and clean solution, and it adds functionality to the cabinet. I'd probably still prefer it not be there at all, but I don't want to go through the whole putty/sand/repaint/recoat process over just this.

While I had the control panel off the cab, I went to work on the hinge as well - I don't have any 'before' pictures, but suffice to say it had a fair bit of rust and grime built up. My process for cleaning was:
  • Initial pass with Simple Green + scrubbing to get dirt and loose rust off
  • Rinse
  • Vinegar bath for 30 minutes (undiluted pure cleaning vinegar)
  • Rinse
  • Coat with WD-40 to displace water and protect against rust
  • Wipe off excess until the surface is nearly dry, with just a tiny bit of oil remaining as a barrier and lubricant
20201205_003358.jpg
20201205_003405.jpg

It cleaned up really well after that. I'm not entirely sure about the long-term stability but I think it should be a good process for a hinge like this.

That catches up to the present state of the cabinet!

Upcoming things I'd like to do:
  • Make a proper stereo connector to run the cabinet speakers in stereo once AMP-UP parts arrive from DigiKey
  • Install an internal headphone amplifier (should be easy with the BetsuBetsu line out)
  • Design and 3D print a mount bracket for the speaker amplifier
  • Design and 3D print a mount bracket for hand cam when streaming
  • Figure out a clean 'cable passthrough' solution for capturing- ideally I want just one or two cables coming from the cabinet, hopefully terminated in panel mount connectors somewhere non-destructive. The most obvious place would be the 30mm hole on the AC plate, but that's a relatively small area...
  • Finish preparing the 2L12B panel
  • Try out the G1 and 15/31kHz MS9 mods discovered by Hatsune Mike in his thread here
  • Add an 'input display' system for streaming, probably based on this github project by wnka. I have a handcam already, but the input display seems like a cool feature
Now that I'm playing shmups on it again, I'm also considering getting a single player panel so I can play centered - probably a 1L6B. I've heard @alberto1225 makes great panels, so I'll probably hit him up for one soon.
 
Last edited:
Wow, nice restore Softdrink! That's gotta be really satisfying to play on that cab now.
Hey hey! Great to hear from you again, hope you're doing well these days! You still have your Astro and PCB gear?

Yeah, it's awesome being able to play on it again. It kinda drifted out of my life for a couple years but I'm really glad I held on to it and made the time to work on it. It's been a really satisfying and fulfilling project; much more so than I would have expected. Definitely well worth the effort.
 
It looks great! Maybe after this covid stuff clears up we can get together for some games. I still have my astro and some pcbs. I've been playing a lot of Ninja Spirit and Ghosts'n Goblins lately. I'm starting to get the itch to play some shmups too.
 
It looks great! Maybe after this covid stuff clears up we can get together for some games. I still have my astro and some pcbs. I've been playing a lot of Ninja Spirit and Ghosts'n Goblins lately. I'm starting to get the itch to play some shmups too.
Yeah absolutely!

I'd love to see you and some of the other SoCal crew again. It's been far too long.
 
Back
Top