FS Egret 2/Windy 2/NNC/Q25 (Repair refund)

For Sale
Chirping can be caused by a bad HOT, bad VR or the flyback could be going. I recommended a bad HOT on Kuze because of the click sound. Vertical collapse is usually a sign that you need a cap kit.

I'd recommend the same thing as the others. Replace the HOT and do a full cap kit. The hot is easy to identify, as on JP monitors it's usually attached to the metal shielding around the flyback.
 
Before simply replace part you can easily check hot function with diode setting in multimeter. Can be checked like most transistor bce. They will blow short when bad. Can first check in circuit quick and easily. If it's good it's good, if it test bad then pull part from circuit by either remove or isolate pin and retest to confirm bad part not bad circuit :-).
 
Before simply replace part you can easily check hot function with diode setting in multimeter. Can be checked like most transistor bce. They will blow short when bad. Can first check in circuit quick and easily. If it's good it's good, if it test bad then pull part from circuit by either remove or isolate pin and retest to confirm bad part not bad circuit :-).
There are several things they can check sure. For most folks though this is a task they're both not familiar nor comfortable with, which is why sending it in for service is usually the best and easiest option. I'm also quick to recommend repair in this situation as I've never received a fully functioning chassis from Yaton.
 
I've recapped and repaired a ton of chassis. Mostly K7000's. Watched Randy Fromm's training video on Youtube. But this is the first experience with the Toshiba PB7534. There isn't a manual for that anywhere to be found. No idea what the part numbers are for the HOT, VR, Flyback. I'll figure it out when I see it again next week. But knowing what the part numbers now helps with the search to source the parts.
 
I will probably follow @radiantsvgun and send my Toshiba PB7534 chassis to Sharp and go ahead and have them swap the HOT, do a full cap replacement and check the flyback. Hopefully they can figure out the beeping sound too or it will be fixed by one of the above if lucky.

Going to finish cleaning up the E2 and NNC this weekend and get them in the game room. The Windy 2 will be a longer term project.

Huge thanks again to @XeD for arranging the group buy and @Cereth for handling the importing and shipping - very much appreciate all the work and time you have both put into this.
 
@kuze I just dropped mine off. It’s kind of a pain to get out, but hoping sharp can get it sorted. I may pull my monitor now to get in there for a deeper clean.
 
@kuze I just dropped mine off. It’s kind of a pain to get out, but hoping sharp can get it sorted. I may pull my monitor now to get in there for a deeper clean.
Nice, fingers crossed. I was thinking I would have to pull the monitor to discharge and remove the chassis. How did you go about it?

Also the other day I started to remove the maintenance hatch panel until I noticed it has a huge vent that goes over the neck and there looked to be a grounding wire screwed to the inside of the vent which requires consideration. Decided to put it back and wait for a second pair of hands to remove that screw without accidentally necking the monitor or something.
 
@kuze I accessed from the back panel. You have to be super careful because the monitor neck is in the way. Besides the chassis screws, there’s two additional screws for the vga port. If you’re careful it will come out no problem.
 
@kuze I accessed from the back panel. You have to be super careful because the monitor neck is in the way. Besides the chassis screws, there’s two additional screws for the vga port. If you’re careful it will come out no problem.
Right on, it sounds like it may actually be easier/safer to just pull the tube first - would you agree having just done it the other way?
 
If you pull the tube, get some help. There’s a wide area of things to go wrong doing it alone.
 
would this work for a windy2 its a blast city psu supposedly by rivercity
IbpFpH2.jpg
 
Any psu will work if you rewire it. I don’t know if Riverservice still makes those, I asked last year and they said they didn’t.
 
Does anyone know how to remove the feet from a Sega New Net City to get it through smaller doorways?

I've already got the legs off, but the feet are blocking my path. >_>

It's either the feet that must come off or the crown molding on the doorway....
 
Does anyone know how to remove the feet from a Sega New Net City to get it through smaller doorways?

I've already got the legs off, but the feet are blocking my path. >_>

It's either the feet that must come off or the crown molding on the doorway....
the feet on the bottom of the rails? Remove the rails and there should be some screws and a nut holding them in
 
Does anyone know how to remove the feet from a Sega New Net City to get it through smaller doorways?

I've already got the legs off, but the feet are blocking my path. >_>

It's either the feet that must come off or the crown molding on the doorway....
the feet on the bottom of the rails? Remove the rails and there should be some screws and a nut holding them in
Right, the feet that attach to the bottom of the rails that the legs slide into. That would mean undoing the CP/monitor wiring first in order to get the rails off though.

I removed one screw and a nut from another screw on the other side of the rail, but the feet themselves won't come off due to the screw that the nut was threaded on. So yeah I guess the rails would have to come off to properly remove them. What's excruciating is I'm only off by like a quarter of an inch without having to take them off.

Removing the first two inches or so of the crown molding door stop instead is mighty tempting. :evil:
 
could just make cable adapters so no rewiring needed?
Yeah as @radiantsvgun put it you could use any PSU so long as you build an adapter/harness so you don't have to rewire the cab.

A Happ PSU would probably be much more cost effective, unless you can find a deal on the RS one or some other arcade PSU.
 
Does anyone know how to remove the feet from a Sega New Net City to get it through smaller doorways?

I've already got the legs off, but the feet are blocking my path. >_>

It's either the feet that must come off or the crown molding on the doorway....
the feet on the bottom of the rails? Remove the rails and there should be some screws and a nut holding them in
Right, the feet that attach to the bottom of the rails that the legs slide into. That would mean undoing the CP/monitor wiring first in order to get the rails off though.
I removed one screw and a nut from another screw on the other side of the rail, but the feet themselves won't come off due to the screw that the nut was threaded on. So yeah I guess the rails would have to come off to properly remove them. What's excruciating is I'm only off by like a quarter of an inch without having to take them off.

Removing the first two inches or so of the crown molding door stop instead is mighty tempting. :evil:
You shouldnt have to remove the monitor cover to slide the rails out. Just remove the top metal piece on top of the rail with a security torx bit. Then remove all the screws holding the rail in place. This should allow you to slide the rail up and remove. Then you'll see the screws and nut hold the feet in place.

Check this video on how to remove it. It shows a net city, but the process is exactly the same.

 
Does anyone know how to remove the feet from a Sega New Net City to get it through smaller doorways?

I've already got the legs off, but the feet are blocking my path. >_>

It's either the feet that must come off or the crown molding on the doorway....
the feet on the bottom of the rails? Remove the rails and there should be some screws and a nut holding them in
Right, the feet that attach to the bottom of the rails that the legs slide into. That would mean undoing the CP/monitor wiring first in order to get the rails off though.I removed one screw and a nut from another screw on the other side of the rail, but the feet themselves won't come off due to the screw that the nut was threaded on. So yeah I guess the rails would have to come off to properly remove them. What's excruciating is I'm only off by like a quarter of an inch without having to take them off.

Removing the first two inches or so of the crown molding door stop instead is mighty tempting. :evil:
You shouldnt have to remove the monitor cover to slide the rails out. Just remove the top metal piece on top of the rail with a security torx bit. Then remove all the screws holding the rail in place. This should allow you to slide the rail up and remove. Then you'll see the screws and nut hold the feet in place.
Check this video on how to remove it. It shows a net city, but the process is exactly the same.

Thanks, I had already removed the rails/legs by sliding them off the top but was just having problems with the feet.

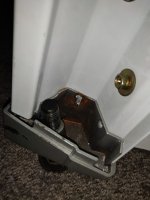
Here's where I was at (1x nut removed and 1x screw removed). The other side was actually worse in terms of rust in there.

nnc-foot.jpg

It was just rusted on there a bit, but since it wouldn't come loose easily I thought the screw had to be removed from the other side (behind the rail which the "legs" slide onto).

I pried it off of there and it came free, was able to get the cab to clear the doorway. 8o
 
So I've been still going at scrubbing down this windy 2. Unfortunately you guys are going to have to pull that monitor to clean it.

This monitor fan was mega gross, I replaced it with a noctura fan from the guide:

HjidKwvl.jpg


Here is where I pulled the monitor, everything was black and brown- I used some scrubbing bubbles + simple green to get it out. I was able to get farther in the cabinet and clean as much as I could.

d8FwwBvl.jpg


Heres how it looks so far. I am going to take a break from cleaning for a few days, as I've spent a lot of time each day since it came in. The marquees just need some multi-surface cleaner and it looks great.

8RBg8gkl.jpg
 
Back
Top